Quantcast
Channel: Linux Archives | Unixmen
Viewing all 194 articles
Browse latest View live

Install and using netstat in Linux

$
0
0


How to install netstat

netstat is a useful tool for checking your network configuration and activity. It is in fact a collection of several tools lumped together.

download

Install “net-tools” package using yum

[root@livedvd ~]$ sudo yum install net-tools
Loaded plugins: fastestmirror
Loading mirror speeds from cached hostfile
* base: centos.mirror.secureax.com
* extras: centos.mirror.secureax.com
* updates: centos.mirror.secureax.com
Resolving Dependencies
--> Running transaction check
---> Package net-tools.x86_64 0:2.0-0.17.20131004git.el7 will be installed
--> Finished Dependency Resolution
Dependencies Resolved
===============================================================================
Package         Arch         Version                          Repository  Size
================================================================================
Installing:
net-tools       x86_64       2.0-0.17.20131004git.el7         base       304 k
Transaction Summary
================================================================================
Install  1 Package
Total download size: 304 k
Installed size: 917 k
Is this ok [y/d/N]: y
Downloading packages:
net-tools-2.0-0.17.20131004git.el7.x86_64.rpm              | 304 kB   00:00
Running transaction check

Running transaction test
Transaction test succeeded
Running transaction
Installing : net-tools-2.0-0.17.20131004git.el7.x86_64                    1/1
Verifying  : net-tools-2.0-0.17.20131004git.el7.x86_64                    1/1
Installed:
net-tools.x86_64 0:2.0-0.17.20131004git.el7


Complete!


The netstat Command

Displaying the Routing Table

When you invoke netstat with the –r flag, it displays the kernel routing table in the way we’ve been doing with route. On vstout, it produces:

# netstat -nr

 Kernel IP routing table
 Destination   Gateway      Genmask         Flags  MSS Window  irtt Iface
 127.0.0.1     *            255.255.255.255 UH       0 0          0 lo
 172.16.1.0    *            255.255.255.0   U        0 0          0 eth0
 172.16.2.0    172.16.1.1   255.255.255.0   UG       0 0          0 eth0

The –n option makes netstat print addresses as dotted quad IP numbers rather than the symbolic host and network names. This option is especially useful when you want to avoid address lookups over the network (e.g., to a DNS or NIS server).

The second column of netstat‘s output shows the gateway to which the routing entry points. If no gateway is used, an asterisk is printed instead. The third column shows the “generality” of the route, i.e., the network mask for this route. When given an IP address to find a suitable route for, the kernel steps through each of the routing table entries, taking the bitwise AND of the address and the genmask before comparing it to the target of the route.

The fourth column displays the following flags that describe the route:

G The route uses a gateway.
U The interface to be used is up.
H Only a single host can be reached through the route. For example, this is the case for the loopback entry 127.0.0.1.
D This route is dynamically created. It is set if the table entry has been generated by a routing daemon like gated or by an ICMP redirect message
M This route is set if the table entry was modified by an ICMP redirect message.
! The route is a reject route and datagrams will be dropped.


The next three columns show the MSS, Window and irtt that will be applied to TCP connections established via this route. The MSS is the Maximum Segment Size and is the size of the largest datagram the kernel will construct for transmission via this route. The Window is the maximum amount of data the system will accept in a single burst from a remote host. The acronym irtt stands for “initial round trip time.” The TCP protocol ensures that data is reliably delivered between hosts by retransmitting a datagram if it has been lost. The TCP protocol keeps a running count of how long it takes for a datagram to be delivered to the remote end, and an acknowledgement to be received so that it knows how long to wait before assuming a datagram needs to retransmitted; this process is called the round-trip time. The initial round-trip time is the value that the TCP protocol will use when a connection is first established. For most network types, the default value is okay, but for some slow networks, notably certain types of amateur packet radio networks, the time is too short and causes unnecessary retransmission. The irtt value can be set using the route command. Values of zero in these fields mean that the default is being used.

Finally, the last field displays the network interface that this route will use.

Displaying Interface Statistics

When invoked with the –i flag, netstat displays statistics for the network interfaces currently configured. If the –a option is also given, it prints all interfaces present in the kernel, not only those that have been configured currently. On vstout, the output from netstat will look like this:

# netstat -i
 Kernel Interface table
 Iface MTU Met  RX-OK RX-ERR RX-DRP RX-OVR  TX-OK TX-ERR TX-DRP TX-OVR Flags
 lo      0   0   3185      0      0      0   3185      0      0      0 BLRU
 eth0 1500   0 972633     17     20    120 628711    217      0      0 BRU

The MTU and Met fields show the current MTU and metric values for that interface. The RX and TX columns show how many packets have been received or transmitted error-free (RX-OK/TX-OK) or damaged (RX-ERR/TX-ERR); how many were dropped (RX-DRP/TX-DRP); and how many were lost because of an overrun (RX-OVR/TX-OVR).

The last column shows the flags that have been set for this interface. These characters are one-character versions of the long flag names that are printed when you display the interface configuration with ifconfig:

B A broadcast address has been set.
L This interface is a loopback device.
M All packets are received (promiscuous mode).
O ARP is turned off for this interface.
P This is a point-to-point connection.
R Interface is running.
U Interface is up.


Displaying Connections

netstat supports a set of options to display active or passive sockets. The options –t, –u, –w, and –x show active TCP, UDP, RAW, or Unix socket connections. If you provide the –a flag in addition, sockets that are waiting for a connection (i.e., listening) are displayed as well. This display will give you a list of all servers that are currently running on your system.

Invoking netstat -ta on vlager produces this output:

$ netstat -ta
 Active Internet Connections
 Proto Recv-Q Send-Q Local Address    Foreign Address    (State)
 tcp        0      0 *:domain         *:*                LISTEN
 tcp        0      0 *:time           *:*                LISTEN
 tcp        0      0 *:smtp           *:*                LISTEN
 tcp        0      0 vlager:smtp      vstout:1040        ESTABLISHED
 tcp        0      0 *:telnet         *:*                LISTEN
 tcp        0      0 localhost:1046   vbardolino:telnet  ESTABLISHED
 tcp        0      0 *:chargen        *:*                LISTEN
 tcp        0      0 *:daytime        *:*                LISTEN
 tcp        0      0 *:discard        *:*                LISTEN
 tcp        0      0 *:echo           *:*                LISTEN
 tcp        0      0 *:shell          *:*                LISTEN
 tcp        0      0 *:login          *:*                LISTEN

This output shows most servers simply waiting for an incoming connection. However, the fourth line shows an incoming SMTP connection from vstout, and the sixth line tells you there is an outgoing telnetconnection to vbardolino.

Using the –a flag by itself will display all sockets from all families.

Top 20 command netstat for network management

  1. Listing all the LISTENING Ports of TCP and UDP connections

Listing all ports (both TCP and UDP) using netstat -a option.

# netstat -a | more

Active Internet connections (servers and established)
 Proto Recv-Q Send-Q Local Address               Foreign Address             State
 tcp        0      0 *:sunrpc                    *:*                         LISTEN
 tcp        0     52 192.168.0.2:ssh             192.168.0.1:egs             ESTABLISHED
 tcp        1      0 192.168.0.2:59292           www.gov.com:http            CLOSE_WAIT
 tcp        0      0 localhost:smtp              *:*                         LISTEN
 tcp        0      0 *:59482                     *:*                         LISTEN
 udp        0      0 *:35036                     *:*
 udp        0      0 *:npmp-local                *:*

Active UNIX domain sockets (servers and established)
 Proto RefCnt Flags       Type       State         I-Node Path
 unix  2      [ ACC ]     STREAM     LISTENING     16972  /tmp/orbit-root/linc-76b-0-6fa08790553d6
 unix  2      [ ACC ]     STREAM     LISTENING     17149  /tmp/orbit-root/linc-794-0-7058d584166d2
 unix  2      [ ACC ]     STREAM     LISTENING     17161  /tmp/orbit-root/linc-792-0-546fe905321cc
 unix  2      [ ACC ]     STREAM     LISTENING     15938  /tmp/orbit-root/linc-74b-0-415135cb6aeab


  1. Listing TCP Ports connections

Listing only TCP (Transmission Control Protocol) port connections using netstat -at.

# netstat -at

Active Internet connections (servers and established)
 Proto Recv-Q Send-Q Local Address               Foreign Address             State
 tcp        0      0 *:ssh                       *:*                         LISTEN
 tcp        0      0 localhost:ipp               *:*                         LISTEN
 tcp        0      0 localhost:smtp              *:*                         LISTEN
 tcp        0     52 192.168.0.2:ssh             192.168.0.1:egs             ESTABLISHED
 tcp        1      0 192.168.0.2:59292           www.gov.com:http            CLOSE_WAIT


  1. Listing UDP Ports connections

Listing only UDP (User Datagram Protocol ) port connections using netstat -au.

# netstat -au

Active Internet connections (servers and established)
 Proto Recv-Q Send-Q Local Address               Foreign Address             State
 udp        0      0 *:35036                     *:*
 udp        0      0 *:npmp-local                *:*
 udp        0      0 *:mdns                      *:*


  1. Listing all LISTENING Connections

Listing all active listening ports connections with netstat -l.

# netstat -l

Active Internet connections (only servers)
 Proto Recv-Q Send-Q Local Address               Foreign Address             State
 tcp        0      0 *:sunrpc                    *:*                         LISTEN
 tcp        0      0 *:58642                     *:*                         LISTEN
 tcp        0      0 *:ssh                       *:*                         LISTEN
 udp        0      0 *:35036                     *:*
 udp        0      0 *:npmp-local                *:*

Active UNIX domain sockets (only servers)
 Proto RefCnt Flags       Type       State         I-Node Path
 unix  2      [ ACC ]     STREAM     LISTENING     16972  /tmp/orbit-root/linc-76b-0-6fa08790553d6
 unix  2      [ ACC ]     STREAM     LISTENING     17149  /tmp/orbit-root/linc-794-0-7058d584166d2
 unix  2      [ ACC ]     STREAM     LISTENING     17161  /tmp/orbit-root/linc-792-0-546fe905321cc
 unix  2      [ ACC ]     STREAM     LISTENING     15938  /tmp/orbit-root/linc-74b-0-415135cb6aeab


  1. Listing all TCP Listening Ports

Listing all active listening TCP ports by using option netstat -lt.

# netstat -lt

Active Internet connections (only servers)
 Proto Recv-Q Send-Q Local Address               Foreign Address             State
 tcp        0      0 *:dctp                      *:*                         LISTEN
 tcp        0      0 *:mysql                     *:*                         LISTEN
 tcp        0      0 *:sunrpc                    *:*                         LISTEN
 tcp        0      0 *:munin                     *:*                         LISTEN
 tcp        0      0 *:ftp                       *:*                         LISTEN
 tcp        0      0 localhost.localdomain:ipp   *:*                         LISTEN
 tcp        0      0 localhost.localdomain:smtp  *:*                         LISTEN
 tcp        0      0 *:http                      *:*                         LISTEN
 tcp        0      0 *:ssh                       *:*                         LISTEN
 tcp        0      0 *:https                     *:*                         LISTEN


  1. Listing all UDP Listening Ports

Listing all active listening UDP ports by using option netstat -lu.

# netstat -lu

Active Internet connections (only servers)
 Proto Recv-Q Send-Q Local Address               Foreign Address             State
 udp        0      0 *:39578                     *:*
 udp        0      0 *:meregister                *:*
 udp        0      0 *:vpps-qua                  *:*
 udp        0      0 *:openvpn                   *:*
 udp        0      0 *:mdns                      *:*
 udp        0      0 *:sunrpc                    *:*
 udp        0      0 *:ipp                       *:*
 udp        0      0 *:60222                     *:*
 udp        0      0 *:mdns                      *:*


  1. Listing all UNIX Listening Ports

Listing all active UNIX listening ports using netstat -lx.

# netstat -lx

Active UNIX domain sockets (only servers)
 Proto RefCnt Flags       Type       State         I-Node Path
 unix  2      [ ACC ]     STREAM     LISTENING     4171   @ISCSIADM_ABSTRACT_NAMESPACE
 unix  2      [ ACC ]     STREAM     LISTENING     5767   /var/run/cups/cups.sock
 unix  2      [ ACC ]     STREAM     LISTENING     7082   @/tmp/fam-root-
 unix  2      [ ACC ]     STREAM     LISTENING     6157   /dev/gpmctl
 unix  2      [ ACC ]     STREAM     LISTENING     6215   @/var/run/hald/dbus-IcefTIUkHm
 unix  2      [ ACC ]     STREAM     LISTENING     6038   /tmp/.font-unix/fs7100
 unix  2      [ ACC ]     STREAM     LISTENING     6175   /var/run/avahi-daemon/socket
 unix  2      [ ACC ]     STREAM     LISTENING     4157   @ISCSID_UIP_ABSTRACT_NAMESPACE
 unix  2      [ ACC ]     STREAM     LISTENING     60835836 /var/lib/mysql/mysql.sock
 unix  2      [ ACC ]     STREAM     LISTENING     4645   /var/run/audispd_events
 unix  2      [ ACC ]     STREAM     LISTENING     5136   /var/run/dbus/system_bus_socket
 unix  2      [ ACC ]     STREAM     LISTENING     6216   @/var/run/hald/dbus-wsUBI30V2I
 unix  2      [ ACC ]     STREAM     LISTENING     5517   /var/run/acpid.socket
 unix  2      [ ACC ]     STREAM     LISTENING     5531   /var/run/pcscd.comm


  1. Showing Statistics by Protocol

Displays statistics by protocol. By default, statistics are shown for the TCP, UDP, ICMP, and IP protocols. The -s parameter can be used to specify a set of protocols.

# netstat -s

Ip:
 2461 total packets received
 0 forwarded
 0 incoming packets discarded
 2431 incoming packets delivered
 2049 requests sent out
 Icmp:
 0 ICMP messages received
 0 input ICMP message failed.
 ICMP input histogram:
 1 ICMP messages sent
 0 ICMP messages failed
 ICMP output histogram:
 destination unreachable: 1
 Tcp:
 159 active connections openings
 1 passive connection openings
 4 failed connection attempts
 0 connection resets received
 1 connections established
 2191 segments received
 1745 segments send out
 24 segments retransmited
 0 bad segments received.
 4 resets sent
 Udp:
 243 packets received
 1 packets to unknown port received.
 0 packet receive errors
 281 packets sent


  1. Showing Statistics by TCP Protocol

Showing statistics of only TCP protocol by using option netstat -st.

# netstat -st

Tcp:
 2805201 active connections openings
 1597466 passive connection openings
 1522484 failed connection attempts
 37806 connection resets received
 1 connections established
 57718706 segments received
 64280042 segments send out
 3135688 segments retransmited
 74 bad segments received.
 17580 resets sent


  1. Showing Statistics by UDP Protocol
# netstat -su

Udp:
 1774823 packets received
 901848 packets to unknown port received.
 0 packet receive errors
 2968722 packets sent


  1. Displaying Service name with PID

Displaying service name with their PID number, using option netstat -tp will display “PID/Program Name”.

# netstat -tp

Active Internet connections (w/o servers)
 Proto Recv-Q Send-Q Local Address               Foreign Address             State       PID/Program name
 tcp        0      0 192.168.0.2:ssh             192.168.0.1:egs             ESTABLISHED 2179/sshd
 tcp        1      0 192.168.0.2:59292           www.gov.com:http            CLOSE_WAIT  1939/clock-applet


  1. Displaying Promiscuous Mode

Displaying Promiscuous mode with -ac switch, netstat print the selected information or refresh screen every five second. Default screen refresh in every second.

# netstat -ac 5 | grep tcp

tcp        0      0 *:sunrpc                    *:*                         LISTEN
 tcp        0      0 *:58642                     *:*                         LISTEN
 tcp        0      0 *:ssh                       *:*                         LISTEN
 tcp        0      0 localhost:ipp               *:*                         LISTEN
 tcp        0      0 localhost:smtp              *:*                         LISTEN
 tcp        1      0 192.168.0.2:59447           www.gov.com:http            CLOSE_WAIT
 tcp        0     52 192.168.0.2:ssh             192.168.0.1:egs             ESTABLISHED
 tcp        0      0 *:sunrpc                    *:*                         LISTEN
 tcp        0      0 *:ssh                       *:*                         LISTEN
 tcp        0      0 localhost:ipp               *:*                         LISTEN
 tcp        0      0 localhost:smtp              *:*                         LISTEN
 tcp        0      0 *:59482                     *:*                         LISTEN


  1. Displaying Kernel IP routing

Display Kernel IP routing table with netstat and route command.

# netstat -r

Kernel IP routing table
 Destination     Gateway         Genmask         Flags   MSS Window  irtt Iface
 192.168.0.0     *               255.255.255.0   U         0 0          0 eth0
 link-local      *               255.255.0.0     U         0 0          0 eth0
 default         192.168.0.1     0.0.0.0         UG        0 0          0 eth0


  1. Showing Network Interface Transactions

Showing network interface packet transactions including both transferring and receiving packets with MTU size.

# netstat -i

Kernel Interface table
 Iface       MTU Met    RX-OK RX-ERR RX-DRP RX-OVR    TX-OK TX-ERR TX-DRP TX-OVR Flg
 eth0       1500   0     4459      0      0      0     4057      0      0      0 BMRU
 lo        16436   0        8      0      0      0        8      0      0      0 LRU


  1. Showing Kernel Interface Table

Showing Kernel interface table, similar to ifconfig command.

# netstat -ie

Kernel Interface table
 eth0      Link encap:Ethernet  HWaddr 00:0C:29:B4:DA:21
 inet addr:192.168.0.2  Bcast:192.168.0.255  Mask:255.255.255.0
 inet6 addr: fe80::20c:29ff:feb4:da21/64 Scope:Link
 UP BROADCAST RUNNING MULTICAST  MTU:1500  Metric:1
 RX packets:4486 errors:0 dropped:0 overruns:0 frame:0
 TX packets:4077 errors:0 dropped:0 overruns:0 carrier:0
 collisions:0 txqueuelen:1000
 RX bytes:2720253 (2.5 MiB)  TX bytes:1161745 (1.1 MiB)
 Interrupt:18 Base address:0x2000

lo        Link encap:Local Loopback
 inet addr:127.0.0.1  Mask:255.0.0.0
 inet6 addr: ::1/128 Scope:Host
 UP LOOPBACK RUNNING  MTU:16436  Metric:1
 RX packets:8 errors:0 dropped:0 overruns:0 frame:0
 TX packets:8 errors:0 dropped:0 overruns:0 carrier:0
 collisions:0 txqueuelen:0
 RX bytes:480 (480.0 b)  TX bytes:480 (480.0 b)


  1. Displaying IPv4 and IPv6 Information

Displays multicast group membership information for both IPv4 and IPv6.

# netstat -g

IPv6/IPv4 Group Memberships
 Interface       RefCnt Group
 --------------- ------ ---------------------
 lo              1      all-systems.mcast.net
 eth0            1      224.0.0.251
 eth0            1      all-systems.mcast.net
 lo              1      ff02::1
 eth0            1      ff02::202
 eth0            1      ff02::1:ffb4:da21
 eth0            1      ff02::1


  1. Print Netstat Information Continuously

To get netstat information every few second, then use the following command, it will print netstat information continuously, say every few seconds.

# netstat -c

Active Internet connections (w/o servers)
 Proto Recv-Q Send-Q Local Address               Foreign Address             State
 tcp        0      0 tecmint.com:http   sg2nlhg007.shr.prod.s:36944 TIME_WAIT
 tcp        0      0 tecmint.com:http   sg2nlhg010.shr.prod.s:42110 TIME_WAIT
 tcp        0    132 tecmint.com:ssh    115.113.134.3.static-:64662 ESTABLISHED
 tcp        0      0 tecmint.com:http   crawl-66-249-71-240.g:41166 TIME_WAIT
 tcp        0      0 localhost.localdomain:54823 localhost.localdomain:smtp  TIME_WAIT
 tcp        0      0 localhost.localdomain:54822 localhost.localdomain:smtp  TIME_WAIT
 tcp        0      0 tecmint.com:http   sg2nlhg010.shr.prod.s:42091 TIME_WAIT
 tcp        0      0 tecmint.com:http   sg2nlhg007.shr.prod.s:36998 TIME_WAIT


  1. Finding non supportive Address

Finding un-configured address families with some useful information.

# netstat --verbose

netstat: no support for `AF IPX' on this system.
 netstat: no support for `AF AX25' on this system.
 netstat: no support for `AF X25' on this system.
 netstat: no support for `AF NETROM' on this system.


  1. Finding Listening Programs

Find out how many listening programs running on a port.

# netstat -ap | grep http

tcp        0      0 *:http                      *:*                         LISTEN      9056/httpd
 tcp        0      0 *:https                     *:*                         LISTEN      9056/httpd
 tcp        0      0 tecmint.com:http   sg2nlhg008.shr.prod.s:35248 TIME_WAIT   -
 tcp        0      0 tecmint.com:http   sg2nlhg007.shr.prod.s:57783 TIME_WAIT   -
 tcp        0      0 tecmint.com:http   sg2nlhg007.shr.prod.s:57769 TIME_WAIT   -
 tcp        0      0 tecmint.com:http   sg2nlhg008.shr.prod.s:35270 TIME_WAIT   -
 tcp        0      0 tecmint.com:http   sg2nlhg009.shr.prod.s:41637 TIME_WAIT   -
 tcp        0      0 tecmint.com:http   sg2nlhg009.shr.prod.s:41614 TIME_WAIT   -
 unix  2      [ ]         STREAM     CONNECTED     88586726 10394/httpd


  1. Displaying RAW Network Statistics
# netstat --statistics --raw

Ip:
 62175683 total packets received
 52970 with invalid addresses
 0 forwarded
 Icmp:
 875519 ICMP messages received
 destination unreachable: 901671
 echo request: 8
 echo replies: 16253
 IcmpMsg:
 InType0: 83
 IpExt:
 InMcastPkts: 117

The post Install and using netstat in Linux appeared first on Unixmen.


RHCSA module 2 – Operating Red Hat Enterprise Server 7

$
0
0


Operating Red Hat  Enterprise Server 7 – An introduction

This is the continuation part of RHCSA exam guide, this module will include all of the tools, services, commands required for operating Red Hat Enterprise Linux 7. To handle a Red Hat Linux server a skills is required to monitor various processes, to handle various software and to schedule backups to that catastrophic situations can be avoided. It is possible that you can get out of storage disk storage therefore you must learn how to handle these storage device, and add or remove extra disk space if required.

Have a look on recently published articles in RHCSA series

http://www.unixmen.com/everything-know-rhcsa-certification/

http://www.unixmen.com/basics-must-know-rhcsa-exam-preparation/

http://www.unixmen.com/learn-man-vim-editor-file-globbing-rhcsa/

http://www.unixmen.com/learn-file-management-commnad-line-required-rhcsa/

http://www.unixmen.com/hard-soft-links-user-group-management-rhcsa/


 What you will learn in this module of RHCSA curriculum?

After finish this module candidate will be able to monitor processes, prioritise any process, manage, install uninstall or update software with resolving the dependencies. Further a candidate will schedule tasks with the help of cron and at commands, run virtual machines with kvm virtualisation utility, mange logs and will be handle to manage hard disk partitioning, disk formatting, adding or removing of any new hard disk with the help of Logical Volume Manager or LVM utility.

What topics are covered in module-2 of RHCSA curriculum?

  1. Process management in RHEL 7.
  2. software managing using yum in RHEL 7.
  3. Virtualization using KVM in RHEL 7.
  4. Job scheduling with cron and at in RHEL 7.
  5. Log management in RHEL 7.
  6. Disk management with disk partitioning utilities in RHEL 7.
  7. LVM management in RHEL 7.

    1. Process management in RHEL 7

Hundred of processes start when system is booted on.  You can monitor currently running processes with following command

# ps aux

Selection_039

Start some process on terminal

# firefox

Now terminal will engaged till the process is on, to send this process to background press ‘control+z’. See background process with following command.

# bg

Selection_040 To see child parent process relationship in running processes use

# ps fax

Selection_041

To see memory status of the system (-m option will display output in megabyte)

# free -m

Output

total used free shared buff/cache available
Mem: 1119 410 289 7 419 540
Swap: 819 0 819

Get the uptime of cpu alongwith average cpu load

Selection_042

To list busy most process which are consuming maximum resources use top

# top

Selection_043

You can watch cpu, memory and swap usages status as live.

Assume we wants to kill a process firefox, use killall command

 # killall firefox

Kill a process by pid.

Let us wants to kill a process with process id 11, as shown with top command.

# kill -9 11

Generally processes are initiated with a same level of priority which is by default set to a value of 20, have a look in top command.

Selection_045

You may need to change the priority of some process to make it more preferred or you may need to make it to be some lesser priority process, this can be achieved by nicing a process, these values can be between -20 to 20, more negative value means more prior process.

use top command, and press r to renice a process.

Selection_046

Let us renice sshd process with pid 2689

Selection_047

Make that value to 0

Selection_048

See the nice value of sshd now, it is a preferred process now

Selection_050

Define process renicing from terminal command line. Change value of sshd service which has a PID value of 2689 in our example.

# renice -n 20 -p 2689

Use nice to set value for some new process, define nice value after -n option, for more detail use

nice –help

# nice -n 10 dd if=/dev/zero of=/dev/null &

Have a look with top that nice value is set to 10.

# top

Selection_0512. managing software in RHEL 7 using yum.

A good article to manage yum in Red Hat Linux is already published with unixmen.com, link of the article is provided below, that article is sufficient to make you understand yum in RHEL 7.

Managing Software Packages with yum in RHEL7/CENTOS7

3. Virtualization using KVM in RHEL 7

KVM is a fully open source and complete virtualisation software, it consists of kvm.ko the loadable kernel module, it can run multiple virtual machines without modifying the host configurations.

Install kvm package

# yum install kvm libvirt virt-manager qemu-kvm

Verify whether, kvm is active or not

# systemctl status libvirtd

Selection_052Get virtualisation shell

# virsh

A new console for kvm virtualisation will get open, use help for more options.

List existing virtaul machines running on server

# virsh list


Selection_054

All of the configuration file of kvm virtualisation are stored in /etc/libvirt/, each virtual machines get its configuration file generated automatically.

To create a new virtual machine

#virt-manager

Create a new machine

Selection_055

Browse for Image OS image, define ram size

Selection_057


Selection_056

Define disk space

Selection_057

Configure and boot

Selection_060

Use following command to show installed vm

# virsh list --all
 Id Name State
----------------------------------------------------
 - centos7.0 shut off

To shut down running virtual machine

# virsh destroy centos7.0

Manage Hardware configuration of virtual machine in virt-manager

Selection_061

For more details you can access official kvm link

http://www.linux-kvm.org/page/Main_Page

4. Job scheduling with cron and at in RHEL 7

i. Using cron to handle job scheduling in Red Hat Linux 7

To automate administrative tasks,a task scheduler is required, cron and at utilities are available with Linux to schedule automated scripts or commands, cron is used when need to perform certain automation tasks on daily/hourly/weekly or on some regular time period, but at command is used when you need to perform some task once at a defined time.

Cron configuration files is /etc/crontab

# vim /etc/crontab

Sample output

SHELL=/bin/bash
PATH=/sbin:/bin:/usr/sbin:/usr/bin
MAILTO=root

# For details see man 4 crontabs

# Example of job definition:
# .---------------- minute (0 - 59)
# | .------------- hour (0 - 23)
# | | .---------- day of month (1 - 31)
# | | | .------- month (1 - 12) OR jan,feb,mar,apr ...
# | | | | .---- day of week (0 - 6) (Sunday=0 or 7) OR sun,mon,tue,wed,thu,fri,sat
# | | | | |
# * * * * * user-name command to be executed

You never put your scheduling in this file, avoiding editing that file.

Schedule cronjob for a user

time format is like [minute] [hour] [day of the month] [month] [day of the week] 

Add a job in cron

# crantab -e

Get backup of /home directory daily at 5 pm daily using crontab -e

0 17  * * *  tar cfz /root/home.tgz /home

List what cron jobs are scheduled on system

# crontab -l

Selection_062

Schedule back on specific month

* * * march,april,may * cp /etc/named.* /root/backup

Schedule task after every 30 minutes

*/30 * * * *  rm  -rf /tmp/*

Another method of managing cron jobs is to use /etc/cron.d/ directory

# cd /etc/cron.d

In this file you can put files with any name you desire and define your cron job in defined format.

Selection_063

Have a look in some sample file

# vim sa-update

Selection_064

You can define your own job schedules using /etc/cron.d/ directory. Use man or help toolsto get more details on cronjob.

ii. Using at to handle job scheduling in Red Hat Linux 7

Have a look on current time

# date
Fri Jun 10 13:03:44 EDT 2016

Log hello world suppose at 13:10 using at command, define time with at command, press enter, give command, press Ctrl+D to save and quit.

# at 13:10
at> logger hellow world 
at> <EOT>
job 2 at Fri Jun 10 13:10:00 2016

Check logs

# tail -f /var/log/messages

Selection_065

With at you can manage various time specific tasks with at.

Conclusion

Three chapters of module 2 of RHCSA we will cover in next topic, in which we we will discuss disk management with various command line tools available, creating and managing LVM based disk partitions. Log management is another important aspect of Linux administration therefore we will discuss that part too in detail in next and last article of module-2 of RHCSA curriculum.

The post RHCSA module 2 – Operating Red Hat Enterprise Server 7 appeared first on Unixmen.

Reasons why you should use Linux

$
0
0

Since its initial release in 1991, Linux had made tremendous leaps and bounds to target not only corporate entities but desktop and home users as well. If you are Windows or Mac user, chances are that you have interacted with Linux at one point or another without your knowledge. This is because, unlike a decade ago, Linux underpins most modern technologies. Smart devices such as smartphones, smart TVs and tablets ride on Android which is based on the modern version of the Linux kernel. Most modern websites are hosted on Linux servers on either Apache or Nginx web servers. Linux has also found its way to the Internet of Things (IoT) devices which are mostly used in research and development.

If you are not yet convinced on why you should embrace Linux in the ever-changing technological space, then here are more reasons why you should make the switch to Linux.

1) Linux is free and opensource

As you know, purchasing a Windows desktop license can be pricey, leave alone the server version. Mac OS comes already packaged in the hardware leaving no choice but to purchase the entire machine.

In sharp contrast, Linux is available for download at absolutely no cost! Save for a few enterprise distributions such as RHEL (Redhat Enterprise Linux) most Linux distributions are free to download and install. Additionally, most Linux distributions ship with out-of-the-box applications for everyday use such as Firefox browser, audio and video apps such as VLC and Mplayer, Office productivity tools like LibreOffice, calendar & calculator apps and so much more. Most Linux distributions have upped their game to provide stunning and elegant desktop environments such as GNOME, KDE Plasma and Deepin alongside a polished set of icons for desktop users and beginners.

One of the most crucial and striking aspects of Linux is the availability of its source code unlike proprietary systems like Windows and mac-OS. Users can not only view the code but also modify and redistribute the code to other users. Over time, this has given rise to multiple Linux flavors and a huge community of opensource developers.

2) Linux is stable and secure

Linux is renowned as a fast and stable operating system compared to its Windows counterpart. A Linux server can stay live for a long period without compromising its performance unlike Windows that needs periodic reboots to keep performing at optimal levels. For this reason, Linux comes as a system of choice for most cloud servers including web, database and application servers.

In comparison to Windows, Linux is considered more secure and offers a heightened degree of privacy & confidentiality. In fact, some Linux distributions such as Tails and Discreet Linux were developed with privacy in mind.

3) Availability of tons of software applications

I have used Linux for nearly 6 years and what has made my experience worthwhile and exciting is the availability of tons of packages from various repositories. Ubuntu repository alone provides over 50,000 software packages for download! Recently, they launched snap packages which are zipped packages that ship with their own libraries and dependencies which further simplify software installation. Additionally, you can browse an array of software application the Software Center that comes with almost every distro and install your preferred application.

4) Unlimited Customization

One of the most exciting things about Linux is the ability to customize its look and feel in every possible way you can fathom. You can install as many desktop environments as you with and get to savour the appeal that each has to offer. Additionally, you can tweak the Window managers, icons, notification bars and select your preferred theme or wallpaper. Each distribution is unique in its own way offering you a wide array of customization options to end up with the UI of your choice.

5) Jump-starting an old PC

If you have an old PC sitting somewhere gathering dust and wondering what to do with it, don’t dispose of it yet. The Linux community has availed some lightweight flavors that are ideal for old machines with low system specifications. With only 1 GB RAM and 5Gb of hard disk space, you can readily install any of these lightweight Linux distros: Linux Lite LXLE, AntiX, TinyCore, MX Linux and Sparky Linux to mention a few.

6) Stellar Community Support

Having been built around an opensource project, Linux boasts of a wide community of vibrant developers and enthusiasts who are ready to provide assistance in case you get stuck. More importantly, there are tons of online forums that you can visit and acquire more knowledge on various Linux tips and tricks.

Conclusion

As technology evolves with every passing minute, knowledge of using the Linux operating system is becoming valuable. In fact, now more than ever, there’s a huge demand for professionals with Linux skills. If you are in the IT industry, we cannot emphasize more how competency in Linux is. Linux will unlock doors to advanced technologies such as Docker and Ansible. We hope that we have convinced you enough on why you should use Linux and what the future holds for Linux and users with Linux expertise.

The post Reasons why you should use Linux appeared first on Unixmen.

How to get wifi on Linux mint 19

$
0
0

Most modern Linux flavors such as Ubuntu and Mint come with out of the box support for several hardware components such as graphic drivers, and WiFi adapters. After installation, it’s usually quite a breeze using your WiFi connection as the system automatically installs the required WiFi driver. This is also true even when you are just running a live installation to test out the operating system before installing it on your hard drive. However, in some few cases, problems may occur and your WiFi functionality may not kick in as expected. Additional steps are required to setup Wifi on your system. In this tutorial, we will show you how you can get wifi on Linux Mint 19. Without much further ado, let us dive in.

How to resolve wireless connection issues on Mint 19

If you are pulling out your hair with frustration because you cannot get your WiFi connection to kick in, fret not. In this guide, we have outlined a number of solutions that you can apply to fix the issue. We recommend that you give each of these solutions a try until your WiFi problem goes away.

  1. Confirm that your Wireless adapter is properly installed.
  2. Update your Linux Mint kernel.
  3. Manually install WiFi Drivers.
  4. Use a USB Wi-Fi adapter.

Now, let’s take a look at each in turn.

1) Confirm that the WiFI adapter driver is properly installed

Ideally, this should be your starting point when troubleshooting your WiFi connection woes. To get started, connect your system to the internet using an ethernet cable / LAN cable.

Next, click on the menu button and select ‘Administration>Device manager

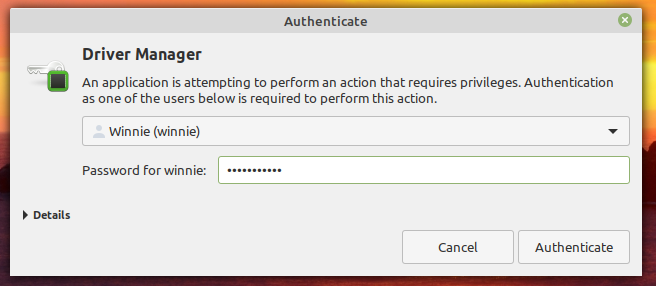
An authentication pop-up will appear on the screen requesting for your password. To authenticate, simply type in your password and click on the ‘Authenticate‘ button.

Authenticate-when-launching-device-manager
Device manager Linux Mint 19.3 Tricia

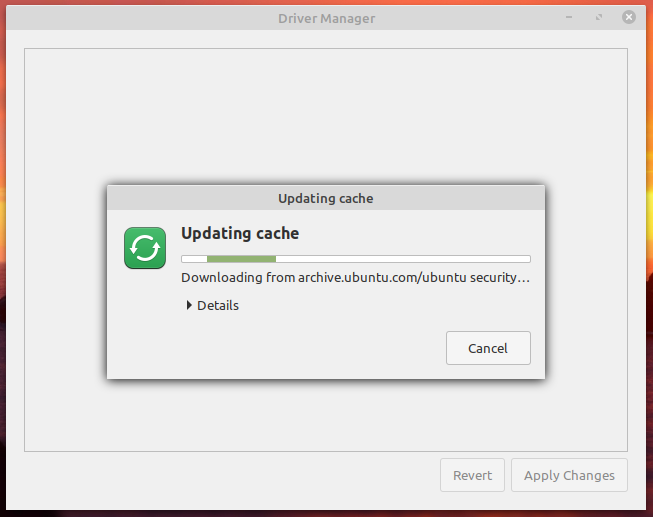
Wait for the cache update to complete. It may take quite a while but some patience will do.

updating-cache-on-driver-manager
updating cache

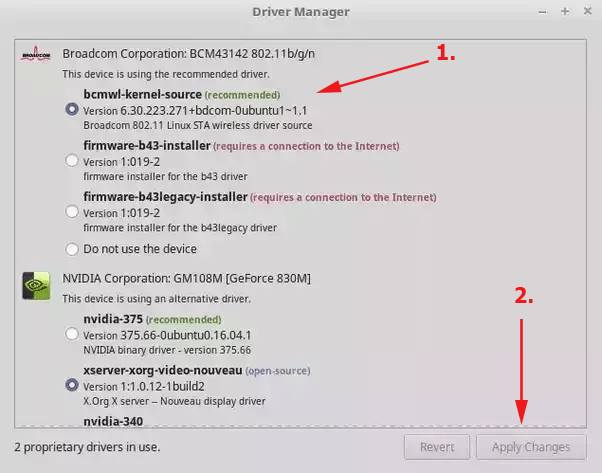
This ushers you to the driver Manager window where all the drivers are listed as shown below. Since our interest is in the WiFi drivers, ensure that your WiFi driver appears on the list and is selected. In our case, we are using a PC with Broadcom wireless adapter and the corresponding wireless driver vendor is Broadcom. Yours may be different. For example, in our case, we have RealTek wireless drivers instead of Broadcom.

Click on the radio button adjacent to the WiFi driver and click on ‘Apply changes‘.

select-wifi-dirver-linux-mint-19
select wifi driver in Linux Mint 19

Once you are done, exit the driver manager window and restart your system. Upon login, click on the Network symbol at the bottom of the screen and enable the wireless network. Then select the wireless network that you want to connect to from the list of wireless devices.

If this worked for you, well and good, but if it didn’t proceed to the next solution.

2. Update Linux Mint kernel

Another solution that has proven to fix missing WiFi drivers is updating your system’s kernel. As you may already know, the kernel is the core of the Linux system and it interfaces the Operating systems with the hardware components.

Updating the kernel comes with multiple advantages. The latest kernel improves your system’s stability, fortifies your system’s security by applying fixes to pre-existing security flaws and updates the system’s drivers to their latest versions. Additionally, the latest kernel ships with additional drivers for your system’s hardware.

If your Mint system cannot detect the Wifi adapter, updating the kernel comes highly recommended. But first, to check what kernel version you are using, run:

$ uname -r

To update the kernel, run the commands:

$ sudo apt update -y  && sudo apt upgrade -y
$ sudo apt dist-upgrade

Once the upgrade is over, reboot your system and once again verify the kernel version:

$ uname -r
check whether latest kernel version is installed
check Linux kernel version

Additionally, you can use the inxi command-line tool as shown

$ inxi | grep -i kernel

With the latest kernel installed, proceed and check whether you can use the Wi-Fi functionality to connect to any wireless network.

3. Manually installing drivers to get WiFi on Linux Mint

Another solution to this problem is to manually install WiFi drivers. Again, connect your PC to the internet using a LAN cable. For systems with RealTek adapters, begin by cloning the git repository as shown:

$ git clone https://github.com/abperiasamy/rtl8812AU_8821AU_linux.git

Then navigate into the cloned directory.

$ cd rtl8812AU_8821AU_linux

Compile from source.

$ make
$ sudo make install

Finally, reboot for the changes to take effect.

$ sudo reboot

For Broadcom wireless drivers, first update the system as shown before:

$ sudo apt update -y  &&  sudo apt upgrade

Thereafter, install the Broadcom drivers as shown:

 $ sudo apt-get install b43-fwcutter firmware-b43-installer 

Next, reboot your system and try connecting to nearby wireless networks. The above fix should solve your WiFi problems.

4. Use a USB WiFi adapter

If all attempts to get WiFi on Linux Mint are futile, you still have one bullet left – and that is using an external WiFi adapter. This is usually a USB adapter that can be no longer than your thumb. Some, however, do have an antenna but will still work the same by providing WiFi functionality.

Simply plug in the USB Wi-FI adapter and the kernel will search for WLAN drivers that will work with the adapter. In my case, I’m using a TP-Link USB WiFi adapter

Next, click on the Network icon on the taskbar as shown.

click-on-network-icon
click on the network icon Linux Mint

On the pull-up menu, enable the wireless functionality by turning on the toggle.

get-wifi-on-linux-mint
Turn on wireless functionality

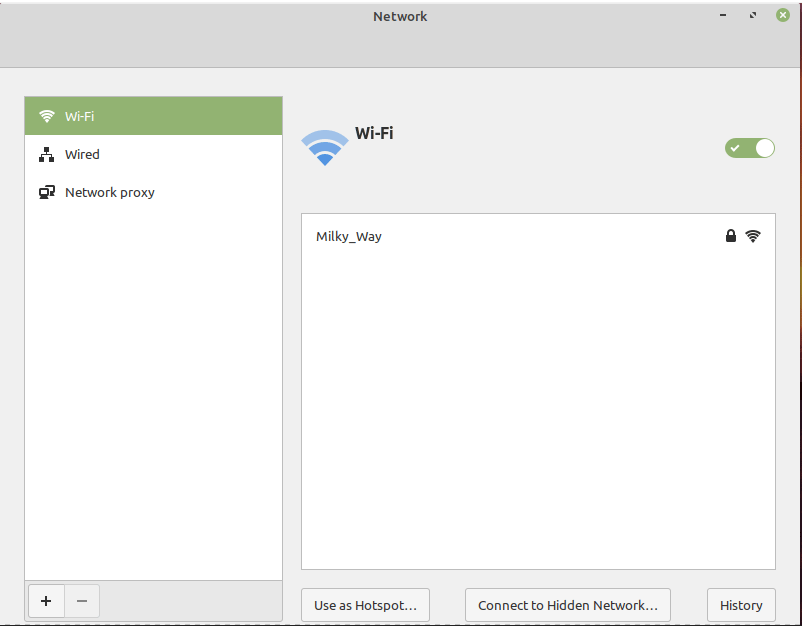
Next, click on the ‘Network Settings’ options just below. This opens the window shown below with a list of available wireless networks.

Available-wireless-networks
Available Wi-Fi networks

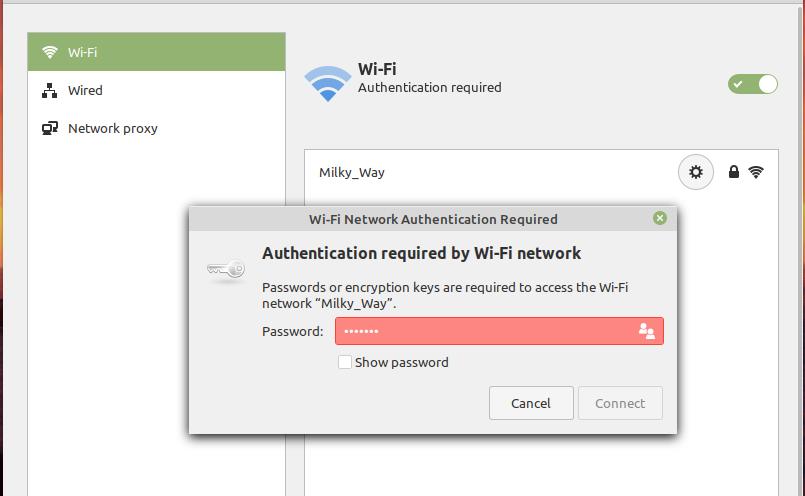
I have my home wireless network called ‘Milky Way‘. To connect to it, I’ll click on it and provide the password for authentication.

Provide password for authentication
Provide a password for authentication

Click on the ‘Connect‘ button to establish a connection to your wireless connection as shown below.

get-wifi-on-Linux-mint

You can confirm that the driver has been installed by running the command:

$ lsusb | grep WLAN
Confirm-WLAN-WiFi-adapter

Conclusion

This concludes this topic on How to setup WiFi drivers on your Linux Mint system. You’ll rarely encounter this issue with Linux Mint 19 due to major kernel improvements which support a broad array of WiFi adapters. It’s recommended however to install the latest Mint – Linux Mint 20 codenamed Ulyana. It packs with all the major improvements and enhancements that guarantee you superb user experience.

The post How to get wifi on Linux mint 19 appeared first on Unixmen.

How to rename files in UNIX / Linux

$
0
0

As a UNIX user, one of the basic tasks that you will often find yourself performing is renaming files and folders. Renaming a file is quite elementary and really shouldn’t be an uphill task. You can rename a file or directory in UNIX from a terminal (CLI) or using third-party tools (GUI tools).
In this guide, we will discuss two command-line tools that you can use to rename files in UNIX.

Rename files in UNIX using the mv command

Short for ‘move’ the mv command is a command that is used primarily to move files and folder from one location to another. However, it can also be used to rename a file.

The syntax for renaming a file using the mv command is shown below:

 $ mv (option) filename1 filename2 

In the command above,

filename1
is the original file while
filename2
is the new name that the file will take. If the file to be renamed is not located in the current directory, be sure to specify the full path of the file.

Let’s take an example as shown in the command below:

$ mv  /home/sales.txt /home/marketing.txt

The command renames the file

sales.txt
located in the home directory to
marketing.txt

NOTE:

When the file is not located in the current folder, the complete file path to the file and the new file name should be specified. If the path of the file differs from the path of the new filename, the file will be moved to the new file path and later on renamed.

For example:

$ mv  /home/sales.txt /home/data/marketing.txt

In the above example, the

sales.txt
file is moved entirely from the home directory to the /home/data path and renamed
marketing.txt
.This is a cool way of killing two birds at the same time – moving and renaming files. However, if your sole goal is to rename the file, ensure the file paths in both instances match without any variations.

The mv command can be used with a variety of options. For example to print the verbose output of the command, use the

-v
option as shown.
$ mv -v  sales.txt marketing.txt
how to rename  file in Unix

Renaming a directory

Renaming a directory also follows the same syntax as renaming a file, i.e.

$ mv directory_name1 directory_name2

For example, to rename a directory called

python_docs
to
django_docs
in the current working space run the command:
$ mv python_docs django_docs
rename a directory in Linux

Rename files in UNIX using the rename command

So far we have looked at how to rename files and directories using the

mv
command. Quite a straightforward task right? However, a challenge presents itself when renaming multiple files and folders at a go. Things get a little tricky and in that case, you may be required to use some bash scripts or loops to achieve your goal. In that scenario, the
mv
command will not be of much help.

This is where the

rename
command comes in. The command comes in handy when renaming bulk. The command replaces the search expression contained in the file with another expression provided for by the user.

Installing rename

Modern Linux distributions ship with rename command by default. However, if you are running an older Linux distribution, here is how you to install it:

For Debian and Ubuntu systems, run the command:

$ sudo apt update
 $ sudo apt-get install rename 

For CentOS, Fedora and RHEL, execute:

 $ sudo dnf install prename 

Notice the ‘p’ that precedes the rename command. The ‘p’ stands for Perl.

For Arch / Manjaro systems run:

 $ sudo pacman -Syu perl-rename 

Using rename command

As earlier stated, the rename command is used for renaming a batch of files, more specifically changing the file extension of multiple files simultaneously.

To better demonstrate how the command works, we have 5 text files all with a ‘.txt’ file extension as shown.

show text files to be renamed

The following command is going to convert all the .txt files to .pdf files

$ rename 's/.txt/.pdf/' *.txt

You can confirm that the files have been renamed using the good-old

ls
command as shown. And true to your expectations, the file extensions will have been renamed.
rename a file in UNIX using rename command

Let’s break down the command:

‘s/…/…/’ – This is the substitution operator. The first argument is the search term and the second argument is the replacement.

.txt – This represents the search term. The rename command will scour for this pattern in all files in the directory and thereafter replace it with the second argument

.pdf – This is the replacement option that will replace the pattern in the first argument.

*.txt – The use of the wildcard symbol instructs the rename command to search for all instances with the pattern .txt

If you are not sure which files will be affected, you might need to perform a dry run before proceeding with the operation.

To achieve this, use the -n option as shown

 $ rename -n 's/.txt/.pdf/' *.txt 
perform a dry run before you rename a file in Unix

To view the verbose output as files are being renamed, use the -v option as shown.

$ rename -v 's/.txt/.pdf/' *.txt
rename command with verbose output

And this brings us to the end of this topic on how to rename files in UNIX. Renaming files is part of the basic commands that every Linux user should have at their fingertips. We hope that you can comfortably rename your files and directories without much of an issue. Give us a shout and let us know if you are having any difficulties.

The post How to rename files in UNIX / Linux appeared first on Unixmen.

Linux vs Unix – How is UNIX different from Linux

$
0
0

Linux and Unix are two terminologies that are interchangeably used to refer to the same Operating system. This is largely due to their striking similarities and few are not able to draw a distinction between the two. In the Linux vs Unix conundrum, there exists confusion on which system does what. If you are were born around the mid-’90s, chances are that you have only interacted with the Linux Operating system. Linux commands a huge market share in datacenter and cloud computing platforms. So ubiquitous is Linux that it underpins most smart devices such as smartphones, Android TVs and IoT devices.

While it’s true that Linux and Unix share a lot in common especially in terms of the file system hierarchy and terminal commands, we cannot ignore the differences that exist between these two systems. In this article, we will seek to understand both Unix and Linux in greater detail and flesh out the variations between the two.

To start off, Linux is a clone of Unix. It’s a Unix variant that has grown in leaps and bounds spawning hundreds of flavours or distributions. These are maintained by a vibrant community of developers. To better understand how we arrived where we are, let’s journey into the history of Unix. We will later look at the sequence of events that spawned the creation of Linux.

History of Unix

Unix dates back in the late 1960s in AT&T Bell labs where a team of ambitious developers led by Dennis Ritchie and Ken Thompson was seeking to develop a multi-user and multi-tasking system for a minicomputer known as PDP-7. At the time, Unix was a derivative of the Multics operating system (Multiplexed Information and Computing Service). This was a system that powered the Mainframe computers.

However, in the 1970s, the two lead developers became uncomfortable with the direction UNIX was taking. Frustrated with the scope and the direction of Multics, they decided to chart a different course and spin up a new operating system off Multics. Concerted efforts between Dennis Ritchie, who’s regarded as the father of C programming language, and Ken Thompson, the inventor of Go language, spawned a better system known as UNICS which later changed to UNIX. UNIX proved to be portable and could be installed and supported by many hardware architectures.

Unix grew rapidly in the ‘70s and ‘80s and become popular in academia. Among the institutions that adopted and changed the trajectory of Unix was the University of California in Berkley where engineers modified and developed UNIX further that gave rise to a new system known as BSD short for Berkeley Software Development. BSD shipped with several enhancements and new software applications which heralded a new era in operating systems. Meanwhile, AT&T charted its own course and came up with its version of UNIX known as System V. BSD later came into the picture and was quick to edge out System V and from BSD, variants like NetBSD, OpenBSD and FreeBSD were spawned.

The inception of Linux

In 1990, Linus Torvalds, who’s popularly known as the father of Linux, further worked on UNIX and eventually came up with a viable Linux kernel that he dubbed Linux. The kernel opened doors to the realization of an operating system with utilities and other application programs, away from the proprietary UNIX system. Going forward, Linux was made opensource and free to use under the GNU/GPL license model. This made way for other distributions such as Slackware with a Linux kernel, GNU tools such as GCC compiler, X windows system ( The Graphical User Interface ), and other additional BSD components.

Nowadays, there are hundreds upon hundreds of Linux distributions that are listed in distrowatch according to popularity and usage. Among the most popular and widely used distributions are Ubuntu, Linux Mint, Fedora, CentOS, ArchLinux, and Manjaro.

Thus far, we have looked at a brief history of UNIX and how, through concerted efforts of many developers, it gave rise to Linux which is a free and opensource system. The question begs, What’s the difference between UNIX and Linux? What is in UNIX that’s not in Linux?

Let’s now shift gears and cast the spotlight on the differences between the two:

Linux vs UNIX

Let now check out the differences between the two operating systems.

For a start, Unix is an operating system that was initially developed in AT&T Bell lab. It’s from UNIX that Linux and its derivates are derived. Linux code was developed by Linux Torvalds in 1991 totally from scratch.

Linux is free to download and use. While some enterprise distributions such as RHEL require a paid subscription, most distros remain largely free and opensource. This is one attribute that has made it so popular and seen its widespread use among developers and software engineers. It majorly explains why we have a myriad of Linux distributions, each unique in its own way. UNIX, on the other hand, is largely proprietary and usually comes preinstalled in most hardware, a good example being macOS.

Additionally, while Linux is opensource, UNIX is not. You need a license from its manufacturers and even then, you don’t get to view, and modify the code or even redistribute it. With Linux, this is quite different. Linux is free and opensource and gives it’s users the freedom to modify the code and redistribute it without any limitations.

Due to its cost-effectiveness, Linux is more preferred to UNIX in data centres, cloud hosting platforms, and even for desktop use at homes or in the office. UNIX is proprietary and has been a reserve for special application servers and internet servers. Over time, the usage of UNIX had waned leaving Linux to take up the front seat in Cloud hosting platforms.

In terms of portability, Linux is very portable and can be installed in almost any hardware platform. You can install it on intel, AMD processor-based hardware, and even ARM devices such as Raspberry Pi. In sharp contrast, UNIX is available for installation on only a few platforms.

What about support?

Linux constitutes a wide community of vibrant opensource enthusiasts. Furthermore, you get tons of forums to provide support and guidance to Linux users. In UNIX, however, support is commercial, unlike Linux.

Conclusion

In this article, we shed light on the history of UNIX and how various efforts by developers led to the development of Linux as a free and opensource system. Lastly, we touched base on the differences between UNIX and Linux and fleshed out the nuances therein.

Linux reigns King in the Opensource circles with numerous distributions available for download and use at absolutely no cost. While still used in special platforms, the use and demand for UNIX are on a decline. This is mostly due to vendor lock-in and proprietary licenses.

The post Linux vs Unix – How is UNIX different from Linux appeared first on Unixmen.

What is UNIX used for? – Popular use cases

$
0
0

In our previous topic, we introduced the UNIX operating system and touched base on what it does and its quintessential components. Furthermore, we have compared UNIX to Linx and drawn comparisons between the two operating systems. Although not as widely used as it was decades ago, it still derives some use cases in a few circles. In this tutorial, we will look at the uses cases of UNIX.

UNIX flavors

Before we look at some of its use cases, it’s important that we familiarize ourselves with some of the UNIX systems.

1) Solaris

Built for Sun Microsystems that was later acquired by Oracle, Solaris is a proprietary UNIX system. It was initially released in 1992 and by then was known as SunOS. Later, it became known as Solaris after 1993. This gave rise to new versions of Solaris OS i.e., Solaris for Power PC, SPARC, and Intel platforms. In 2010, its name changed to Oracle Solaris after the acquisition of Sun by Oracle.

2) HP-UX

Short for Hewlett Packard UNIX, HP-UX was HP’s implementation of the UNIX system. HP-UX was first released in 1984 and was based on System V version 2 which was one of the earliest versions on UNIX written by developers in AT&T labs. HP-UX came preloaded on their computers.

3) IBM-AIX

Initially launched in 1986, IBM AIX is based on System V version 3 and BSD 4.3. The idea was to make it run on IBM machines. Nowadays, it supports a wide spectrum of hardware platforms including Apple Network Server, PowerPC -based systems and PS/2 personal computers.

4) A/UX

A/UX is Apple’s implementation of the UNIX system which was tailored for macintosh computers. Initially released in 1988, it ground to a halt in 1995.

5) IRIX

IRIS is a discontinued variant of UNIX that was written by Silicon Graphics (SG) intended to run on the company’s workstations and servers. Like A/UX, it was first released in 1988 but discontinued in 2006.

6) FreeBSD

This is a free ( non-proprietary ) and opensource UNIX flavor that descended from BSD branch of the original UNIX system. FreeBSD is compatible with modern processors such as amd64, Intel x86 processors. It is popular for its speed and stability. You can even run an X windows desktop such as XFCE and KDE.

It ships with additional packages that make it ideal for server-related functions. You can configure it to act as a web server, FTP server or even a mail server. Its latest release is November 4th 2019 at the time of writing this review.

7) OpenBSD

Developed by the OpenBSD project. OpenBSD is another free and opensource system with a major focus on security, portability and standardization. In fact, OpenBSD inspired the development of OpenSSH service which is a secure protocol that later replaced telnet.

8) NetBSD

Lastly, we have NetBSD. This was the earliest release from the BSD distribution and is still being actively developed with the latest release being in February 14th 2020. Like others, it’s free and opensource and is considered fast, stable, reliable and highly secure.

What is UNIX used for?

Although reasons for using UNIX are few today than they were back in the ’80s and ’90s, popular systems such as FreeBSD, NetBSD and Oracle Solaris are very much in use, especially in Enterprise environments. Now let’s dive in and see some of the uses cases:

1) Datacenter applications support

Way past its glory days, Solaris still underpins datacenter infrastructure and applications thanks to its robust ZFS filesystem. Moreover, it is still used in distributed scientific computing, virtual server deployments, databases and web servers. On the same note, FreeBSD powers high-end servers and other tasks that are invincible to a majority of ordinary end users.

2) Cloud support

Variants such as Solaris are compatible with contemporary Cloud infrastructure such as Oracle Cloud. This gives them the ability to power cloud applications is an efficient and secure manner.

3) Enhanced cloud security

Tailored for Cloud security compliance, you can bank on Solaris to provide the much-needed security for your Enterprise applications. Not left behind is FreeBSD which also guarantees robustness, scaling and high reliability.

4) Interoperability and ease of use

Modern UNIX distributions are lightweight and easy to install. The latest additional features allow users to easily troubleshoot errors in real-time enabling you to resolve faults in the fastest time possible.

Benefits of using UNIX

Here are some of the key advantages that UNIX systems ship with:

  1. UNIX systems are excellent in multitasking operations. They score highly in providing high performance and reliability.
  2. It’s portable and easy to install.
  3. Modern systems pack with an intuitive and user-friendly user interface that allows user to have an easy time during operation.
  4. Enhanced security with additional configurations to harden the servers and keep applications secure. This makes it ideal for use in datacenters.
  5. Impressive stability and robustness.

Wrapping up

Though not popular as it once was, UNIX is a system to reckon with in most enterprise circles to power high-end applications and other crucial enterprise platforms. For several decades the operating system has helped to power mission-critical Information Technology operations throughout the world. However, Linux has grown in leaps and bounds and usurped most of the functionalities of UNIX. This is mostly because it is free and opensource. The future of UNIX remains uncertain as more companies embrace Linux for their enterprise needs.

The post What is UNIX used for? – Popular use cases appeared first on Unixmen.

How to get wifi on Linux mint 19

$
0
0

Most modern Linux flavors such as Ubuntu and Mint come with out of the box support for several hardware components such as graphic drivers, and WiFi adapters. After installation, it’s usually quite a breeze using your WiFi connection as the system automatically installs the required WiFi driver. This is also true even when you are just running a live installation to test out the operating system before installing it on your hard drive. However, in some few cases, problems may occur and your WiFi functionality may not kick in as expected. Additional steps are required to setup Wifi on your system. In this tutorial, we will show you how you can get wifi on Linux Mint 19. Without much further ado, let us dive in.

How to resolve wireless connection issues on Mint 19

If you are pulling out your hair with frustration because you cannot get your WiFi connection to kick in, fret not. In this guide, we have outlined a number of solutions that you can apply to fix the issue. We recommend that you give each of these solutions a try until your WiFi problem goes away.

  1. Confirm that your Wireless adapter is properly installed.
  2. Update your Linux Mint kernel.
  3. Manually install WiFi Drivers.
  4. Use a USB Wi-Fi adapter.

Now, let’s take a look at each in turn.

1) Confirm that the WiFI adapter driver is properly installed

Ideally, this should be your starting point when troubleshooting your WiFi connection woes. To get started, connect your system to the internet using an ethernet cable / LAN cable.

Next, click on the menu button and select ‘Administration>Device manager

An authentication pop-up will appear on the screen requesting for your password. To authenticate, simply type in your password and click on the ‘Authenticate‘ button.

Authenticate-when-launching-device-manager
Device manager Linux Mint 19.3 Tricia

Wait for the cache update to complete. It may take quite a while but some patience will do.

updating-cache-on-driver-manager
updating cache

This ushers you to the driver Manager window where all the drivers are listed as shown below. Since our interest is in the WiFi drivers, ensure that your WiFi driver appears on the list and is selected. In our case, we are using a PC with Broadcom wireless adapter and the corresponding wireless driver vendor is Broadcom. Yours may be different. For example, in our case, we have RealTek wireless drivers instead of Broadcom.

Click on the radio button adjacent to the WiFi driver and click on ‘Apply changes‘.

select-wifi-dirver-linux-mint-19
select wifi driver in Linux Mint 19

Once you are done, exit the driver manager window and restart your system. Upon login, click on the Network symbol at the bottom of the screen and enable the wireless network. Then select the wireless network that you want to connect to from the list of wireless devices.

If this worked for you, well and good, but if it didn’t proceed to the next solution.

2. Update Linux Mint kernel

Another solution that has proven to fix missing WiFi drivers is updating your system’s kernel. As you may already know, the kernel is the core of the Linux system and it interfaces the Operating systems with the hardware components.

Updating the kernel comes with multiple advantages. The latest kernel improves your system’s stability, fortifies your system’s security by applying fixes to pre-existing security flaws and updates the system’s drivers to their latest versions. Additionally, the latest kernel ships with additional drivers for your system’s hardware.

If your Mint system cannot detect the Wifi adapter, updating the kernel comes highly recommended. But first, to check what kernel version you are using, run:

$ uname -r

To update the kernel, run the commands:

$ sudo apt update -y  && sudo apt upgrade -y
$ sudo apt dist-upgrade

Once the upgrade is over, reboot your system and once again verify the kernel version:

$ uname -r
check whether latest kernel version is installed
check Linux kernel version

Additionally, you can use the inxi command-line tool as shown

$ inxi | grep -i kernel

With the latest kernel installed, proceed and check whether you can use the Wi-Fi functionality to connect to any wireless network.

3. Manually installing drivers to get WiFi on Linux Mint

Another solution to this problem is to manually install WiFi drivers. Again, connect your PC to the internet using a LAN cable. For systems with RealTek adapters, begin by cloning the git repository as shown:

$ git clone https://github.com/abperiasamy/rtl8812AU_8821AU_linux.git

Then navigate into the cloned directory.

$ cd rtl8812AU_8821AU_linux

Compile from source.

$ make
$ sudo make install

Finally, reboot for the changes to take effect.

$ sudo reboot

For Broadcom wireless drivers, first update the system as shown before:

$ sudo apt update -y  &&  sudo apt upgrade

Thereafter, install the Broadcom drivers as shown:

 $ sudo apt-get install b43-fwcutter firmware-b43-installer 

Next, reboot your system and try connecting to nearby wireless networks. The above fix should solve your WiFi problems.

4. Use a USB WiFi adapter

If all attempts to get WiFi on Linux Mint are futile, you still have one bullet left – and that is using an external WiFi adapter. This is usually a USB adapter that can be no longer than your thumb. Some, however, do have an antenna but will still work the same by providing WiFi functionality.

Simply plug in the USB Wi-FI adapter and the kernel will search for WLAN drivers that will work with the adapter. In my case, I’m using a TP-Link USB WiFi adapter

Next, click on the Network icon on the taskbar as shown.

click-on-network-icon
click on the network icon Linux Mint

On the pull-up menu, enable the wireless functionality by turning on the toggle.

get-wifi-on-linux-mint
Turn on wireless functionality

Next, click on the ‘Network Settings’ options just below. This opens the window shown below with a list of available wireless networks.

Available-wireless-networks
Available Wi-Fi networks

I have my home wireless network called ‘Milky Way‘. To connect to it, I’ll click on it and provide the password for authentication.

Provide password for authentication
Provide a password for authentication

Click on the ‘Connect‘ button to establish a connection to your wireless connection as shown below.

get-wifi-on-Linux-mint

You can confirm that the driver has been installed by running the command:

$ lsusb | grep WLAN
Confirm-WLAN-WiFi-adapter

Conclusion

This concludes this topic on How to setup WiFi drivers on your Linux Mint system. You’ll rarely encounter this issue with Linux Mint 19 due to major kernel improvements which support a broad array of WiFi adapters. It’s recommended however to install the latest Mint – Linux Mint 20 codenamed Ulyana. It packs with all the major improvements and enhancements that guarantee you superb user experience.

The post How to get wifi on Linux mint 19 appeared first on Unixmen.


What is UNIX used for? – Popular use cases

$
0
0

In our previous topic, we introduced the UNIX operating system and touched base on what it does and its quintessential components. Furthermore, we have compared UNIX to Linx and drawn comparisons between the two operating systems. Although not as widely used as it was decades ago, it still derives some use cases in a few circles. In this tutorial, we will look at the uses cases of UNIX.

UNIX flavors

Before we look at some of its use cases, it’s important that we familiarize ourselves with some of the UNIX systems.

1) Solaris

Built for Sun Microsystems that was later acquired by Oracle, Solaris is a proprietary UNIX system. It was initially released in 1992 and by then was known as SunOS. Later, it became known as Solaris after 1993. This gave rise to new versions of Solaris OS i.e., Solaris for Power PC, SPARC, and Intel platforms. In 2010, its name changed to Oracle Solaris after the acquisition of Sun by Oracle.

2) HP-UX

Short for Hewlett Packard UNIX, HP-UX was HP’s implementation of the UNIX system. HP-UX was first released in 1984 and was based on System V version 2 which was one of the earliest versions on UNIX written by developers in AT&T labs. HP-UX came preloaded on their computers.

3) IBM-AIX

Initially launched in 1986, IBM AIX is based on System V version 3 and BSD 4.3. The idea was to make it run on IBM machines. Nowadays, it supports a wide spectrum of hardware platforms including Apple Network Server, PowerPC -based systems and PS/2 personal computers.

4) A/UX

A/UX is Apple’s implementation of the UNIX system which was tailored for macintosh computers. Initially released in 1988, it ground to a halt in 1995.

5) IRIX

IRIS is a discontinued variant of UNIX that was written by Silicon Graphics (SG) intended to run on the company’s workstations and servers. Like A/UX, it was first released in 1988 but discontinued in 2006.

6) FreeBSD

This is a free ( non-proprietary ) and opensource UNIX flavor that descended from BSD branch of the original UNIX system. FreeBSD is compatible with modern processors such as amd64, Intel x86 processors. It is popular for its speed and stability. You can even run an X windows desktop such as XFCE and KDE.

It ships with additional packages that make it ideal for server-related functions. You can configure it to act as a web server, FTP server or even a mail server. Its latest release is November 4th 2019 at the time of writing this review.

7) OpenBSD

Developed by the OpenBSD project. OpenBSD is another free and opensource system with a major focus on security, portability and standardization. In fact, OpenBSD inspired the development of OpenSSH service which is a secure protocol that later replaced telnet.

8) NetBSD

Lastly, we have NetBSD. This was the earliest release from the BSD distribution and is still being actively developed with the latest release being in February 14th 2020. Like others, it’s free and opensource and is considered fast, stable, reliable and highly secure.

What is UNIX used for?

Although reasons for using UNIX are few today than they were back in the ’80s and ’90s, popular systems such as FreeBSD, NetBSD and Oracle Solaris are very much in use, especially in Enterprise environments. Now let’s dive in and see some of the uses cases:

1) Datacenter applications support

Way past its glory days, Solaris still underpins datacenter infrastructure and applications thanks to its robust ZFS filesystem. Moreover, it is still used in distributed scientific computing, virtual server deployments, databases and web servers. On the same note, FreeBSD powers high-end servers and other tasks that are invincible to a majority of ordinary end users.

2) Cloud support

Variants such as Solaris are compatible with contemporary Cloud infrastructure such as Oracle Cloud. This gives them the ability to power cloud applications is an efficient and secure manner.

3) Enhanced cloud security

Tailored for Cloud security compliance, you can bank on Solaris to provide the much-needed security for your Enterprise applications. Not left behind is FreeBSD which also guarantees robustness, scaling and high reliability.

4) Interoperability and ease of use

Modern UNIX distributions are lightweight and easy to install. The latest additional features allow users to easily troubleshoot errors in real-time enabling you to resolve faults in the fastest time possible.

Benefits of using UNIX

Here are some of the key advantages that UNIX systems ship with:

  1. UNIX systems are excellent in multitasking operations. They score highly in providing high performance and reliability.
  2. It’s portable and easy to install.
  3. Modern systems pack with an intuitive and user-friendly user interface that allows user to have an easy time during operation.
  4. Enhanced security with additional configurations to harden the servers and keep applications secure. This makes it ideal for use in datacenters.
  5. Impressive stability and robustness.

Wrapping up

Though not popular as it once was, UNIX is a system to reckon with in most enterprise circles to power high-end applications and other crucial enterprise platforms. For several decades the operating system has helped to power mission-critical Information Technology operations throughout the world. However, Linux has grown in leaps and bounds and usurped most of the functionalities of UNIX. This is mostly because it is free and opensource. The future of UNIX remains uncertain as more companies embrace Linux for their enterprise needs.

The post What is UNIX used for? – Popular use cases appeared first on Unixmen.

Linux vs Unix – How is UNIX different from Linux

$
0
0

Linux and Unix are two terminologies that are interchangeably used to refer to the same Operating system. This is largely due to their striking similarities and few are not able to draw a distinction between the two. In the Linux vs Unix conundrum, there exists confusion on which system does what. If you are were born around the mid-’90s, chances are that you have only interacted with the Linux Operating system. Linux commands a huge market share in datacenter and cloud computing platforms. So ubiquitous is Linux that it underpins most smart devices such as smartphones, Android TVs and IoT devices.

While it’s true that Linux and Unix share a lot in common especially in terms of the file system hierarchy and terminal commands, we cannot ignore the differences that exist between these two systems. In this article, we will seek to understand both Unix and Linux in greater detail and flesh out the variations between the two.

To start off, Linux is a clone of Unix. It’s a Unix variant that has grown in leaps and bounds spawning hundreds of flavours or distributions. These are maintained by a vibrant community of developers. To better understand how we arrived where we are, let’s journey into the history of Unix. We will later look at the sequence of events that spawned the creation of Linux.

History of Unix

Unix dates back in the late 1960s in AT&T Bell labs where a team of ambitious developers led by Dennis Ritchie and Ken Thompson was seeking to develop a multi-user and multi-tasking system for a minicomputer known as PDP-7. At the time, Unix was a derivative of the Multics operating system (Multiplexed Information and Computing Service). This was a system that powered the Mainframe computers.

However, in the 1970s, the two lead developers became uncomfortable with the direction UNIX was taking. Frustrated with the scope and the direction of Multics, they decided to chart a different course and spin up a new operating system off Multics. Concerted efforts between Dennis Ritchie, who’s regarded as the father of C programming language, and Ken Thompson, the inventor of Go language, spawned a better system known as UNICS which later changed to UNIX. UNIX proved to be portable and could be installed and supported by many hardware architectures.

Unix grew rapidly in the ‘70s and ‘80s and become popular in academia. Among the institutions that adopted and changed the trajectory of Unix was the University of California in Berkley where engineers modified and developed UNIX further that gave rise to a new system known as BSD short for Berkeley Software Development. BSD shipped with several enhancements and new software applications which heralded a new era in operating systems. Meanwhile, AT&T charted its own course and came up with its version of UNIX known as System V. BSD later came into the picture and was quick to edge out System V and from BSD, variants like NetBSD, OpenBSD and FreeBSD were spawned.

The inception of Linux

In 1990, Linus Torvalds, who’s popularly known as the father of Linux, further worked on UNIX and eventually came up with a viable Linux kernel that he dubbed Linux. The kernel opened doors to the realization of an operating system with utilities and other application programs, away from the proprietary UNIX system. Going forward, Linux was made opensource and free to use under the GNU/GPL license model. This made way for other distributions such as Slackware with a Linux kernel, GNU tools such as GCC compiler, X windows system ( The Graphical User Interface ), and other additional BSD components.

Nowadays, there are hundreds upon hundreds of Linux distributions that are listed in distrowatch according to popularity and usage. Among the most popular and widely used distributions are Ubuntu, Linux Mint, Fedora, CentOS, ArchLinux, and Manjaro.

Thus far, we have looked at a brief history of UNIX and how, through concerted efforts of many developers, it gave rise to Linux which is a free and opensource system. The question begs, What’s the difference between UNIX and Linux? What is in UNIX that’s not in Linux?

Let’s now shift gears and cast the spotlight on the differences between the two:

Linux vs UNIX

Let now check out the differences between the two operating systems.

For a start, Unix is an operating system that was initially developed in AT&T Bell lab. It’s from UNIX that Linux and its derivates are derived. Linux code was developed by Linux Torvalds in 1991 totally from scratch.

Linux is free to download and use. While some enterprise distributions such as RHEL require a paid subscription, most distros remain largely free and opensource. This is one attribute that has made it so popular and seen its widespread use among developers and software engineers. It majorly explains why we have a myriad of Linux distributions, each unique in its own way. UNIX, on the other hand, is largely proprietary and usually comes preinstalled in most hardware, a good example being macOS.

Additionally, while Linux is opensource, UNIX is not. You need a license from its manufacturers and even then, you don’t get to view, and modify the code or even redistribute it. With Linux, this is quite different. Linux is free and opensource and gives it’s users the freedom to modify the code and redistribute it without any limitations.

Due to its cost-effectiveness, Linux is more preferred to UNIX in data centres, cloud hosting platforms, and even for desktop use at homes or in the office. UNIX is proprietary and has been a reserve for special application servers and internet servers. Over time, the usage of UNIX had waned leaving Linux to take up the front seat in Cloud hosting platforms.

In terms of portability, Linux is very portable and can be installed in almost any hardware platform. You can install it on intel, AMD processor-based hardware, and even ARM devices such as Raspberry Pi. In sharp contrast, UNIX is available for installation on only a few platforms.

What about support?

Linux constitutes a wide community of vibrant opensource enthusiasts. Furthermore, you get tons of forums to provide support and guidance to Linux users. In UNIX, however, support is commercial, unlike Linux.

Conclusion

In this article, we shed light on the history of UNIX and how various efforts by developers led to the development of Linux as a free and opensource system. Lastly, we touched base on the differences between UNIX and Linux and fleshed out the nuances therein.

Linux reigns King in the Opensource circles with numerous distributions available for download and use at absolutely no cost. While still used in special platforms, the use and demand for UNIX are on a decline. This is mostly due to vendor lock-in and proprietary licenses.

The post Linux vs Unix – How is UNIX different from Linux appeared first on Unixmen.

How to rename files in UNIX / Linux

$
0
0

As a UNIX user, one of the basic tasks that you will often find yourself performing is renaming files and folders. Renaming a file is quite elementary and really shouldn’t be an uphill task. You can rename a file or directory in UNIX from a terminal (CLI) or using third-party tools (GUI tools).
In this guide, we will discuss two command-line tools that you can use to rename files in UNIX.

Rename files in UNIX using the mv command

Short for ‘move’ the mv command is a command that is used primarily to move files and folder from one location to another. However, it can also be used to rename a file.

The syntax for renaming a file using the mv command is shown below:

 $ mv (option) filename1 filename2 

In the command above,

filename1
is the original file while
filename2
is the new name that the file will take. If the file to be renamed is not located in the current directory, be sure to specify the full path of the file.

Let’s take an example as shown in the command below:

$ mv  /home/sales.txt /home/marketing.txt

The command renames the file

sales.txt
located in the home directory to
marketing.txt

NOTE:

When the file is not located in the current folder, the complete file path to the file and the new file name should be specified. If the path of the file differs from the path of the new filename, the file will be moved to the new file path and later on renamed.

For example:

$ mv  /home/sales.txt /home/data/marketing.txt

In the above example, the

sales.txt
file is moved entirely from the home directory to the /home/data path and renamed
marketing.txt
.This is a cool way of killing two birds at the same time – moving and renaming files. However, if your sole goal is to rename the file, ensure the file paths in both instances match without any variations.

The mv command can be used with a variety of options. For example to print the verbose output of the command, use the

-v
option as shown.
$ mv -v  sales.txt marketing.txt
how to rename  file in Unix

Renaming a directory

Renaming a directory also follows the same syntax as renaming a file, i.e.

$ mv directory_name1 directory_name2

For example, to rename a directory called

python_docs
to
django_docs
in the current working space run the command:
$ mv python_docs django_docs
rename a directory in Linux

Rename files in UNIX using the rename command

So far we have looked at how to rename files and directories using the

mv
command. Quite a straightforward task right? However, a challenge presents itself when renaming multiple files and folders at a go. Things get a little tricky and in that case, you may be required to use some bash scripts or loops to achieve your goal. In that scenario, the
mv
command will not be of much help.

This is where the

rename
command comes in. The command comes in handy when renaming bulk. The command replaces the search expression contained in the file with another expression provided for by the user.

Installing rename

Modern Linux distributions ship with rename command by default. However, if you are running an older Linux distribution, here is how you to install it:

For Debian and Ubuntu systems, run the command:

$ sudo apt update
 $ sudo apt-get install rename 

For CentOS, Fedora and RHEL, execute:

 $ sudo dnf install prename 

Notice the ‘p’ that precedes the rename command. The ‘p’ stands for Perl.

For Arch / Manjaro systems run:

 $ sudo pacman -Syu perl-rename 

Using rename command

As earlier stated, the rename command is used for renaming a batch of files, more specifically changing the file extension of multiple files simultaneously.

To better demonstrate how the command works, we have 5 text files all with a ‘.txt’ file extension as shown.

show text files to be renamed

The following command is going to convert all the .txt files to .pdf files

$ rename 's/.txt/.pdf/' *.txt

You can confirm that the files have been renamed using the good-old

ls
command as shown. And true to your expectations, the file extensions will have been renamed.
rename a file in UNIX using rename command

Let’s break down the command:

‘s/…/…/’ – This is the substitution operator. The first argument is the search term and the second argument is the replacement.

.txt – This represents the search term. The rename command will scour for this pattern in all files in the directory and thereafter replace it with the second argument

.pdf – This is the replacement option that will replace the pattern in the first argument.

*.txt – The use of the wildcard symbol instructs the rename command to search for all instances with the pattern .txt

If you are not sure which files will be affected, you might need to perform a dry run before proceeding with the operation.

To achieve this, use the -n option as shown

 $ rename -n 's/.txt/.pdf/' *.txt 
perform a dry run before you rename a file in Unix

To view the verbose output as files are being renamed, use the -v option as shown.

$ rename -v 's/.txt/.pdf/' *.txt
rename command with verbose output

And this brings us to the end of this topic on how to rename files in UNIX. Renaming files is part of the basic commands that every Linux user should have at their fingertips. We hope that you can comfortably rename your files and directories without much of an issue. Give us a shout and let us know if you are having any difficulties.

The post How to rename files in UNIX / Linux appeared first on Unixmen.

How to List Installed Packages on Ubuntu Linux

$
0
0
ubuntu

How to List Installed Packages on Ubuntu Linux

If your preferred Linux distribution is Ubuntu or other Debian-based Linux distributions.  It is important to occasionally check your installed packages. 

What Are Packages in Ubuntu?

In Debian-based Linux distributions such as Ubuntu,  packages are pre-compiled archives containing software applications, libraries, and associated files. The package management system simplifies the installation, removal, and updating of software on your system.

Ubuntu employs a package management system to handle the installation, upgrading, configuration, and removal of software. Let’s explore how this works:

  1. Packages in Ubuntu usually have a `.deb` extension at the end. They are composed of metadata, related files and instructions to execute given functions or run software in the Ubuntu system. 
  2. Packages are stored in groups called repositories normally found online. The repositories are defined in the `/etc/apt/sources.list` file and the `/etc/apt/sources.list.d` directory in the Ubuntu system
  3. APT (Advanced Packaging Tool): this is a tool found in Ubuntu which is used to install new software, update already installed packages and update the list of packages. It is also used to update the whole Ubuntu system. 
  4. Dependencies: These are additional packages required for an installed package to work properly. These dependencies are installed automatically by the package management tools in Ubuntu together with the original package. 
  5. Binary Format: Packages come in binary format which enable for a quick installation because they are pre-compiled and therefore no need for additional software. 
  6. Graphical Interface: Ubuntu contains a user friendly graphical interface which makes it easy to use the package management system for new users.

Reasons Why You Might Want to List the Packages Installed on Your Ubuntu System:

  • Inventory: Listing packages can help maintain an inventory of installed packages and can help you understand what software is present on your system and identify potential conflicts or dependencies.
  • Troubleshooting: Listing packages can help with certain system issues. It can provide valuable information about the software environment and potential culprits.
  • System Management: If you need to duplicate or migrate a system’s software setup, having a list of installed packages can be invaluable  to ensure you don’t miss anything. 
  • Cleanup: Listing packages can also help you identify and remove unnecessary or unwanted software, freeing up disk space and reducing potential security risks.

How to List Installed Packages on Ubuntu

Ubuntu system has  several ways to view the list of installed packages on your system. Whether you’re a beginner or an experienced user, knowing how to check installed packages can be helpful for troubleshooting, system maintenance, or documentation purposes.

1. Using the Command Line

The command line is a powerful tool for managing packages on Ubuntu. Open a terminal and try the following commands:

a. Using ‘dpkg’

‘dpkg’ is a low-level package manager that directly interacts with the package database. To list all installed packages, run:

dpkg --list

This command will display a detailed list of installed packages, including their names, versions, and descriptions.

Why you should use ‘dpkg’

  • Provides Detailed Information: dpkg –list provides an extensive list of installed packages, including their versions and descriptions.
  • Low-Level Control: Directly interacts with the package database.

Disadvantages:

  •   Verbose Output: The output can be overwhelming for beginners.
  •   Not User-Friendly: Requires familiarity with package names and syntax.

b. Using apt

apt (Advanced Package Tool) is a higher-level package manager that makes package management easier. To list installed packages using apt, run:

apt list  --installed

This command will show a concise list of installed packages.

Advantages:

  • Concise Output: apt list –installed offers a more compact list.
  • Higher-Level Tool: Simplifies package management
  • User-Friendly: Easier for beginners.

Disadvantages:

  • Limited Details: Doesn’t provide as much information as dpkg.
  • Dependency on APT Repositories: Requires an active internet connection to fetch package data

2. Graphical Package Managers

Ubuntu also provides graphical tools for managing packages:

a. Ubuntu Software Center

The Ubuntu Software Center (or just ‘Software’ in recent versions) is a user-friendly interface for installing and managing software. Open it from the application menu, navigate to the “Installed” section, and explore the list of installed packages.

Advantages:

  •  User-Friendly Interface: Ideal for beginners.
  •  Visual Exploration: Allows browsing through installed packages.
  •  Additional Features: Can install and remove software directly. 

Disadvantages:

  • Limited Customization: Less control over filtering or sorting.
  • Resource-Intensive: May consume more system resources. 

b. Synaptic Package Manager

For more advanced users, Synaptic Package Manager offers a comprehensive view of installed packages. Install it using:

sudo apt install synaptic

Launch Synaptic, click on “Status” > “Installed,” and browse through the packages.

Advantages:

  •  Comprehensive View: Shows detailed package information.
  •  Advanced Features: Allows package pinning, history tracking, and more.
  •  Customizable Filters: Can narrow down the list based on criteria.

Disadvantages:

  • Steep Learning Curve: Not recommended for novices.
  • Outdated Interface: May feel less modern compared to other tools.

3. Generating a List File

You can create a text file containing the list of installed packages. This is useful for documentation or system backups. Run the following command:

generating list file using dpkg

This will save the list to a file named installed_packages.txt.

Advantages:

  •  Documentation: Creating a text file (installed_packages.txt) serves as a record.
  •  Backup and Migration: Useful for system backups or transferring to a new machine.

Disadvantages:

  •  Static Snapshot: The list becomes outdated as you install or remove packages.
  •  No Real-Time Updates: Doesn’t reflect changes made after generating the file.

4. Customizing the Output

If you want to filter the list based on specific criteria (e.g., only display packages related to development), consider using grep or other text-processing tools. For example:

customizing output using dpkg

This command will show installed packages related to development.

Advantages:

  • Focused Results: Use tools like grep to filter specific packages (e.g., development-related).
  • Tailored Information: Allows you to extract relevant details. 

Disadvantages:

  • Requires Additional Commands: Involves combining commands for specific queries.
  • Learning Curve: Understanding regular expressions and text manipulation.

Recommended Practices for Managing Packages

When you are working with packages on Ubuntu it is important to consider the following practices:

  1. Use Official Repositories: It is advised to use installation packages from official Ubuntu repositories so as not to compromise on security and stability of your system and to make sure they are compatible. 
  2. Keep System Updated: It is important to keep the system’s package lists and packages up-to-date so as to bring security fixes and improvements on functionality. 
  3. Remove Unused Packages: In order to free up disk space on your system, one should regularly review and remove Unused Packages. This also helps in reducing security risks in your system. 
  4. Document Package Changes: To ensure that it is easy to troubleshoot and restore your system, keep a record of when you install new packages, remove old ones and update existing ones.
  5. Backup Before Major Changes: It is important to create a backup for your system when making changes. This makes it easier to rollback on the updates when something goes wrong. 

In conclusion, knowing how to list installed packages is an essential skill for maintaining a healthy system in Ubuntu Linux. Whether you prefer the command line or graphical tools, explore the options listed in the article and find the method that suits your needs. 

External Links:

How to List Installed Packages on Ubuntu 20.04 in 2024

How to List Installed Packages on Ubuntu and Debian-based Linux Distributions

Internal Links

The post How to List Installed Packages on Ubuntu Linux appeared first on Unixmen.

How to Master Regex in Bash

$
0
0

What is a Regular Expression (Regex)?

The term Regex or in full –  regular expression, refers to a sequence of characters that form a particular search pattern. These expressions allow you to match, search, and manipulate text based on specific patterns. Regular expression is supported in many programming languages and tools, including Bash.  

Why Use Regex in Bash Scripts?

Using regex in your bash script has a number of benefits Such benefits include:

1. Text Search and Manipulation: Regex makes it easy to search for specific patterns in text data, enabling advanced text processing and manipulation.

2. Input Validation: You can use regex to validate user input or data formats, ensuring that your scripts work with correctly formatted data.

3. File Operations: Regex can help you filter, rename, or process files based on their names or contents.

4. String Manipulation: Bash’s inbuilt string manipulation tools can be combined with regex for powerful text processing capabilities.

Bash Regex – The Basic Syntax

Regex, which stands for regular expressions, can be used in conditionals and with commands like grep, sed, and awk in Bash scripting. The core linguistic structure of regex in Bash is similar to any other programming language, however it is important to remember that certain characters might require a punctuation line (\) before them.

YouTube Link: Regular Expressions (RegEx) Tutorial #2 – Simple RegEx Patterns

Here are Some of the Commonly Used Regex Elements in Bash:

– `.` matches any single character except a newline

– `\d` matches any digit character

– `\w` matches any word character (alphanumeric and underscore)

– `^` matches the start of a line

– `$` matches the end of a line

Here Are Some of The Commonly Used Regex Patterns

Some of the widely used regex patterns in Bash scripts include; 

– `^` matches lines starting with a hash symbol (comments in many programming languages)

– `^\s$` matches blank lines

– `\b\w+\b` matches whole words

– `\d{4}-\d{2}-\d{2}` matches dates in the format YYYY-MM-DD

– `\w+@\w+\.\w+` matches simple email addresses

How to Use Regex with Bash Commands

Regex in Bash is often used in combination with commands like `grep`, `sed`, and others. Here are some examples:

Regex with bash commands 'grep' and 'sed'

How to Use Regex for Character Classes

There are several character classes that allow you to match a specific set of characters. Here are some common character classes in Bash regex:

– `[abc]` matches any single character within the brackets

– `[^abc]` matches any single character not within the brackets

– `[a-z]` matches any lowercase letter

– `[A-Z]` matches any uppercase letter

– `[0-9]` matches any digit

Regex Quantifiers

Quantifiers specify how many times a pattern should be matched. Here are some common quantifiers in Bash regex:

– `?` matches the preceding element zero or one time

– “ matches the preceding element zero or more times

– `+` matches the preceding element one or more times

– `{n}` matches the preceding element exactly `n` times

– `{n,}` matches the preceding element at least `n` times

– `{n,m}` matches the preceding element between `n` and `m` times

Regex Grouping and Capturing

Characters such as parentheses `()` can be used to group patterns in regex. This allows you to apply quantifiers or perform capturing for later use. i.e.helps you to repeat or remember specific parts of the text you’re looking for.

Parentheses used in regex grouping and capturing.

Regex Lookarounds

Lookarounds allow you to match patterns based on the presence or absence of other patterns around them, without including those patterns in the match. Bash supports positive and negative lookaheads (`(?=pattern)` and `(?!pattern)`). Regex lookarounds are like secret agents checking the surroundings before making a move. In Bash, you can use them to see if certain patterns are nearby without actually grabbing them. It’s like peeking ahead and saying “okay, proceed” or “abort mission” without getting tangled up in the details.

Bash script, regex lookaround.

Regex Substitution and Replacement

Regular expressions in Bash aren’t just limited to matching and searching text, In simple terms, besides finding and searching for specific text, regular expressions in Bash can also help you swap and change text patterns. This is really useful when you need to make big changes to lots of text or tidy up messy data.

One popular tool for this in Bash is called ‘sed’ (Stream EDitor). It’s like a magic wand for replacing text using regular expressions. For example, you can use sed to swap out every instance of a certain word or phrase with a new one.

Bash script for swapping with sed command.

With ‘sed,’ you can do even more cool stuff by capturing parts of the text you find and using them in the new text you’re putting in. It’s like cutting out a piece of a picture and pasting it somewhere else. For example:

substituting using "sed" command.

In Bash, there’s another handy tool called the =~ operator that lets you use regular expressions to compare patterns in if statements and similar commands. It’s like having a special filter that helps you decide what to do based on how something looks or fits together.

Using =~ operator to compare patterns in if statements

Advanced Regex Techniques

Once you’ve mastered the basics of regex, there are some cool advanced techniques you can learn in Bash. These techniques give you even more power to manipulate and work with text in creative ways.

Negative Lookbehind

In addition to negative lookahead ((?!pattern)), Negative Lookbehind is another tool in Bash regex that’s pretty handy. It’s like checking behind a word to see if something specific isn’t there before deciding if it’s a match. This helps you exclude certain matches based on what comes before them in the text.

Using the negative look behind using 'grep' command.

Recursive Patterns

Bash supports recursive patterns, you can find patterns within patterns, kind of like finding smaller puzzles inside a bigger puzzle. This is really handy when dealing with data that’s organized in layers, like when you’re working with complex files or documents.

Recursive patterns in Bash scripts.

Regex Backreferences

Regex backreferences let you refer back to and reuse bits of text you’ve already found in your pattern. It’s like using a shortcut to repeat something you’ve already said. This can be handy for making sure your pattern matches all the right parts and stays consistent throughout.

Regex backreferences in Bash scripts

Regex Comments

In Bash, you can add comments within your regex patterns using the syntax (?#comment). It’s like leaving little reminders or explanations right inside your pattern, which can be really useful for keeping track of what each part of the pattern is doing, especially when it gets complicated.

Adding regex comments

Best Practices for Regex in Bash

When using regex in Bash scripts, it is important to consider the following practices that are considered industry’s standard. 

1. Test Your Regex: before using them in the scripts, the use of online regex testers or tools like `grep -E` to validate your regular expressions has to be done.

2. Use Comments and Documentation: Write clear explanations for your regex patterns, especially if they’re complex in nature. This helps you and others understand what each part does.

3. Escape Special Characters: Minimize the use of special characters in regex patterns to avoid unintended matches or errors. i.e. Don’t forget to put a backslash (\) before special characters in your regex. This prevents them from causing unexpected matches or errors.

4. Consider Performance: While regex is great, it can slow things down if you’re working with big data or complicated patterns. Try to make your regex efficient, and if it’s causing problems, think about other ways to do things.

5. Use Modular Design: Break your regex into smaller pieces or bits that you can reuse. This makes your code easier to understand and maintain.

6. Checking User Input: If you’re using regex to check what people type in, think about all the weird things they might try and give them helpful error messages if they get it wrong.

In short, learning how to use regex well in Bash gives you a powerful way to work with text, manipulate data, and check inputs in your scripts.

Internal Links:

External References:

Bash Regex: How to Use Regex in a Shell Script 

A Brief Introduction to Regular Expressions

The post How to Master Regex in Bash appeared first on Unixmen.

The Linux Command Line: A Tale of Two Tools – apt and apt-get

$
0
0
difference between apt and apt get
apt vs apt get

Regardless of your preferred Linux distribution, package management is an important function for every user interacting with the command line. Two similar tools that often come up in this context are ‘apt’ and ‘apt-get’. While they may seem interchangeable, they serve different purposes and have distinct features. This article will look into these two similar commands with very different functions. 

What is Package Management in Linux

Package management is the process of installing, updating, and removing software packages in an operating system. In Debian-based Linux distributions, such as Ubuntu, this is handled by the Debian Package Management System, which uses ‘.deb’ files to manage software packages. The system ensures that all software dependencies are met and that packages are installed correctly.

The Role of ‘dpkg’

At the centre of Debian’s package management system is ‘dpkg’, a low-level tool that directly interacts with .deb files. Its main task is to install and uninstall packages as well as giving information about the latter. However, handling of dependencies is not one of its tasks and is done by apt and apt-get. 

apt-get: The Traditional Tool

apt-get is a command-line tool that was introduced as a way to work with the package management system. It works directly with the package management system to provide the ability to perform the following functions: installing and uninstalling software in the system, updating already installed packages and upgrading the entire system. Apt-get is also tasked with automating tasks because it is known to be really stable and predictable. 

apt: A Modern Alternative

apt  on the other hand was added recently to Ubuntu’s package management tools and is designed to be easier to use by combining features from both apt-get and apt-cache. It has a simpler syntax and is equipped with features that make it more accessible like progress bars and colour-coded output.

What are the Difference Between at and apt-get?

While both ‘apt’ and ‘apt-get’ can be used to install, remove, and manage packages, there are some key differences:

  • User Interface: ‘apt’ offers a more modern and user-friendly interface compared to apt-get.
  • Output: ‘apt’ provides colour-coded output and progress bars, while apt-get has a more traditional, plain-text output.
  • Commands: ‘apt’ includes some additional commands that are not available in ‘apt-get’, such as list and search.
  • Scripting: ‘apt-get’ is much more suitable for scripting due to its stable output format.

Here are some of the similarities between apt and apt-get:

  1. Package Management Tools:
  • Both apt and apt-get are package management tools used in Debian-based Linux distributions.
  • They facilitate package installation, update, and removal.
  1. Common Commands:

Many of their options and commands are quite similar. For example: 

  • To install a package: 
sudo apt get install package name
sudo apt install package
  • To remove a package: 
sudo apt-get remove package
sudo apt remove package
  • Other common commands include purge, update, upgrade, and autoremove.
  1. Shared Features:
  • Both tools interact with the Debian Package Manager (dpkg) to install and manage packages.
  • They retrieve data and packages from trusted sources for installation, upgrade, and removal.
  1. Visual Differences:

When using apt instead of apt-get, you’ll notice some visual differences: 

  • apt provides a progress bar during package installations and removals, which is not available in apt-get.
  • Additionally, apt shows the number of upgradable packages when updating.

Example:

  • To install the synaptic package:
    • Using apt:
    • sudo apt install synaptic
    • Using apt-get:
    • sudo apt-get install synaptic
  • The progress bar is visible with apt, but not with apt-get.

YouTube Link: Apt vs. Apt-get: What’s the Difference | LinuxSimply 

What are some of the use cases for apt 

1. Updating Package Index (apt update)

The apt update command keeps your system up-to-date on the latest software by refreshing the list of available packages. It’s recommended to run this command regularly to ensure you’re aware of potential updates.

sudo apt update

2. Upgrading Installed Packages (apt upgrade)

It is important to keep your system up-to-date so as to improve it’s security and stability. By using the apt upgrade command, the installed packages can be updated to their latest versions. This results in improved performance and security. It also fixes bugs in the installed packages. 

sudo apt upgrade

3. Full Upgrading (apt full-upgrade)

The apt full-upgrade command goes beyond a simple upgrade. The command also removes packages which are no longer required in the system. It should be used carefully because it may lead to the removal of packages which the user may need in the future. 

sudo apt full upgrade

4. Installing Packages (apt install)

‘apt’ install is used to install new software to the system. The command plus the name of the package results in direct installation of the latter.

sudo apt install package

You can also install multiple packages at once:

sudo apt install package1 package2

5. Removing Packages (apt remove)

To uninstall a package, use the apt remove command:

For multiple packages:

sudo apt remove package1 package2

6. Removing Unused Packages (apt autoremove)

Over time, unused dependencies accumulate. The apt autoremove command removes unneeded packages that were installed as dependencies but are no longer required:

sudo apt autoremove

7. Searching for Packages (apt search)

The apt search command is used when searching for packages by the use of specific keywords 

apt search keyword

8. Cleaning Up (apt clean)

To free up disk space by removing downloaded package files, use:

sudo apt clean

Here Are Some of the Key apt-get Commands and Their Use Case

1. Update the Package Database:

It is vital to ensure that the package index is up to date before installing new packages to the system. This is done by running:

sudo apt-get update

This ensures that the system is aware of the latest available packages. 

2. Upgrade Installed Packages:

After updating the package database, upgrade all installed packages to their latest versions:

sudo apt get upgrade

To upgrade a specific package, use:

sudo apt-get upgrade package

3. Search for Dependencies and Perform Upgrades:

The following command is used to search for dependencies, install new packages, and remove old ones automatically. 

sudo apt-get dist-upgrade

You should be careful with dist-upgrade as it may remove some packages you still need.

4. Install New Packages:

To install a package, use:

sudo apt-get install package

Typing a few letters from the package name and pressing TAB will bring suggestions if you are not sure of the package name.

5. Remove Installed Packages:

In order to uninstall a package while keeping the configuration files, run the following command:

sudo-apt-get-remove-package

For a complete removal (including configuration files), use:

sudo-apt-get-purge package

6. Clean Your System:

Clear out local repository files to free up disk space:

sudo apt get clean

Remove package files that can no longer be downloaded:

sudo apt-get autoclean

Youtube Link: Stop Using APT 

Table comparing apt and apt get commands.

There is no doubt that both apt and apt-go have their strengths and weaknesses. If you’re looking for a reliable, and stable package manager, stick with apt. However, if you want better performance and are willing to explore a novel tool, give apt-go a try. 

External References: 

apt vs apt get. Difference Between Package Management.

How to Manage Packages in Ubuntu and Debian 

Internal Links: 

The post The Linux Command Line: A Tale of Two Tools – apt and apt-get appeared first on Unixmen.

A Guide on How to Master Bash If Else… Statements

$
0
0
Bash if else statements

Introduction

As someone who creates apps and occasionally uses Linux, it’s crucial to control how things operate, whether I’m writing applications, automating tasks, or writing scripts. This is where Bash if-else statements in Linux come in handy; they enable me to include intelligent decision-making into my scripts by adding logic to my scripts, helping me create smarter applications which result in better and more efficient software.

What are Bash If Else Statements?

In the world of programming, conditionals are statements that evaluate a given expression and execute different blocks of code based on whether the expression is true or false. Bash if else statements are a type of conditional that enables me to make decisions within my Bash scripts, providing the flexibility to handle various scenarios and respond accordingly.

Shell Scripting – If & If/else

The Anatomy of a Bash If Statement

Before diving into the syntax and examples, let’s dissect the structure of the basic if statement in Bash

Structure of if else statement.

Here’s what each part of the code means:

  • if: The keyword that introduces the conditional statement.
  • [ condition ]: The condition to evaluate, enclosed in square brackets. This can be a simple comparison, a command, or a compound expression.
  • then: The keyword that separates the condition from the code block to execute if the condition is true.
  • # Code to execute if condition is true: The commands or statements that will run if the condition is true.
  • else: The keyword that introduces the code block to execute if the condition is false (optional).
  • # Code to execute if condition is false: The commands or statements that will run if the condition is false (optional).
  • fi: The keyword that marks the end of the if statement.

Bash If Else: The Basic Syntax

Let’s dive into the basic syntax of Bash if else statements:

This is the simplest form of an if statement, where the code block after then will execute only if the specified condition is true.

I can also include an else clause to handle cases when the condition is false:

Else clause if condition is false

Additionally, I can chain multiple conditions using elif (else if) clauses:

Multiple conditions using elif (else if) clauses

Compound Conditions with Logical Operators

In many cases, I’ll need to evaluate more complex conditions involving multiple expressions. Bash provides logical operators like && (and), || (or), and ! (not) to combine and negate conditions.

Here’s an example that checks if a file exists and has a specific permission:

Checking if a file exists us if else statements.

In this example, the -f and -r tests check for the existence and readability of the file, respectively. The && operator ensures that both conditions must be true for the then block to execute.

Case Statement: A Powerful Alternative

While if else statements are versatile, Bash also offers the case statement, which can be a more concise and readable alternative when dealing with multiple conditions. The case statement evaluates an expression and executes the associated code block based on the matching pattern.

Using dase statements

Here’s an example that uses a case statement to handle user input:

Real-world Examples of Bash If Else

Now that we have gone through the basics, let’s explore some real-world examples of using Bash if else statements:

File Existence Check

One common use case for if else statements is checking if a file or directory exists before performing an operation:

Checking if a file exists using if else statement.

User Input Validation

Bash scripts often require user input, and if else statements can help validate and handle different input scenarios:

User input validation in Bash using if else statements.

System Resource Monitoring

If else statements can be used to monitor system resources and take appropriate actions based on predefined thresholds:

Monitor system resource on Bash using if Else

Best Practices for Using Bash If Else

While these statements can be powerful and versatile, it’s essential to follow best practices to ensure your scripts are maintainable, readable, and efficient:

  1. Quote Variables: Always quote variables to avoid word splitting and globing issues.
  2. Use Descriptive Conditions: Write clear and descriptive conditions to enhance code readability.
  3. Avoid Unnecessary Complexity: Keep your if else statements as simple as possible, and consider using case statements for complex branching scenarios.
  4. Indent Properly: Proper indentation makes your code more readable and easier to follow.
  5. Error Handling: Implement error handling mechanisms to gracefully handle unexpected scenarios.
  6. Comments: Use comments to explain the purpose and logic behind your if else statements, especially for complex conditions.
  7. Validate User Input: Always validate user input to prevent unexpected behavior and security vulnerabilities.

For anyone developing Bash scripts or using Linux, knowing how to utilize if-else statements in Bash is essential. By learning the syntax, logical operators, and some clever methods to employ them, you can generate more powerful and intelligent scripts that can cope with a variety of circumstances and make decisions based on specific conditions.

Related Articles

Bash Scripting: If Statements 

If else statement in Bash

More Articles from Unixmen

Arguments in Bash

Bash Scripting: Statements and Variables

While Loops in Bash

Master Regex in Bash

The post A Guide on How to Master Bash If Else… Statements appeared first on Unixmen.


Distrobox: Manage Your Linux Distros Like a Pro

$
0
0
distrobox

Introduction

Are you are a Linux user with multiple distributions but hates the hassle of constantly setting up new environments? Say hello to Distrobox, your solution for managing multiple Linux distros effortlessly. This tool allows you to interact with Linux instances with simple commands, changing the way users experience Linux.

What is Distrobox?

Distrobox is a powerful utility that leverages containerization to streamline the process of running Linux distributions alongside your primary OS. With Distrobox, you can create isolated, disposable environments for each distribution, ensuring a clean and consistent experience every time.

Key Features of Distrobox

  1. Effortless Distro Management: Create, use, and dispose of Linux distributions with simple commands.
  2. Isolated Environments: Each distro instance runs in an isolated container, ensuring that your primary system remains unaffected.
  3. Seamless Integration: Distrobox seamlessly integrates with your host system, providing access to your files, directories, and desktop environment.
  4. Lightweight and Efficient: Leveraging containerization technologies, Distrobox offers a lightweight and efficient solution minimizing system resource overhead.
  5. Cross-Platform Compatibility: Distrobox is compatible with various Linux distributions.

Getting Started with Distrobox

Installing Distrobox

First, before diving into Distrobox, ensure that your system meets the necessary requirements. The open source project relies on containerization technologies like Docker or Podman, as prerequisites.

Once installed and running, you can install Distrobox using your distribution’s package manager. Alternatively you can follow the instructions in the official repository.

Creating a New Distro Instance

Creating a new distro instance with Distrobox is as simple as running a single command. For example, to create an instance of Ubuntu 22.04, you can run:

distrobox create --image ubuntu:22.04 --name ubuntu-2204

This command will download the necessary components and create a new Ubuntu 22.04 instance named “ubuntu-2204”.

Entering and Exiting Distro Instances

To enter your newly created distro instance, simply run:

distrobox enter --name ubuntu-2204

This will launch a new terminal session within the Ubuntu 22.04 environment. From here, you can interact with the distro as you would with any other Linux system, installing packages, running applications, and more.

To exit the distro instance and return to your host system, simply type exit in the terminal.

Advanced Usage

While the basic functionality of Distrobox is incredibly straightforward, it offers a wealth of advanced features and customization options for power users.

Managing Distro Instances

Distrobox provides a range of commands for managing your distro instances, including listing, stopping, and deleting instances. For example, to list all available instances, you can run:

distrobox list

To stop or delete an instance, use the following commands:

distrobox stop --name ubuntu-2204

distrobox delete --name ubuntu-2204

Sharing Files and Directories

One of the key advantages of Distrobox is its ability to seamlessly share files and directories between your host system and distro instances. By default, Distrobox shares your home directory, allowing you to access your files from within the distro instance.

However, you can also selectively share additional directories or files using the –share option when creating or entering an instance:

distrobox create --image ubuntu:22.04 --name ubuntu-2204 --share /path/to/directory

Integrating with Your Desktop Environment

Distrobox offers excellent integration with popular desktop environments like GNOME, KDE, and others. This integration allows you to launch applications from your distro instances directly from your host system’s desktop, providing a seamless and unified experience.

To enable desktop integration, you can use the –desktop option when entering an instance:

distrobox enter --name ubuntu-2204 --desktop

This configures the necessary components to ensure that applications launched from the distro instance work within your host environment.

Why Use Distrobox?

The open source software offers numerous benefits that make it an attractive choice for Linux enthusiasts and developers alike:

  1. Distro Exploration: With Distrobox, you can easily try out different Linux distributions without the need for dual-booting or virtual machines. This allows the user to explore and find their perfect distro.
  2. Isolated Development Environments: Developers can create isolated environments for each project, ensuring that dependencies and configurations don’t conflict with other projects or their host system.
  3. Reproducible Setups: By encapsulating entire distro instances, Distrobox enables reproducible and consistent setups. This makes it easier to collaborate with others or replicate specific environments.
  4. Resource Efficiency: Compared to traditional virtual machines, Distrobox offers a lightweight and efficient solution. This minimizes the overhead on your system’s resources.
  5. Simplified Cleanup: When you’re done with a distro instance, simply delete it, and all associated files and configurations are automatically removed, keeping your system clean and organized.

Distrobox vs. Virtual Machines

While virtual machines have been a popular solution for running multiple operating systems on a single host, Distrobox offers several advantages over traditional virtualization:

  1. Lightweight and Efficient: Distrobox leverages containerization technologies, which are generally more lightweight and efficient than full-blown virtual machines, resulting in lower resource overhead.
  2. Seamless Integration: Distrobox seamlessly integrates with your host system, allowing for easy file sharing, desktop integration, and a consistent user experience.
  3. Faster Setup and Teardown: Creating, starting, and stopping distro instances with Distrobox is significantly faster compared to virtual machines. This allows a more agile and streamlined workflow.
  4. Simplified Management: Distrobox provides a simple and intuitive command-line interface for managing distro instances, making it easier to create, use, and dispose of environments as needed.

However, it’s important to note that virtual machines still have their place, particularly when running applications or services that require direct access to hardware resources or specific system configurations that containerization cannot provide.

Community and Support

Distrobox is an open-source project with an active and growing community. The official repository on GitHub is the central hub for accessing the latest updates, reporting issues, and contributing to the project.

Additionally, there are various forums and communities you can seek help, share tips, and engage with other users and contributors.

To summarize Distrobox is a game-changer for Linux enthusiasts and developers who wan an efficient and easy to use distro manager. Its simple yet powerful approach to containerization streamlines the process of managing distro instances.

Related Articles

Distrobox: Try Multiple Linux Distributions via the Terminal

Declaring your own personal distro boxes 

Related Articles from Unixmen

Void Linux: A Review of a Fast and Lightweight Distro

The Simple, Fast, And Lightweight Linux Distro for Beginners

Best Linux Distros for Small Businesses

Which is the Best Linux Distros for Students?

The post Distrobox: Manage Your Linux Distros Like a Pro appeared first on Unixmen.

LSOF: How to List Open Files in Unix Systems

$
0
0
lsof command

What is LSOF?

The LSOF command, which stands for “LiSt Open Files,” is a powerful command-line utility available on Unix and Unix-like operating systems. It provides a comprehensive view of all open files and the processes that have opened them. In Unix systems, “everything is a file,” including regular files, directories, network sockets, pipes, and devices. LSOF allows you to peek into these open files, offering invaluable insights for system administrators, developers, and power users.

Why Use LSOF?

LSOF is an indispensable tool for several reasons:

  1. Used for troubleshooting: lsof can identify processes holding files or ports open. This can assist with your troubleshooting needs. 
  2. For security analysis: You can use the lsof command to detect unauthorized access or suspicious file activities. 
  3. To monitor your system. If you want to track file and network usage in real-time, you should use lsof. 
  4. To optimize your system performance: The lsof command can help you identify resource-intensive processes. 
  5. Debugging: Locate files that applications are accessing. 

Understanding and utilizing lsof can significantly enhance your ability to manage and optimize Unix systems.

Basic Syntax and Usage

The basic syntax of lsof is straightforward:

lsof [options] [names]

When run without any options, lsof lists all open files for all active processes. However, this can produce an overwhelming amount of information. Therefore, it’s often more useful to apply filters and options to narrow down the results.

Here are some basic examples:

  1. List all open files:
    lsof

  2. List files opened by a specific user:
    lsof -u username

  3. List files opened by a specific process ID:
    lsof -p PID

  4. List files opened in a specific directory:
    lsof +D /path/to/directory

What are Some of the Common LSOF Commands

  1. List all network connections:
    lsof -i

  2. Find who’s using a specific port:
    lsof -i :port_number

  3. List all IPv4 network files:
    lsof -i 4

  4. List all IPv6 network files:
    lsof -i 6

  5. List all open files in a specific filesystem:
    lsof /home

These commands demonstrate the versatility of lsof in various scenarios, from network troubleshooting to file system analysis.

What are the Advanced LSOF Techniques

  1. For continuous monitoring with:
    lsof -r 5

    This command will repeat the command listing every 5 seconds.
  1. Combining multiple options:

    lsof -u username -i TCP

    This lists all TCP connections opened by a specific user.
  2. Using the command along with grep for specific searches:

    lsof | grep '/home/user'

    This filters the command’s output to show only files in the /home/user directory.
  3. Finding deleted but still open files:

    lsof +L1

    This can be crucial for freeing up disk space.
  4. Listing files open by defunct processes:

    lsof -X

    Useful for identifying and cleaning up zombie processes.

Using the Command for Troubleshooting

LSOF is an excellent troubleshooting tool. Here are some common scenarios:

  1. Identifying why a file can’t be deleted:

    lsof /path/to/file

    This shows which process is keeping the file open.
  2. Finding processes listening on a specific port:

    lsof -i :80

    Useful for diagnosing web server issues.
  3. Checking for network issues:

    lsof -i TCP:http<br />
    This lists all processes using HTTP over TCP.
  4. Investigating high disk I/O:
    lsof -r 5 /

    This repeatedly lists open files, helping identify processes with high disk activity.

Alternatives to LSOF

There is no doubt that this is a powerful command, however there are other tools that can provide an alternate solution while providing the same functionality. 

  1. Fuser: This command is used to identify processes that are using files or sockets
  2. netstat:This command shows all the network connections. However it has phased in newer versions in favor of ss)
  3. ss: This is another command used for investigating sockets
  4. ps: This command is used to show  process-related information
  5. strace: This command traces system calls and signals

Each of these commands has its strengths and weaknesses and a skilled unix user often employs them in combination with lsof for comprehensive system analysis.

Best Practices and Security Considerations

To get the best experience out of the command. You can follow this industry’s best practices and recommendations. 

  1. Regular auditing: It is recommended to use the command as part of your regular system audits to detect unusual file or network activity.
  2. Bash Scripting: You can incorporate the command into your monitoring scripts to perform automated system checks.
  3. Administrator Permission:When using lsof it is important to remember that this unix command requires root privileges to see all information. It is recommended to sudo when necessary.
  4. Performance impact: While generally lightweight, lsof can be resource-intensive on very busy systems. It is crucial to use this sparingly.
  5. Output management: When operating large systems, you should consider piping lsof output to files for later analysis.
  6. Stay updated: You should keep your version up-to-date to benefit from the latest features and security patches.

In summation, LSOF is a versatile and powerful tool that provides deep insights into the workings of Unix systems. By mastering the command unix system administrators and linux users can more effectively monitor, troubleshoot, and optimize their systems. Whether you’re tracking down a stubborn process, investigating network issues, or performing security audits, there is no doubt that the is an invaluable addition to your toolkit.

It is recommended to effectively use lsof lies in understanding its various options and how to combine them to extract the specific information you need. With practice, this command can become one of your most frequently used and valuable command-line utilities.

Related Articles

How to use the lsof command to troubleshoot Linux

How to List Open Files in Linux

More Articles from Unixmen


The post LSOF: How to List Open Files in Unix Systems appeared first on Unixmen.

Git Amend Commit Message: Fixing Your Last Commit

$
0
0
git amend

Have you ever made a typo or written a completely wrong message on your last commit? Well don’t worry you can quickly fix this using the Git amend option. 

What is Git Amend?

So what exactly is Git Amend? Git amend is a powerful feature in Git that allows you to modify your last commit. It’s particularly useful for fixing typos in commit messages, adding forgotten files, or making small changes to your most recent commit. The ‘git commit –amend’ command is the primary tool for this operation, enabling you to rewrite Git history without having to create a new commit.

Why Should You Amend Commit Messages?

The main reason to amend commit messages is to  maintain a clean, informative Git history. It is crucial for these reason; 

  1. Clarity: Clear commit messages help team members understand changes quickly.
  2. Consistency: It ensures your commit history follows project conventions.
  3. Professionalism: Well-written commits reflect positively on you and your team.
  4. Searchability: Accurate messages make it easier to find specific changes later.

How to Amend a Commit Message

Amending your last commit message is pretty, just  follow these steps:

  1. Ensure you’re on the correct branch:

    git branch

  2. Use the amend command:

    git commit --amend

  3. Your default text editor will open. Edit the commit message as needed.
  4. Save and close the editor.
  5. The commit message is now updated.

For a one-line change, you can use:

git commit --amend -m "Your new commit message"

Follow these Best Practices to Amend Commits

  1. It is important to only amend unpushed commits: This is because amending pushed commits can cause conflicts for others. 
  2. You should be descriptive but concise. It recommended that you aim for a 50-character subject line followed by a blank line and a longer description if needed.
  3. While you don’t have to be grammatically correct. It is recommended to use the imperative mood. Write “Fix bug” instead of “Fixed bug” or “Fixes bug”.
  4. You should use a separate subject from the body with a blank line: This improves the readability of the messages in various Git tools.
  5. Use the body to explain the what and why, not the how: Code shows how a change was made; commit messages should explain why.

Common Errors and Mistakes: How to Avoid Them

If you are a newbie in Git you are bound to make some mistakes even while trying to fix those mistakes. Some of the common ones include: 

  • Amending already pushed commits. Yeah If you’ve already pushed the commit, you are better off  creating a new commit instead of amending one.
  • Losing track of your changes. When you are making a lot of changes, you are bound to forget them. Therefore it is important to always stage your changes before amending to include them in the commit.
  • Amending the wrong commit. It is crucial to ensure that you’re making the commit on the right. You should always double-check you’re on the right branch and commit before amending.
  • Forgetting to edit the message: If you only want to change the message, you shouldn’t stage any files before amending.

Advanced Git Amend Techniques

Here are some of the advanced techniques used alongside git amend. 

  1. Amending author information:

    git commit --amend --author="John Doe &lt;john@example.com&gt;"

  2. Changing commit date:

    git commit --amend --date="Wed, 22 Jun 2022 14:30:00 +0300"

  3. Amending without changing the commit message:

    git commit --amend --no-edit

  4. Adding files to the last commit:

    git add forgotten_file.txt

What are Some of the Alternatives to Git Amend

While git amend is powerful, sometimes you need alternatives: Here are some of the alternative to git — amend

  1. git rebase -i
    : This is used for changing multiple commits or reordering them.
  2. git reset
    : To undo commits entirely.
  3. git revert
    : Used for creating a new commit that undoes previous changes.
  4. Creating a new commit: When you’ve already pushed and want to preserve history.

Using Git Amend in Team Workflows

When working in a team, you should consider the following to ensure smooth collaboration:

  1. Communication: It is important to always inform your team that you’re amending shared commits.
  2. Using feature branches: When working with a team, you can amend freely on your own branches before merging.
  3. Establish clear guidelines: Create team rules for when and how to use git amend.
  4. Used for Code review: Amend is used to address review comments before merging in  a collaboration setting. .

Why Does This Matter?

Git is the go to software for collaborating with other developers. Therefore, understanding and correctly using git amend is crucial for maintaining a clean, professional Git history. It allows you to present your work in the best possible light, making it easier for you and your team to understand changes over time. A well-maintained Git history is not just about aesthetics; it’s a valuable tool for debugging, code reviews, and the overall project management.

How Can You Actually Use This?

  1. Daily workflow: Make it a habit to review your commit message before pushing. If you spot a typo or want to improve clarity, use git amend.
  2. Code reviews: When a reviewer suggests changes to your commit, use git amend to incorporate their feedback without creating multiple small commits.
  3. Project cleanup: Before merging a feature branch, use git amend to ensure all commit messages are clear and follow project conventions.
  4. Documentation: If you realize you’ve left out important information in a commit message, use git amend to add it, improving your project’s documentation.

Remember, while git amend is a powerful tool, it should be used judiciously, especially in a collaboration setting or on shared repositories. Always consider the impact on your team’s workflow before amending pushed commits.

By mastering git amend, you’ll contribute to a more readable and maintainable codebase, making life easier for yourself and your fellow developers.

Related Articles

How to Modify Existing Unpushed Commit Messages?

How To Edit Your Commits with `git commit –amend`

More Articles from Unixmen

The post Git Amend Commit Message: Fixing Your Last Commit appeared first on Unixmen.

LS Command: Listing Files in Unix Systems

$
0
0
linux ls command

What is the LS Command?

If you occasionally use Linux and Unix based operating systems, you have probably used the ‘ls’ command. The ‘ls’ command, is one of the most fundamental and frequently used commands in Unix and Unix-like operating systems. It’s primarily used to list files and directories in a system. However, its capabilities extend far beyond simple listing, offering a wealth of options to display file information in various formats, sort output, and filter results.

Basic Syntax and Usage

The basic syntax of the ls command is pretty straightforward:

ls [options] [file/directory]

When used without any options or arguments, ls will list the contents of the current directory:

ls

To list the contents of a specific directory:

ls /path/to/directory

Here are Some of Common Options using the ls Command

The ls command becomes truly powerful when combined with various options. Here are some of the most commonly used ones:

  1. List all files, including hidden ones:
    ls -a

  2. List in long format, showing detailed information:
    ls -l

  3. List files with human-readable sizes:
    ls -lh

  4. Sort files by modification time, newest first:
    ls -lt

  5. Reverse the order of the sort:
    ls -lr

  6. Recursively list subdirectories:
    ls -R

These options can be combined. For example, to list all files in long format with human-readable sizes:

ls -lah

Some Advanced Techniques Using the ls Command

  1. List only directories:
    ls -d */

  2. List files sorted by size, largest first:
    ls -lS

  3. List files and append file type indicators:
    ls -F

  4. List inode number of files:
    ls -i

  5. List files with color-coded output:
    ls --color=auto

  6. List files in a single column:
    ls -1

How to Customize the LS Output

The ls command offers various ways to customize its output:

  1. Use time of last access instead of last modification:
    ls -lu

  2. Print the allocated size of each file in blocks:
    ls -s

  3. List entries by columns:
    ls -C

  4. Display a slash after each directory:
    ls -p

  5. Sort files by extension:
    ls -X

Integrating the LS Command in Scripts

The ls command is often used in shell scripts for file manipulation and system administration tasks. Here are a few examples:

Looping through files in a directory

looping through files ls

Counting files in a directory

ls counting files

Finding the largest file in a directory

ls largest file

Alternatives to LS

While list command is the standard command for listing files, there are alternatives that offer additional features:

  1. tree: Displays directory contents in a tree-like format
  2. exa: A modern replacement for ls with color schemes and Git integration
  3. lsd: Another ls alternative with colorful output and icons
  4. find: More powerful for searching and listing files based on various criteria

Best Practices and Tips

  1. Aliasing: Create aliases for commonly used ls commands. For example:

    alias ll='ls -lah'

  2. Use
    ls -ltr
    for troubleshooting: This lists files in long format, sorted by modification time in reverse order, helping you quickly identify recently modified files.
  3. Combine with grep: You can use the list command in combination with grep to filter results:

    ls -l | grep "^d"&nbsp; # Lists only directories

  4. Be cautious with wildcards: When using the list command with wildcards, be aware of hidden files and use quotes to prevent shell expansion if necessary.
  5. Use
     ls -Z
    on SELinux systems: This shows security context information for files.
  6. Remember file permissions: When listing files in directories you don’t own, you might not see all files due to permission restrictions.

Why Does This Matter?

Mastering the list command is crucial for anyone working with Unix-like systems. It’s not just about listing files; it’s about efficiently gathering information about your file system. Whether you’re a system administrator managing servers, a developer organizing project files, or a data scientist handling large datasets, proficiency with ls can significantly boost your productivity.

How Can You Actually Use This?

  1. System Administration: You can use the list command to quickly check file permissions, ownership, and modification times during security audits or troubleshooting.
  2. Development Workflows: Organize your project files more effectively by using the list command to sort and filter files based on various criteria.
  3. Data Management: You can handle large datasets by using the list command to identify file sizes, types, and creation dates.
  4. Scripting and Automation: You can also incorporate the list command into your shell scripts to automate file management tasks and system maintenance.
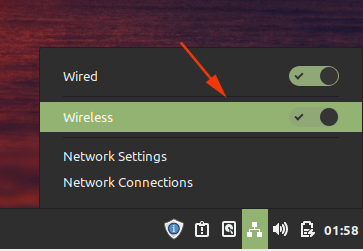
Remember, the power of list command = lies in its versatility. By combining different options and using it in conjunction with other commands, you can extract precisely the information you need about your file system quickly and efficiently.

Related Articles

The Linux LS Command – How to List Files in a Directory + …

Ls Command in Linux: Listing Files & Directories | Linode Docs

More Articles from Unixmen

The post LS Command: Listing Files in Unix Systems appeared first on Unixmen.

RHEL 8: RedHat’s Flagship OS for Enterprises

$
0
0
rhel 8

RHEL 8 (RedHat Enterprise Linux series 8) is one of the most expected and celebrated series of operating system versions in the tech community. With the launch of RedHat’s series 8 operating system, RedHat offered enhanced reliability, performance, security, and deployment to organizations. In this article, let us learn if RHEL 8 is an ideal choice for your needs and the features that set RedHat Enterprise Linux series 8 apart.

The Launch

RedHat Enterprise Linux 8 was officially rolled out in the month of May 2019 after much expectations from large organizations and the tech community. The final GA version in the RedHat Enterprise Linux 8 series is RHEL 8.10. The 8 series of RHEL OS came with numerous enhancements in the already superior security and performance.

What’s New with RedHat Enterprise Linux 8?

Security – The Top Most Priority

The Payment Card Industry Data Security Standard version 4.0 demanded more security enhancements in all operating systems. RHEL, in its 8.10 version, rolled out the SCAP security guide version 0.17.2 that complies with the required security standards. Adding to this, the Linux kernel cryptographic API version 1.4.0 has been made available to further boost data security.
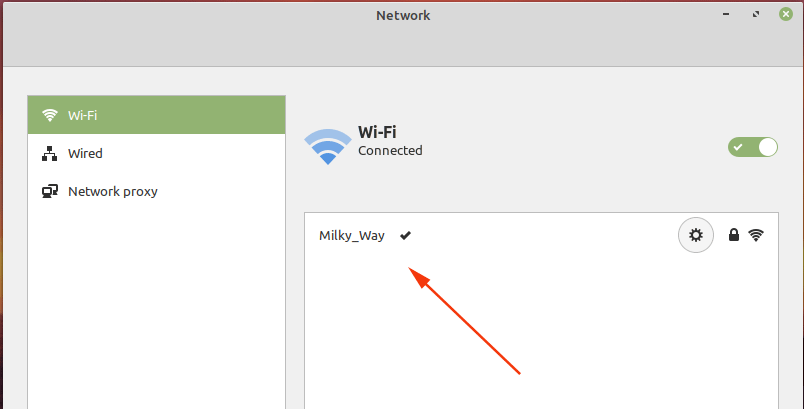
More Developer Friendly

The RedHat Enterprise Linux 8 series of operating systems comes bundled with updated versions of databases and programming languages making the life of administrators and developers easier. Parts of the package include Nginx 1.2.4, PostgreSQL 16, Ruby 3.3, Python 3.12 (Python 3 and above being the minimum requirement for many applications now), and MariaDB 10.11. These updates aid developers and administrators with the latest tools and frameworks to build faster, scalable, secure, and efficient applications.

Seamless Migration to RHEL

RHEL is always concerned about migration from other distributions of Linux (distros in short). RHEL 8 comes with support to move to the RedHat Enterprise Linux 8 series either from its own RHEL 7.9 and also other distros. For RHEL 7.9, RHEL 8.10 release offers in-place upgrades to make the migration smooth across architectures. For systems migrating from other distros like CentOS (approaching EOL at the time of publishing this article), AlmaLinux, and Oracle Linux, RHEL’s 8.10 version makes the migration easier with its Convert2RHEL util (utility).

OpenSSL Tunnel Upgrade

With the latest RHEL 8.10 version, RedHat included updates to the TLS/SSL tunneling service and OpenSSL TLS toolkit to improve protection against cryptographic attacks. These improvements are a major leap to secure communications and confidential data.

Sufficient Support Phase

The RHEL 8.10 version is the end of the RedHat Enterprise Linux 8 series of operating system versions. RHEL 8.10 has entered the maintenance support phase until May 2029 providing ample time for users to migrate to the latest and more advanced RHEL 9 series. In this maintenance support phase, RedHat Enterprise Linux 8 series will still get security updates and critical bug fixes but only the RHEL 9 series will get new features.

Is RHEL 8 the best fit for you?

Is Performance the Deciding Factor?

The entire RHEL series of operating systems are known for their performance and stability making it a popular choice for organizations where 100% availability and reliability are the primary requirements. RHEL 8 is a proven time tested series of operating systems that can tackle any demanding workload.

Is Security the Deciding Factor?

As discussed in detail above, RedHat Enterprise Linux 8 comes with advanced cryptographic tools and security enhancements since RedHat emphasizes more on security as most of their user base falls under the enterprise category handling sensitive data. In addition to the existing security tools, RedHat Enterprise Linux 8 will continue to get all security patches and critical bug fixes for a long time.

Is Compatibility the Deciding Factor?

RedHat Enterprise Linux 8 supports most of the modern applications, cloud environments, and also containers. RedHat being one of the major players in innovating scalable work environments like OpenShift, RHEL 8 was also optimized for compatibility with latest development tools and frameworks.

Is Future Support the Deciding Factor?

RedHat Enterprise Linux 8 came with a 10 year support lifecycle which means until May 2029 the operating system will get all support patches and critical bug fixes. This gives enough time to enjoy RedHat Enterprise Linux 8 and also to plan for RHEL 9 migration.

How to Install RHEL 8?

There are two approaches to install RHEL operating systems in general. Deploying an operating system on one device is a different process than deploying it on an organization scale. For a single device, it is as easy as downloading the ISO image and following the installation wizard. For organizations, there are specialized tools and processes to do this on an enterprise scale and RedHat has enough support and documentation already in place to make the move easier.

Wrapping Up

RHEL 8 or the RedHat Enterprise Linux version 8 comes with the cumulative years of development and expertise of RedHat. Satisfying the expectations of the community and organizations is a hard thing to do but RedHat managed to do that with its 8 series of operating systems. Give it a go and let us know what you liked.

Related Links

RedHat’s official documentation for RHEL 8

Other Articles that You would Love

The post RHEL 8: RedHat’s Flagship OS for Enterprises appeared first on Unixmen.

Viewing all 194 articles
Browse latest View live