This Weekend Comics : Linux on the iphone

Via geekherocomic
--------------------------------------------------------------------- Linux on the iphone -Weekend Comics-
This Weekend Comics : Linux on the iphone
Via geekherocomic
--------------------------------------------------------------------- Linux on the iphone -Weekend Comics-
Blender 2.69 has been released! The new release comes with many new features, improvements and bug fixes. According to the announcement, in the new release ” FBX import is now supported, along with improved export. New mesh modeling tools were added and existing ones improved. Cycles subsurface scattering and hair shading were improved, along with the addition of a new sky model, shading nodes and tone mapping in the viewport. The motion tracker now supports plane tracking, to track and replace flat objects in footage.”

Open terminal and use the following PPA:
sudo add-apt-repository ppa:irie/blender
sudo apt-get update
sudo apt-get install blender
- For other Linux Distros, download blender from the Link Bellow :
 I made my own 20th Century Fox intro using blender, see video bellow:

Click here to view the video on YouTube.
In my next tutorial, i will show you how to do this using blender.
Is done.
--------------------------------------------------------------------- Blender 2.69 has been released!| PPA Ubuntu
Gimp 2.8.8 has been released! This is a maintenance release that comes with no new features, only bugs were fixed.
Overview of Changes from GIMP 2.8.6 to GIMP 2.8.8:
- Make sure indexed images always have a colormap
- Fix language selection via preferences on Windows
- Don’t crash on setting a large text size
- Keep the same image active when switching between MWM and SWM
- Make sure all dockables are properly resizable (particularly shrinkable)
- Add links to jump directly to Save/Export from the Export/Save
-file extension warning dialogs
- Fix GimpPickButton on OSX
- Properly document plug-in-autocrop-layer’s PDB interface
- Fix importing of indexed BMPs
- Fix lots of places to use GIO to get proper file sizes and times on windows
- Add an AppData file for GIMP
- Backport lcms2 support from master, because lcms1 is not getting
bug fixes any longer
- Lots of bug fixes
- Lots of translation updates
Press Ctrt+Alt+T and enter the following ppa:
sudo add-apt-repository ppa:otto-kesselgulasch/gimp
sudo apt-get update
sudo apt-get install gimp
- For other Linux distros, please check this link.
Is done.
--------------------------------------------------------------------- Gimp 2.8.8 has been released!
Nowadays Linux is everywhere. What are some big companies that make use of the Gnu/Linux operating system?
There are so many and I am very happy for that! Will you be surprised If I told you that Google is one of them? Probably not. It is a well known fact, but still there are many things to learn.
Yes, the hottest web search engine uses Linux because it is the most cost effective solution. At least that’s what Google’s Sergey Brin told to the journalist back in 2000 when he was asked what led to Google’s decision to use Linux.
He and Larry Page were in the Stanford PhD program in Computer Science. They were surrounded by all kind of machines available at that time such as HPs, Suns, Alphas and Intels.
These computers were running Linux so Larry and Sergey gained alot of experience on Linux platforms. As far as I am concerned Google has created its own version of Ubuntu called Goobuntu which is based on LTS releases.
What can I say more? Since they have their personalized Ubuntu distro based it means alot to the linux and open source community.
“Precise rocks!”, that’s how Thomas Bushnell (a google employee) started his talk at Ubuntu UDS Q – PM Plenary on Tuesday 8th May 2012.
Amazon
Amazon, the place I love to buy books. The giant online retailer Amazon.com is powered by Linux in nearly every corner of its business. Amazon is saving million of dollars and reducing its technology infrastructure costs since it switched to Linux.
Sony Playstation 4
Do we have any gamer around here? Did you know that Sony Playstation 4 uses FreeBSD kernel? The news started to spread on every tech site and Linux blog when a user posted a screenshot on reddit under the title “PS4 runs FreeBSD Kernel”.
I am not surprised at all because Sony has used the FreeBSD kernel on PS3 console too. The fact that they are using an open source kernel does not make Playstation 4 an open platform because the BSD license allows them to make changes and never release them for the general public.
IBM
IBM is one of the greatest Linux supporter out there. Not only that but it runs lynx internally on desktops and servers. To show you guys how much IBM loves Linux I have to mention the 1 billion dollar investment on Linux announcement the company made at LinuxCon (New Orleans) in 2013.
IBM is investing alot of money in Power server architecture and linux development. All this love for linux started back in the old days of computers.
Do you like to watch a very nice IBM Linux commercial?
Ok guys, now we all know that IBM supports Linux 100%.
McDonalds
Yes, McDonalds restaurants run Ubuntu Linux distribution in their computers. This is awesome, isn’t it? The following picture was taken inside of a McDonalds in Australia. What can you tell from it?

Judging by the screen and its decorations an advanced Linux geek can tell that it is Ubuntu 8.10 running the Gnome 2 desktop manager trying to access the wireless network.
Not only the five companies listed above, there are many industry and tech giants are migrating to Linux around the globe. Linux rules the world now and forever!
--------------------------------------------------------------------- Five Industry Giants That Use Linux

My life has changed quite alot since the day I switched to Ubuntu, a friendly Linux distribution with more than twenty million users around the world. I feel smarter, stronger and I am happier than ever before. At the beginning, it wasn’t easy, instead it was very hard.
The first thing that came into my mind after I did a fresh installation of Ubuntu Linux was: how am I going to use this thing that I have never seen before in my life and have absolutely no idea what it is.
To be honest with you guys when I first started using Linux I did not even know how to delete files and was very careful in every action or mouse click I made.
I was used to Recycle Bin on my old Windows machine and never heard about Trash before. I started digging information into websites and asking in forums how to delete files in Linux.
Many answers popped up!
Oww!!! It was amazing! It was my first day using Linux and I was surprised by the amount of Linux users that were trying to help me for free until I had a solution in my hands.
Linux Has a Great Community
So the first reason that you should take in consideration when thinking to switch to Linux or not, is the great and warm community that Linux has. Computer geeks, creators and builders from all over the world contribute their energy to build better open source software, Linux distributions for everyone and for any kind of machine you can can name in planet earth and what it most important these guys work to find new efficient cheap solutions.
I am very sure that if you start using Linux you will feel a freedom that it was missing before and you had no idea that such thing existed.
Linux is freedom!
Someone writes blogs and Linux tutorials to help, someone writes shell scripts so others can use to make their life easier and some stay online on IRC channels to answer your questions about Linux.
If you have a problem with your Linux machine, chances are that it will be solved very fast. We will help you, they will help you, everybody in the Linux community is contributing in his/her own way.
You Can Use Linux From GUI
The first thing most of the people think when they heard the word Linux is the terminal, a tool that only weird geeks and nerds that live in their basement with their computers can use.
Of course that the command line is a powerful tool and learning it is a skill that everyone admires, but it is completely not true and desinformative that you need to know commands in order to use a Linux distribution.
“Don’t try Linux!” “It is scary, only geeks use it!” “You have to learn a ton of crazy commands to work on that operating system.” “These people install software by typing commands in their machines, are they crazy?”
That’s what people would say to you. But, I do not blame them because they have been left in a dark, they have been used to it and they hate the light.
They have no idea about Linux, so how can we expect from the to like it if they have never or seen tried it? We as Linux people, contributors and builders should help them understand Linux and teach them Linux.
I am thinking to teach Linux to my little sister. It is also a very good idea to teach Linux to kids, because they are the future of this world. To me, a world with more Linux people means a better world.
To use a Linux distribution, you don’t need to know anything about commands and terminals. If you do it is ok, it does not hurt anyone, instead it helps you alot.
You can use Linux like you use any operating system that has a graphical user interface. You have a mouse, you can do single clicks and double clicks. Like in Windows guys!
Am I clear enough, or should I continue to explain and give you more arguments that you don’t have to be some type of computer nerd or crazy to use Linux?
Linux Is Open Source And Free
What does the fact that Linux is open source mean? It means that its code is distributed so everyone can see, use, modify for his/her own use and projects and share with others.
I feel safe to use Linux because people cannot hide a backdoors on it to spy my data and invade my privacy. Everything is open, everyone can see it.
If someone tries to put a backdoor in Linux, people will learn about it, but can you say the same for Mac OS X or Windows operating system?
I am not trying to say that they have backdoord, I am just saying that their code is closed. Maybe it is ok for you because it seems very technical to know such thing, but believe me it is not.
It is not about Linux or windows, it is about your freedom. Read more about Linux, get a fresh Linux distro on the internet and take your freedom back again.
Note: I have nothing against Windows or Mac OS X because I am a computer geek and an explorer so I like to use them. But when it comes to freedom I choose Linux.
Do you know what the best part is? You don’t have to pay a dollar to use a Linux distribution. Every Linux distribution I have tried is free and believe me there so many that you would need year to use them all.
There Is A Linux Distribution For Everyone
There are many specific Linux distributions available for download that can help in many areas such education, economy, servers and computer security.
Education
1. Trisquel GNU/Linux
Trisquel GNU/Linux is a 100% libre Ubuntu-based Linux distribution. Its main purpose is to provide an operating system for varied audiences, including home and office users, educational institutions, multimedia workstations, etc.
2. Edubuntu
Edubuntu is a partner project of Ubuntu, a distribution suitable for classroom use. The aim is that an educator with limited technical knowledge and skill will be able to set up a computer lab, or establish an on-line learning environment, in an hour or less, and then administer that environment without having to become a fully-fledged Linux geek.
3. UberStudent
UberStudent is an Ubuntu-based distribution on a DVD designed for learning and teaching academic computing in the higher education and advanced secondary levels. UberStudent comes with software for everyday computing tasks, plus a core set of programs and features designed to teach and make easier the tasks and habits common to high-performing students of all academic disciplines.
Gaming
1. SteamOS
SteamOS is a Debian-based Linux distribution designed to run Valve’s Steam and Steam games. It also provides a desktop mode (GNOME) which can run regular Linux applications. In addition to a stable Debian base, SteamOS features various third-party drivers and updated graphics stack, a newer Linux kernel with long-term support, and a custom graphics compositor designed to provide a seamless transition between Steam, its games and the SteamOS system overlay. The base operating system is open-source software, but the Steam client is proprietary.
2. LinuxConsole
LinuxConsole is an independently developed Linux live CD with different editions designed for desktops, servers, gaming consoles, and old computers. Its primary characteristics are easy installation, extensive choice of software in the form of modules, and excellent hardware detection.
Security And Penetration Testing
If you are interested in learning computer security and penetration testing, then you should check the following Linux distributions.
1. Kali Linux
Kali Linux (formerly known as BackTrack) is a Debian-based distribution with a collection of security and forensics tools. It features timely security updates, support for the ARM architecture, a choice of four popular desktop environments, and seamless upgrades to newer versions.
2. BackBox Linux
BackBox Linux is an Ubuntu-based distribution developed to perform penetration tests and security assessments. It is designed to be fast and easy to use. It provides a minimal yet complete desktop environment, thanks to its own software repositories, which are always updated to the latest stable versions of the most often used and best-known ethical hacking tools.
3. CAINE
CAINE (Computer Aided INvestigative Environment) is an Ubuntu-based GNU/Linux live distribution created as a project of digital forensics. It offers a complete forensic environment that is organized to integrate existing software tools as software modules and to provide a friendly graphical interface. The main design objectives that CAINE aims to guarantee are: an interoperable environment that supports the digital investigator during the four phases of the digital investigation, a user-friendly graphical interface, and a semi-automated compilation of the final report.
4. Matriux
Matriux is a Debian-based security distribution designed for penetration testing and forensic investigations. Although it is primarily designed for security enthusiasts and professionals, it can also be used by any Linux user as a desktop system for day-to-day computing. Besides standard Debian software, Matriux also ships with an optimized GNOME desktop interface, over 300 open-source tools for penetration testing, and a custom-built Linux kernel.
5. Swift Linux
Swift Linux is a lightweight, Debian and Linux Mint-based distribution featuring the IceWM window manager. Compared to its parent, Swift Linux includes extra applications, such as BleachBit (a tool for freeing up space and clearing private information), the LibreOffice office suite, and a wide variety of forensic analysis and data recovery utilities.
6. NetSecL OS
NetSecL is a security-focused distribution and live DVD based on openSUSE (starting from version 3.0, previous versions were based on Slackware Linux). To improve the security aspect of the distribution, servers have been removed, incoming ports closed and services turned off. Additionally, several penetration tools have been included.
7. DEFT Linux
DEFT (Digital Evidence & Forensic Toolkit) is a customized distribution of the Ubuntu live Linux CD. It is an easy-to-use system that includes excellent hardware detection and some of the best open-source applications dedicated to incident response and computer forensics.
8. ForLEx
ForLEx is a lightweight Debian-based Linux live CD which boots into an LXDE desktop. The distribution’s primary goal is to provide several useful utilities for forensic analysis.
Old Computers
Do you have an old machine abandoned in the dust because you can not find the appropriate operating system to power it up and there is no software for it at all?
There are many small and light Linux distributions that can be used to give life to old computers. Tiny Core Linux is one of them. It is only 12 MB, runs entirely in memory and boots very quickly.
The followings are some Linux distributions that you can use in your old computers.
1. Puppy Linux
Puppy Linux is yet another Linux distribution. What’s different here is that Puppy is extraordinarily small, yet quite full-featured. Puppy boots into a ramdisk and, unlike live CD distributions that have to keep pulling stuff off the CD, it loads into RAM. This means that all applications start in the blink of an eye and respond to user input instantly. Puppy Linux has the ability to boot off a flash card or any USB memory device, CDROM, Zip disk or LS/120/240 Superdisk, floppy disks, internal hard drive. It can even use a multisession formatted CD-RW/DVD-RW to save everything back to the CD/DVD with no hard drive required at all.
2. CrunchBang Linux
CrunchBang Linux is a Debian-based distribution featuring the lightweight Openbox window manager and GTK+ applications. The distribution has been built from a minimal Debian system and customized to offer a good balance of speed and functionality. CrunchBang Linux is currently available as a live CD; however, the best performance is achieved by installing it to a hard disk.
3. Lubuntu
Lubuntu is a fast, lightweight and energy-saving variant of Ubuntu using the LXDE (Lightweight X11 Desktop Environment) desktop. It is intended to have low-resource system requirements and is designed primarily for netbooks, mobile devices and older PCs.
Software And Updates Are Free
Most of the software used in Linux distributions is free. There are many developers, fans and geeks that contribute their knowledge and skills through their code in open source and free tools for all Linux people.
It is the user that decides what kind of software should come installed by default with the Linux distribution and not the creator and the maintainers of it.
Linux people, discuss ideas about software and many other things in IRC channels, blogs, mail lists, forums, meetings and big conferences.
Being a student it is very hard to pay for software. And when it comes to updates it really hurts. They are very important for your system security, software performance and make the system cooler with new features.
Thanks to Linux I don’t have to pay for software and updates. And believe me it is freedom!
Conclusion
There are many other reasons why one should put Linux on his/her machine, but I think I gave enough reasons and nice arguments to people that have not heard about Linux before or have not tried it.
--------------------------------------------------------------------- Why Should You Put Linux In Your Computer

Wow! Early last week it was all over the internet, if you haven’t heard it yet then this is the time to get your friends and families ready to enjoy the free Introduction to Linux by the Linux foundation which is already open for registration on EdX. Just head over here and register first. I’ve registered too. :-)
Below is an except of the announcement from linuxfoundation.org:
The Linux Foundation, the nonprofit organization dedicated to accelerating the growth of Linux and collaborative development, today announced it is building a Massive Open Online Course (MOOC) program with edX, the nonprofit online learning platform launched in 2012 by Harvard University and Massachusetts Institute of Technology (MIT). More than 31 universities have partnered with edX and nearly two million people have accessed its courses online since it launched just 18 months ago.
Additionally, The Linux Foundation is announcing a new Authorized Training Partner program with AT Computing, Enea, OlinData and SolutionWare among the first members. Together the new MOOC program and Advanced Training Partner program will increase the ways in which Linux professionals can access high-quality, technically advanced, community-based training materials.
As Linux has become the fabric of computing, demand for talent to support it has skyrocketed. For example, according to the 2014 Linux Jobs Report, nine in 10 hiring managers are hiring Linux pro’s in the next six months. And, while talent isn’t bounded by geography, sometimes access to advanced Linux training has been limited. Employers are seeking Linux professionals in a market where not enough exist, while professionals struggle to find affordable, accessible training opportunities to advance their careers.
The Linux Foundation and edX are partnering to develop a MOOC program that will help address this issue by making basic Linux training materials available to all for free. Previously a $2,400 course, Introduction to Linux will be the first class available as a MOOC and will be free to anyone, anywhere. The Linux Foundation is among a new group of member organizations edX announced today who will contribute courses to the platform.
Image Credit : Linux Foundation
More details on arstechnica.com and venturebeat.com.
--------------------------------------------------------------------- Wow! Linux Foundation To Offer Free Linux Course This Summer Worth $2,400 on EdX

Gabe Newell, co-founder of Valve gave an interview and confirmed the Counter Strike Global Offensive for Linux. A popular game tailored for Linux. Finally the linux gamers can see what Windows and Mac users have had for 2 years now. Of course he didn’t really confirm a date… He just said that they’re working on it.
Q: It’s being worked on but we don’t have an ETA.
Now another interesting thing he said in the interview was that he thought Linux was the platform of the future. We all know that, of course, but it’s nice to see others recognize it. The percentages of operating systems show that Linux is used by 1.5% against the 85% of Windows, and that’s not counting the pirated copies. But in spite of this the Linux users are steadily increasing. The French government, the White House servers and the Munich city government have switched to Linux. Things are looking up for Linux usage, huh?
Q: In the future, do you expect all Steam games to run on Linux/Steam OS?
Gabe: Yes.
Q: Has there been any trouble getting developers to add Linux compatibility?
Gabe: Surprisingly little. There is a lot of popular sentiment in the developer community about Linux and gaming.
Check out the trailer for the Counter Strike Global Offensive here:
--------------------------------------------------------------------- Counter Strike Global Offensive Confirmed For Linux
In Linux world there are two major shell interfaces for someone to interact with the operating system:
From the other hand, Microsoft Windows operating system does not have that option (well…. you can boot into safe-mode command line but that’s not intended to be used as a working environment but just as another way to save the day / troubleshooting).

For Windows users, the GUI (Graphical User Interface) is the primary interface for interaction with the operating system — and this fine by me. I completely understand that some things are easier to be done in a visual perspective, like clicking buttons and stuff rather than typing a bunch of instructions for a compiler: True! However, sometimes there’s a need for a shell — and yes, CLI (Command Line Interface) is still kicking in some tasks — especially if you want to be serious about system administration. So, in Linux, GUI is nothing more than just another program. Normally, when a Linux system boots it prompts you into a Non Login shell and waits for your credentials (username/password) to be given. Then, once you ‘ve successfully logged into the system you are in a Login Shell.

Wait what? You say you use Ubuntu or Fedora or OpenSuSE or OpenWhatever and you don’t see a terminal, right? Well, this is due to the fact that most well-known Linux distribution run startup scripts to enable the GUI session from the very beginning. Even more, they tend to automatically logged you in from startup. I am pretty sure that Arch Linux users have already figured what I am talking about here. Considering that you are already running a modern distro that automatically boots you into a GUI …
…so once you’ve successfully logged in, fire up a terminal (back in classic Gnome 2.x days: Applications >System Tools > Terminal):

and this is what is commonly called as Non Login Shell, because you have already logged in. As you can see my user-name is drpaneas and I have normal user privileges (pay attention to the dollar sign ‘$’ ). If you completely logout from your GUI session (eg kill X server) or boot into a non-graphical interface (just switch session using CTRL + ALT + F[1=7] keys) you will see something like this:

Now, this is what we call as Login shell, because you have not logged in yet (but you are going to). Different scripts may run on Login and Non-Login shells. We will talk about them later in another article here at Unixmen.com
Furthermore, in Linux we have up to 7 different sessions. In order to grant access into them, you can use a common shortcut: CTRL + ALT + F-key (from 1 to 7). For example CTRL + ALT + F2 fires up the second session. In each session you can be a different user also, which means it craves for you credentials first (so the first thing you can say when you change session is that you are in a Login Shell). In order to come back into the normal GUI session, try hitting CTRL+ALT+ F1 (CentOS based distros) or F7 (Ubuntu based).
So, since the desktop is NOT the only interface to interact with the system, there are several GUIs, graphic environments: Unity, KDE, Gnome, XFCE, Mate, E17 etc. This is the beauty of Linux. You are free to use which ever you want — if you want and when you want. For example, webservers do not utilize GUIs at all because there is no reason for such software.
To sum up, there are two different kinds of shells in Linux: Login shell and Non-Login shell. Normally, Linux boots you into a Login shell by default and once you logged in you are into a Non-Login shell. Pretty simple and easy explanation. In the next articles I will talk you about the shell prompts. Until then, may the source be with you!
---------------------------------------------------------------------
Non Login-shell and Login Shell
The linux kernel 3.14.3 has been officially released with many changes and improvements, most of them drivers related.
This release fixes many anomalies such as the crash during hotplug of PCI USB controller card, compilation warning when !CONFIG_PCI && !CONFIG_PM, randconfig build errors, potential hang-up during boot, potential issue in range parsing, lock migration crash and many others.
According to the changelog beep for ASUS 1015E has been enabled, memory leak in nfsd4_encode_fattr() has been fixed, remaining domain support from ARMv6 is removed, accessibility of some twl4030 audio registers is fixed and in x86 architectures build failure has been fixed with older binutils.
Unlike the previous releases this one bring more changes and improvements. It is worth mentioning the fact that there are many Arch improvements done.
The author of the official announcement recommends that all users of the 3.14 kernel series must upgrade.
You can read the official announcement here.
---------------------------------------------------------------------
Linux Kernel 3.14.3 Has Been Released
This is a guest post, written by one of the Unixmen regular reader Mr.Mazen Bdewi. Contact the Author at: mazen.bdewi@gmail.com, if any queries.
Well, let us show you how to upgrade the kernel.
Enter the following command to know about your current kernel version:
uname -r
Then, Let’s Update our system.
On Ubuntu:
sudo apt-get update
On CentOS:
yum update
To update Kernel, you need to install the following prerequisites.
On Ubuntu:
sudo apt-get gcc
sudo apt-get groupinstall "Development Tools"
sudo apt-get install ncurses-devel
sudo apt-get install libncurses5-dev
sudo apt-get install python-dev
On CentOS:
yum gcc
yum groupinstall "Development Tools"
yum install ncurses-deve
yum install libncurses5-dev
yum install python-dev
Then go to site www.kernel.org, and chose any version you need, Here I will download 3.14.4.
On Both Ubuntu & CentOS:
wget https://www.kernel.org/pub/linux/kernel/v3.x/linux-3.14.4.tar.xz
tar xvfvJ linux-3.14.4.tar.xz -C /usr/src
cd /usr/src/linux-3.14.4
Before compiling a new kernel, you need to generate a kernel configuration.
If you want to generate a kernel configuration via graphical user interface, run with root user:
make menuconfig

if you want to use the same kernel configuration as the currently running kernel, run the following command instead. You still need to set any newly added configuration options by manually answering questions. If you do not know the meaning of each option, just press enter to accept a default answer.
make oldconfig
If you want to use the same old kernel configuration, and automatically accept default answers to every question, run the following command instead:
sh -c 'yes "" | make oldconfig'
After kernel configuration is done, go ahead and compile a new kernel.
make
when you do (make) this step will take about 45 minutes, depending on your Ram and CPU speed.
Now install the new kernel by:
make modules_install install
Finally, reboot your system and choose new kernel.

That’s it.
---------------------------------------------------------------------
How To Upgrade The Kernel On Ubuntu 12.04 And Centos 6.5
Millions of websites are powered by WordPress software and there’s a reason for that. WordPress is the most developer-friendly content management system out there, so you can essentially do anything you want with it. Unfortunately, every day some scary report about a major site being hacked or a sensitive database being compromised hits the web … and freaks everyone out.
If you haven’t installed WordPress yet, check the following article.
Following on from my previous article How To Secure WordPress Website show you checklist allows you to secure your WordPress site with as little effort as possible.
In this article, will describe to you through the installation of wpscan and serve as a guide on how to use wpscan to locate any known vulnerable plugins and themes that may make your site vulnerable to attack. Also, how to install and use nmap the free Security Scanner For Network Exploration & Hacking . And at the end we will show you the steps to use nikto.
WPScan is a black box WordPress Security Scanner written in Ruby which attempts to find known security weaknesses within WordPress installations. Its intended use it to be for security professionals or WordPress administrators to asses the security posture of their WordPress installations. The code base is Open Source and licensed under the GPLv3.
Before we get started with the installation, it is important to note that wpscan will not work on Windows systems, so you will need access to a Linux or OSX installation to proceed. If you only have access to a Windows system you can download Virtualbox and install any Linux distro you like as a Virtual Machine.
WPScan is hosted on Github, so if it is not already installed we will need to install the git packages before we can continue.
sudo apt-get install git
Once git is installed, we need to install the dependencies for wpscan.
sudo apt-get install libcurl4-gnutls-dev libopenssl-ruby libxml2 libxml2-dev libxslt1-dev ruby-dev ruby1.9.3
Now we need to clone the wpscan package from github.
git clone https://github.com/wpscanteam/wpscan.git
Now we can move to the newly created wpscan directory and install the necessary ruby gems through bundler.
cd wpscan
sudo gem install bundler && bundle install --without test development
Now that we have wpscan installed, we will walk through using the tool to search for potentially vulnerable files on our WordPress installation. Some of the most important aspects of wpscan are its ability to enumerate not only plugins and themes, but users and timthumb installations as well. WPScan can also perform bruteforce attacks against WordPress– but that is outside of the scope of this article.
ruby wpscan.rb --updateTo enumerate plugins, all we need to do is launch wpscan with the --enumerate p arguments like so.
ruby wpscan.rb --url http(s)://www.yoursiteurl.com --enumerate p
or to only display vulnerable plugins:
ruby wpscan.rb --url http(s)://www.yoursiteurl.com --enumerate vp
Some example output is posted below:
| Name: akismet
| Location: http://********.com/wp-content/plugins/akismet/

| Name: audio-player
| Location: http://********.com/wp-content/plugins/audio-player/
|
| * Title: Audio Player - player.swf playerID Parameter XSS
| * Reference: http://seclists.org/bugtraq/2013/Feb/35
| * Reference: http://secunia.com/advisories/52083
| * Reference: http://osvdb.org/89963
| * Fixed in: 2.0.4.6

| Name: bbpress - v2.3.2
| Location: http://********.com/wp-content/plugins/bbpress/
| Readme: http://********.com/wp-content/plugins/bbpress/readme.txt
|
| * Title: BBPress - Multiple Script Malformed Input Path Disclosure
| * Reference: http://xforce.iss.net/xforce/xfdb/78244
| * Reference: http://packetstormsecurity.com/files/116123/
| * Reference: http://osvdb.org/86399
| * Reference: http://www.exploit-db.com/exploits/22396/
|
| * Title: BBPress - forum.php page Parameter SQL Injection
| * Reference: http://xforce.iss.net/xforce/xfdb/78244
| * Reference: http://packetstormsecurity.com/files/116123/
| * Reference: http://osvdb.org/86400
| * Reference: http://www.exploit-db.com/exploits/22396/

| Name: contact
| Location: http://********.com/wp-content/plugins/contact/Enumeration of themes works the same as enumeration of plugins, just with the --enumerate t argument.
ruby wpscan.rb --url http(s)://www.host-name.com --enumerate t
Or to only display vulnerable themes:
ruby wpscan.rb --url http(s)://www.host-name.com --enumerate vt
Sample output:
| Name: path
| Location: http://********.com/wp-content/themes/path/
| Style URL: http://********.com/wp-content/themes/path/style.css
| Description:

| Name: pub
| Location: http://********.com/wp-content/themes/pub/
| Style URL: http://********.com/wp-content/themes/pub/style.css
| Description:

| Name: rockstar
| Location: http://********.com/wp-content/themes/rockstar/
| Style URL: http://********.com/wp-content/themes/rockstar/style.css
| Description:
|
| * Title: WooThemes WooFramework Remote Unauthenticated Shortcode Execution
| * Reference: https://gist.github.com/2523147

| Name: twentyten
| Location: http://********.com/wp-content/themes/twentyten/
| Style URL: http://********.com/wp-content/themes/twentyten/style.css
| Description:
WPScan can also be used to enumerate users with valid logins to the WordPress installation. This is usually performed by attackers in order to get a list of users in preparation for a bruteforce attack.
ruby wpscan.rb --url http(s)://www.host-name.com --enumerate u
The last function of wpscan we’ll discuss in this article is the ability to enumerate timthumb installations. In recent years, timthumb has become a very common target of attackers due to the numerous vulnerabilities found and posted to online forums, message lists, and advisory boards. Using wpscan to find vulnerable timthumb files is done with the following command.
ruby wpscan.rb --url http(s)://www.host-name.com --enumerate tt
Nmap is an open source tool for network exploration and security auditing. It was designed to rapidly scan large networks, although it works fine against single hosts. Nmap uses raw IP packets in novel ways to determine what hosts are available on the network, what services (application name and version) those hosts are offering, what operating systems (and OS versions) they are running, what type of packet filters/firewalls are in use, and dozens of other characteristics
To install nmap for Debian and Ubuntu Linux based server systems type the following apt-get command:
sudo apt-get install nmapReading package lists... Done Building dependency tree Reading state information... Done The following NEW packages will be installed: nmap 0 upgraded, 1 newly installed, 0 to remove and 2 not upgraded. Need to get 1,643 kB of archives. After this operation, 6,913 kB of additional disk space will be used. Get:1 http://mirrors.service.networklayer.com/ubuntu/ precise/main nmap amd64 5.21-1.1ubuntu1 [1,643 kB] Fetched 1,643 kB in 0s (16.4 MB/s) Selecting previously unselected package nmap. (Reading database ... 56834 files and directories currently installed.) Unpacking nmap (from .../nmap_5.21-1.1ubuntu1_amd64.deb) ... Processing triggers for man-db ... Setting up nmap (5.21-1.1ubuntu1) ...
To find the nmap version, enter:
nmap -VOR
nmap --versionNmap version 5.21 ( http://nmap.org )
To install nmap on RHEL based Linux distributions, type the following yum command:
yum install nmapLoaded plugins: protectbase, rhnplugin, security 0 packages excluded due to repository protections Setting up Install Process Resolving Dependencies --> Running transaction check ---> Package nmap.x86_64 2:5.51-2.el6 will be installed --> Finished Dependency Resolution Dependencies Resolved ================================================================================ Package Arch Version Repository Size ================================================================================ Installing: nmap x86_64 2:5.51-2.el6 rhel-x86_64-server-6 2.8 M Transaction Summary ================================================================================ Install 1 Package(s) Total download size: 2.8 M Installed size: 0 Is this ok [y/N]: y Downloading Packages: nmap-5.51-2.el6.x86_64.rpm | 2.8 MB 00:00 Running rpm_check_debug Running Transaction Test Transaction Test Succeeded Running Transaction Installing : 2:nmap-5.51-2.el6.x86_64 1/1 Verifying : 2:nmap-5.51-2.el6.x86_64 1/1 Installed: nmap.x86_64 2:5.51-2.el6 Complete!
To find the nmap version, enter:
nmap --versionSample outputs:
Nmap version 5.51 ( http://nmap.org )
You can got a lot of information about your server or host using nmap and it let you to think like someone has malicious intent.
For this reason, only test it on servers that you own or in situations where you’ve notified the owners.
The nmap creators actually provide a test server located at:
scanme.nmap.orgSome commands may take a long while to complete:
To scan an IP address or a host name (FQDN), run:
nmap 192.168.1.1
Sample outputs:

Scan for the host operating system:
sudo nmap -O 192.168.1.1
pecify a range with “-” or “/24″ to scan a number of hosts at once:
sudo nmap -PN xxx.xxx.xxx.xxx-yyy
Scan a network range for available services:
sudo nmap -sP network_address_range
Scan without preforming a reverse DNS lookup on the IP address specified. This should speed up your results in most cases:
sudo nmap -n remote_host
Scan a specific port instead of all common ports:
sudo nmap -p port_number remote_host
Scan a network and find out which servers and devices are up and running
This is known as host discovery or ping scan:
nmap -sP 192.168.1.0/24
Sample outputs:
Host 192.168.1.1 is up (0.00035s latency).
MAC Address: BC:AE:C5:C3:16:93 (Unknown)
Host 192.168.1.2 is up (0.0038s latency).
MAC Address: 74:44:01:40:57:FB (Unknown)
Host 192.168.1.5 is up.
Host nas03 (192.168.1.12) is up (0.0091s latency).
MAC Address: 00:11:32:11:15:FC (Synology Incorporated)
Nmap done: 256 IP addresses (4 hosts up) scanned in 2.80 second
Understanding port configuration and how to discover what the attack vectors are on your server is only one step to securing your information and your VPS.
Nikto Web-scanner is a open source web-server scanner which can be used to scan the web-servers for malicious programs and files. Nikto can be used to scan the outdated versions of programs too. Nikto will provide us a quick and easy scan to find out the dangerous files and programs in server, At the end of scan result with a log file.
Perl is pre-installed in linux so all you need to do is download nikto from the project page, unpack it into a directory and start your testing.
wget https://cirt.net/nikto/nikto-2.1.4.tar.gz
You can unpack it with an archive manager tool or use tar and gzip together with this command.
tar zxvf nikto-2.1.4.tar.gz
cd nikto-2.1.4
perl nikto.pl
This should be your results from a working installation:
 - ***** SSL support not available (see docs for SSL install) *****
- Nikto v2.1.4
---------------------------------------------------------------------------
+ ERROR: No host specified

       -config+            Use this config file
       -Cgidirs+           scan these CGI dirs: 'none', 'all', or values like "/cgi/ /cgi-a/"
       -dbcheck            check database and other key files for syntax errors
       -Display+           Turn on/off display outputs
       -evasion+           ids evasion technique
       -Format+            save file (-o) format
       -host+              target host
       -Help               Extended help information
       -id+                Host authentication to use, format is id:pass or id:pass:realm
       -list-plugins       List all available plugins
       -mutate+            Guess additional file names
       -mutate-options+    Provide extra information for mutations
       -output+            Write output to this file
       -nocache            Disables the URI cache
       -nossl              Disables using SSL
       -no404              Disables 404 checks
       -port+              Port to use (default 80)
       -Plugins+           List of plugins to run (default: ALL)
       -root+              Prepend root value to all requests, format is /directory
       -ssl                Force ssl mode on port
       -Single             Single request mode
       -timeout+           Timeout (default 2 seconds)
       -Tuning+            Scan tuning
       -update             Update databases and plugins from CIRT.net
       -vhost+             Virtual host (for Host header)
       -Version            Print plugin and database versions
           + requires a value

    Note: This is the short help output. Use -H for full help.
The error is merely telling us we did not fill in the necessary parameters for a test to run. The SSL support can be enabled by installing the necessary perl ssl module (sudo apt-get install libnet-ssleay-perl).
Before performing any scan we need to update the nikto database packages using.
/usr/local/bin/nikto.pl -update
To list the available Plugins for nikto we can use the below command.
nikto.pl -list-plugins // To list the installed plugins //
For a simple test for we will use test a single url.
perl nikto.pl -h http://www.host-name.com
Sample outputs:
This will produce fairly verbose output that may be somewhat confusing at first. Take the time to read through the output to understand what each advisory means. Many of the alerts in Nikto will refer to OSVDB numbers. These are Open Source Vulnerability Database (http://osvdb.org/) designations. You can search on OSVDB for further information about any vulnerabilities identified.
$ nikto -h http://www.host-name.com
- Nikto v2.1.4
---------------------------------------------------------------------------
+ Target IP:         1.2.3.4
+ Target Hostname:    host-name.com
+ Target Port:        80
+ Start Time:         2012-08-11 14:27:31
---------------------------------------------------------------------------
+ Server: Apache/2.2.22 (FreeBSD) mod_ssl/2.2.22 OpenSSL/1.0.1c DAV/2
+ robots.txt contains 4 entries which should be manually viewed.
+ mod_ssl/2.2.22 appears to be outdated (current is at least 2.8.31) (may depend on server version)
+ ETag header found on server, inode: 5918348, size: 121, mtime: 0x48fc943691040
+ mod_ssl/2.2.22 OpenSSL/1.0.1c DAV/2 - mod_ssl 2.8.7 and lower are vulnerable to a remote buffer overflow which may allow a remote shell (difficult to exploit). CVE-2002-0082, OSVDB-756.
+ Allowed HTTP Methods: GET, HEAD, POST, OPTIONS, TRACE
+ OSVDB-877: HTTP TRACE method is active, suggesting the host is vulnerable to XST
+ /lists/admin/: PHPList pre 2.6.4 contains a number of vulnerabilities including remote administrative access, harvesting user info and more. Default login to admin interface is admin/phplist
+ OSVDB-2322: /gallery/search.php?searchstring=<script>alert(document.cookie)</script>: Gallery 1.3.4 and below is vulnerable to Cross Site Scripting (XSS). Upgrade to the latest version. http://www.securityfocus.com/bid/8288.
+ OSVDB-7022: /calendar.php?year=<script>alert(document.cookie);</script>&month=03&day=05: DCP-Portal v5.3.1 is vulnerable to  Cross Site Scripting (XSS). http://www.cert.org/advisories/CA-2000-02.html.
+ OSVDB-3233: /phpinfo.php: Contains PHP configuration information
+ OSVDB-3092: /system/: This might be interesting...
+ OSVDB-3092: /template/: This may be interesting as the directory may hold sensitive files or reveal system information.
+ OSVDB-3092: /updates/: This might be interesting...
+ OSVDB-3092: /README: README file found.
+ 6448 items checked: 1 error(s) and 14 item(s) reported on remote host
+ End Time:           2012-08-11 15:52:57 (5126 seconds)
---------------------------------------------------------------------------
+ 1 host(s) tested
$
Nikto is an extremely lightweight, and versatile tool. Because of the fact that Nikto is written in Perl it can be run on almost any host operating system.
Hope this will will bring you a good idea to scan vulnerbalites for your wordpress website. Following on from my previous article How To Secure WordPress Website show you checklist allows you to secure your WordPress site with as little effort as possible.
If you have any feedback or comments, feel free to post them in the comment section below.
---------------------------------------------------------------------
How To Scan And Check A WordPress Website Security Using WPScan, Nmap, And Nikto
When doing a standard Linux installation on a Vmware virtual machine, the installation process typically allocates all of the available virtual disk space to the Linux file system and swap partitions.
The size of the virtual disk can easily be increased using the Vmware utility (Vmware Workstation or Vsphere), but as neither the partition table or the file systems themselves are modified by Vmware utility, the guest system does not see the new virtual disk size.
This article explains how to add disk space and memory RAM to VMware VM.
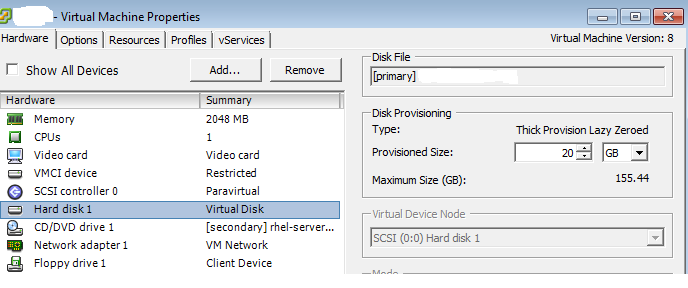
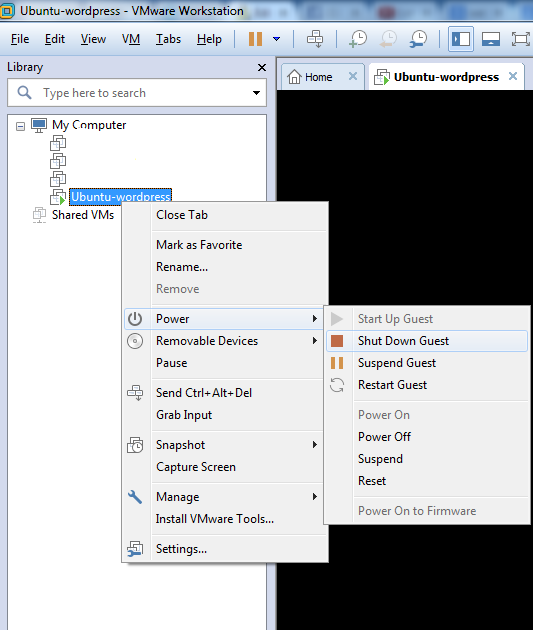
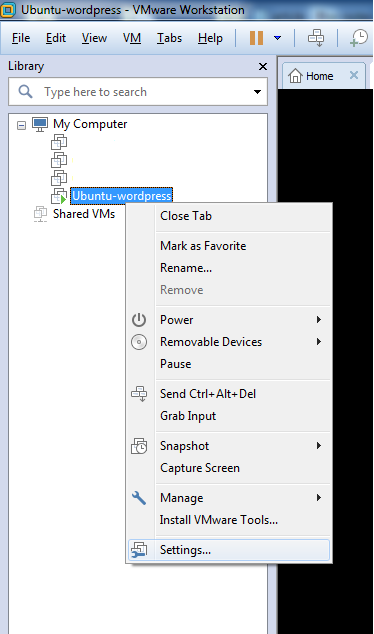
Before Increasing the disk size you need to shutdown your VM. After that you can change the disk sapce by editing the settings of the VM (right click > Settings).
The Vmware utility (Vmware Workstation or Vsphere) provides a dialog to change the size of the Vmware virtual disk.
Select the new storage size by entering the value in the dialog. The virtual disk will be resized to the new value. When increasing the size, the data on the disk is preserved.
Increasing the size of the VM disk size does not change the filesystem on that disk. You need to connect to the command line of the Linux VM via the console or putty session and log in as root.
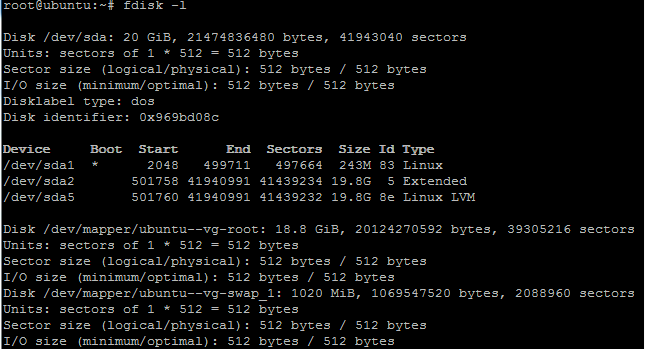
Find the device where the unpartitioned space using this command:
fdisk -l
Create a new partition that takes up the remaining space and is of filesystem type 8e (LVM):
fdisk /dev/sda

Now enter ‘n‘, to create a new partition and choose “p” to create a new primary partition. Please note, your system can only have 4 primary partitions on this disk! If you’ve already reached this limit, create an extended partition.
 n (new)
 p (primary)
 3 (partition number, since 1st and 2nd partition already exists)
 select default first available cylinder to the default last cylinder.
 t (type)
 3 (partition number)
 8e (set type to LVM)
 p (view the new partitions layout)
 w (write out the new partitions layout to disk)
reboot the system so the new partition is recognized by the system.
reboot
The new partition layout is now:
Disk /dev/sda: 53.6 GB, 53687091200 bytes
 255 heads, 63 sectors/track, 6527 cylinders
 Units = cylinders of 16065 * 512 = 8225280 bytes

Device Boot      Start         End      Blocks   Id  System
 /dev/sda1   *           1          13      104391   83  Linux
 /dev/sda2              14        2610    20860402+  8e  Linux LVM
 /dev/sda3            2611        6527    31463302+  8e  Linux LV
Now, create the physical volume as a basis for your LVM.
pvcreate /dev/sda3
Add the new Physical Volume to the Volume Group as additional free space:
vgextend VolGroup00 /dev/sda3
To find out how your Volume Group is called use this command.
vgdisplay
--- Volume group ---
 VG Name               VolGroup00
 System ID
 Format                lvm2
 Metadata Areas        2
 Metadata Sequence No  4
 VG Access             read/write
 VG Status             resizable
 MAX LV                0
 Cur LV                2
 Open LV               2
 Max PV                0
 Cur PV                2
 Act PV                2
 VG Size               49.88 GB
 PE Size               32.00 MB
 Total PE              1596
 Alloc PE / Size       636 / 19.88 GB
 Free  PE / Size       960 / 30.00 GB
 VG UUID               0JB6GV-gFJW-onuN-7Xq1-OKim-n5gM-EVPUKB
Have the Logical Volume (within the Volume Group) overtake the remaining free space of the Volume Group:
lvextend -l +100%FREE /dev/VolGroup00/LogVol00
vgdisplay
--- Volume group ---
 VG Name               VolGroup00
 System ID
 Format                lvm2
 Metadata Areas        2
 Metadata Sequence No  5
 VG Access             read/write
 VG Status             resizable
 MAX LV                0
 Cur LV                2
 Open LV               2
 Max PV                0
 Cur PV                2
 Act PV                2
 VG Size               49.88 GB
 PE Size               32.00 MB
 Total PE              1596
 Alloc PE / Size       1596 / 49.88 GB
  Free  PE / Size       0 / 0
 VG UUID               0JB6GV-gFJW-onuN-7Xq1-OKim-n5gM-EVPUKB
Trigger online resizing of the live and mounted filesystem so the new disk space can be utilized immediately:
resize2fs -p /dev/mapper/VolGroup00-LogVol00
Now, you can check the disk space using this command
df -h
Filesystem            Size  Used Avail Use% Mounted on
 /dev/mapper/VolGroup00-LogVol00 45G  3.2G   40G   8% /
 /dev/sda1              99M   19M   76M  20% /boot
tmpfs 1014M 0 1014M 0% /dev/shmTo increase the memory (RAM) assigned to a virtual machine, you need to edit the VM‘s setting to increase the memory while the VM is shutdown. You cannot edit the VM’s memory configuration while the VM is suspended or powered on.
Follow the instructions to add memory to the VM.
Shutdown the VM.
Go to the VM menu and select Settings
Select Memory on the Hardware tab
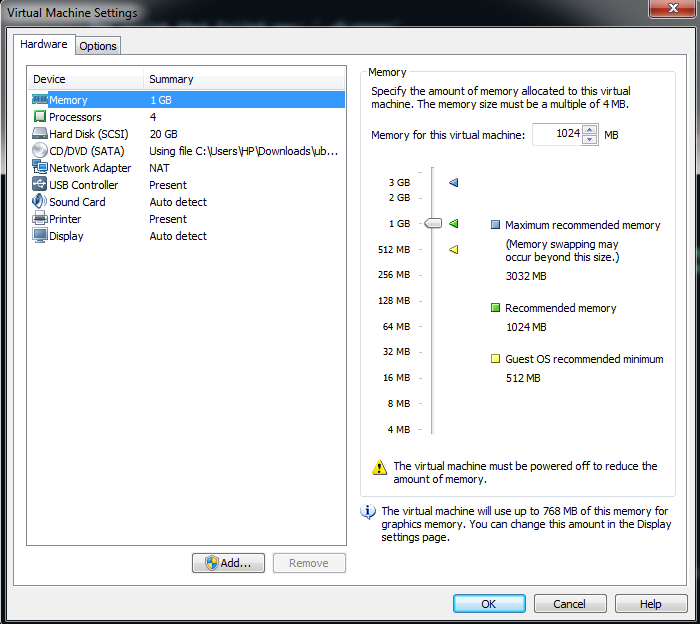
Adjust the slider or enter the amount of memory to assign to the virtual machine. Click OK
Now you have add additional resource to the VM to also increase performance of your virtual environment.
---------------------------------------------------------------------
Increase Disk Space And Memory In Linux VMware Virtual Machines
Nagios is the leader and industry standard in enterprise-class monitoring solutions. Nagios provides two monitoirng tools Nagios Core and Nagios XI.
Nagios Core is a free and open source tool that allows you to monitor your entire IT infrastructure to ensure hosts, services and applications are functioning properly.
Nagios XI is based on Nagios Core and is the commercial solution of Nagios. Nagios XI provides organizations with many benefits:
For more informations, you can visit the website of Nagios, and check our article in this link .
This artilce is intended for use by Nagios Administrators who wish to monitor Linux servers with Nagios XI using the linux NRPE agent. The linux NRPE agent must be installed on the target linux machine and configured before Nagios XI can monitor system metrics, services, processes, or performance data on the target machine.
If you still didn’t install Nagios-Xi , check this article to see how to do that.
In this article we will show you how to install and configure NRPE AGENT in the remote server and how to add the host to Nagios Xi.
Download the Linux NRPE agent to the /tmp directory on the Linux server you wish to monitor.
cd /tmp
For RHEL/CentOS 5+, Fedora 14+, SLES 11+, OpenSUSE 11+, Ubuntu 12+, and Debian 6+:
wget http://assets.nagios.com/downloads/nagiosxi/agents/linux-nrpe-agent.tar.gz
For RHEL 4 & CentOS 4 (el4):
wget http://assets.nagios.com/downloads/nagiosxi/agents/linux-nrpe-agent-el4.tar.gz
Unpack the installation archive you just downloaded:
tar xzf linux-nrpe-agent.tar.gz
Enter the newly created agent sub-directory:
cd linux-nrpe-agent
You need to run the wrapper script as root (if using Ubuntu you’ll need to either run sudo -i to run as root):
sudo ./fullinstall
The script will stop to prompt you once, to ask for the IP address(es) for your monitoring server(s). You will need to type the ip address, of your Nagios Xi server and then press enter. This will allow connections from your monitoring server to the agent process.

You have now successfully installed and configured the monitoring agent and required plugins on the Linux server. In order to monitor the server using Nagios XI, you will need to run the Linux Server configuration wizard in the Nagios XI web interface.
Log into the web interface via : http://[SERVER_IP]/ and enter your login information. You will see this page after the login.

Choose Configure to start the host configuration.

Go Under Run the Monitoring Wizard

You need to choose Linux Server wizard to monitor your host.

Next, we set the device parameters.

Now that the device has been added.

We specify the services that we want to create. This section can be found in the bottom section of the page.

Enter the information regarding the polling strategy:

Our host and services will then be checked every 5 minutes and an alert will be sent out 5 minutes after our host goes « DOWN » (5 check attempts with 1 check every 1 minutes will confirm its « HARD » state). Next you need the configure the notification settings.
The notification will be send immediately in case of alert and every 60 minutes until the problem is resolved.
At last, the notification parameters are as follows:

After you should click Apply to add the host and finish the new configuration.

The results of the polling are visible in the Home => Host Details.
After period of time you can need to see a graphs like this which is the Current-Load.

That’s all.
Congratulations! Enjoy your new Monitoring platform Nagios Xi.
---------------------------------------------------------------------
Nagios Xi: How To Monitor Your Linux Server Using NRPE Agent
One of the most imporant task for an system administrator is the troubleshooting and diagnostic of problems. Today you can say goodbye to top, lsof, strace, iostat, ps, etc., and you can use sysdig: The most powerful Linux system troubleshooting.
Sysdig is open source, system-level exploration and a troubleshooting tool that captures system state and activity from a running Linux instance using a linux kernel facility called tracepoint , then save, filter and analyze. Sysdig combines the benefits of many utilities such as strace, tcpdump, and lsof into one single application.
Sysdig is also packed with a set of scripts called Chisels that make it easier to extract useful information and do troubleshooting.
In this article we’ll explore the installation and basic usage of sysdig to perform system monitoring and troubleshooting on Linux.
For more information, you can see the website of Sysdig.
To install sysdig via apt we will need to setup the apt repository maintained by Draios the company behind sysdig. We can do this by running the following curl commands.
The following commands should be run by root user.
curl -s https://s3.amazonaws.com/download.draios.com/DRAIOS-GPG-KEY.public | apt-key add -
curl -s -o /etc/apt/sources.list.d/draios.list http://download.draios.com/stable/deb/draios.list
After this command you need to update your server. Use this command to do that.
apt-get updateThe sysdig tools requires the kernel headers package before installing it. Flow the command to install the kernel headers package.
Use this command to check the kernel version.
uname -r
apt-get install linux-headers-<kernel version>Now you can install sysdig on ubuntu using this command.
apt-get install sysdigBefore stating with the installation itself, you will need to setup the yum repository that will use this key to verify the authenticity of the package you’re about to download.
Use the rpm tool with the --import flag To manually add the Draios key to your RPM keyring.
sudo rpm --import https://s3.amazonaws.com/download.draios.com/DRAIOS-GPG-KEY.public
Then, download the Draios repository and configure yum to use it:
sudo curl -s -o /etc/yum.repos.d/draios.repo http://download.draios.com/stable/rpm/draios.repoAfter that try to make update to your server using this command
yum update
Then you need to enable extra packages for enterprise Linux (EPEL) The EPL repository is needed in order to download the Dynamic Kernel Module Support (DKMS) package, which is used by sysdig tool. Flow the command to enable EPEL repository:
sudo yum -y install epel-releaseThen you need to install kernel headers in order to setup sysdig-probe module used by sysdig.
sudo yum -y install kernel-devel-$(uname -r)Now you can install sysdig.
sudo yum -y install sysdigThe simplest and easiest method to use sysdig is by invoking it without any argument.By default, sysdig prints the information for each captured event on a single line.
sysdigyou will see output like this example.
25722 22:48:41.788762892 3 sshd (1733) > rt_sigprocmask
25723 22:48:41.788763312 3 sshd (1733) < rt_sigprocmask
25724 22:48:41.788763603 3 sshd (1733) > rt_sigprocmask
25725 22:48:41.788763801 3 sshd (1733) < rt_sigprocmask
25726 22:48:41.788764486 3 sshd (1733) > read fd=11(<f>/dev/ptmx) size=16384
25727 22:48:41.788765210 2 sysdig (3745) > switch next=318 pgft_maj=0 pgft_min=910 vm_size=92452 vm_rss=5532 vm_swap=0
25728 22:48:41.788766062 3 sshd (1733) < read res=118 data=8622 22:48:41.759980138 2 sysdig (3745) > switch next=318 pgft_maj=0 pgft_min...
25729 22:48:41.788778756 2 <NA> (318) > switch next=3745(sysdig) pgft_maj=0 pgft_min=0 vm_size=0 vm_rss=0 vm_swap=0
25731 22:48:41.788785389 3 sshd (1733) > select
To write output of the sysdif in a file you can use the -w flag and specify the file name.
sysdig -w <output file>
Example:
sysdig -w trace.dumpYou can read the output file using this command
sysdig -r <output file>Example:
sysdig -r trace.dumpSysdig command has filters that allow you to filter the output to specific information. You can find a list of available filters by running this command.
sysdig -lsysdig -l
----------------------
Field Class: fd
fd.num the unique number identifying the file descriptor.
fd.type type of FD. Can be 'file', 'ipv4', 'ipv6', 'unix', 'pipe', 'e
vent', 'signalfd', 'eventpoll', 'inotify' or 'signalfd'.
fd.typechar type of FD as a single character. Can be 'f' for file, 4 for
IPv4 socket, 6 for IPv6 socket, 'u' for unix socket, p for pi
pe, 'e' for eventfd, 's' for signalfd, 'l' for eventpoll, 'i'
for inotify, 'o' for uknown.
fd.name FD full name. If the fd is a file, this field contains the full path.
If the FD is a socket, this field contain the connection tuple.
<truncated output>You can use the “proc.name” filter to capture all of the sysdig events for a specific process.
sysdig -r tracefile.dump proc.name=name-of-processExample:
sysdig -r tracefile.dump proc.name=sshd
    530 23:45:02.804469114 0 sshd (917) < select res=1
    531 23:45:02.804476093 0 sshd (917) > rt_sigprocmask
    532 23:45:02.804478942 0 sshd (917) < rt_sigprocmask
    533 23:45:02.804479542 0 sshd (917) > rt_sigprocmask
    534 23:45:02.804479767 0 sshd (917) < rt_sigprocmask
    535 23:45:02.804487255 0 sshd (917) > read fd=3(<4t>10.0.0.12:55993->162.0.0.80:22) size=16384
You can see here many examples how to use sysdig.
That all!
Hope this article help you.
---------------------------------------------------------------------
How To Install And Use Sysdig Troubleshooting Tool
To manage your businesses and your websites remotely you need to use control panel. With such tool you will have the possibility to manage all your web services under the same location which is very fantastic. Without control panel, you will need to install or compile specific tools such as: Php, MySQL and others on your host server which is not usually recommended with normal people. Since they need to have technical knowledge. With control panel, no expert knowledge of server administration is needed, just install it and benefit of its features. These web based control panels offers you the possibility also to manage your emails accounts, FTP accounts, disk space, bandwidth and many others.
The most known and powerful control panels are cPanel and Plesk. Unfortunately they are paid softwares and a monthly fee will be demanded to install them on the suitable server. But don’t worry, there are other alternative open source control panels available for every one with the same features and no fees are required. You will discover those tools in our article then later you can give us your attitudes.
ISPconfig is Open source, BSD-licensed, hosting control panel for Linux, designed to manage Apache, BIND, FTP, and databases, supporting many Linux distributions.With the ISPConfig Monitor App, you can check your server status and find out if all services are running as expected. You can check TCP and UDP ports and ping your servers. ISPConfig is multiserver-capable, you can check all servers that are controlled from your ISPConfig master server.

Concerning its features we can list the following:
For download and usage instructions, please visit the official website.
ZPanel is a free and complete web hosting control panel for Microsoft® Windows™ and POSIX (Linux, UNIX and MacOSX) based servers. ZPanel is written in PHP and uses several open-source (or freely available) software packages to provide a secure, web hosting system.

ZPanel comes with a core set of ‘essential’ modules to help you run a web hosting service these range from Server resource monitoring to DNS management.
The core comes includes Apache Web Server, hMailServer,FileZilla Server, MySQL, PHP, Webalizer, RoundCube, phpMyAdmin, phpSysInfo, FTP Jailing and many more.
For download and usage instructions, please visit the official website
OpenPanel is a is another free open source control panel. It has lots of functionality, an attractive interface and is very user friendly. OpenPanel is a platform for developers. Because it is extremely open and modular it can be utilized to control any process on a Linux server. The OpenPanel graphical user interface is a modern JavaScript application with a a simple, modern design.

We can list the following features of OpenPanel:
For download and usage instructions, please visit the official website
Webmin is a web-based interface for system administration for Unix. Using any modern web browser, you can setup user accounts, Apache, DNS, file sharing and much more. Webmin removes the need to manually edit Unix configuration files like /etc/passwd, and lets you manage a system from the console or remotely.

We can list the following features of Webmin
For download and usage instructions, please visit the official website.
Sentora provides the most common control panel features ‘out of the box’ but when you need more head over to our ‘add-ons store’ and download third-party modules, translations and even theme sets.
Sentora is based on the solid foundations of ZPanel and developed by the original team, Sentora provides a robust open-source web hosting control panel for small to medium ISPs.

Sentora is designed to simplify web hosting management, it gives your clients the ability to quickly and easily manage their web hosting. Sentora Add-ons store provides users with a central repository to install, rate, sell and publish modules, themes and localisations.
For download and usage instructions, please visit the official website.
CentOS Web Panel CWP – Free Web Hosting control panel is designed for quick and easy management of (Dedicated & VPS) servers without of need to use ssh console for every little thing. There is lot’s of options and features for server management in this control panel.

CentOS Web Panel come with lots of features and free services:
For more information, you can visit the official website.
The description of our selected free and open source control panels systems in this article now is finished. Of course, there are other tools we don’t mention, if you want to include them in our article please feel free to leave a comment here with a brief description of the suggested tools. Thank you for reviewing our article and please don’t forget to share it.
---------------------------------------------------------------------
A List Of Free And Open Source Control Panels
You have Windows as operating system and you need to connect to Linux server to transfer files from Linux to Windows and inversely. So you need to have Secure Shell known as SSH. In fact, SSH is a network protocol which enables you to connect to Linux and Unix servers over the network. It uses public key cryptography to authenticate the remote computer. You can use SSH by several ways, either by using it automatically or by using a password authentication to log in.
This article provides a list of SSH clients let you to connect SSH to your Linux servers.
let’s start.
PuTTY is the most famous SSH and telnet client, developed originally by Simon Tatham for the Windows platform. PuTTY is open source software that is available with source code and is developed and supported by a group of volunteers.

Putty is very easy to install and to use.You don’t usually need to change most of the configuration options. To start the simplest kind of session, all you need to do is to enter a few basic parameters.You can download PuTTY here
Bitvise SSH Client is an SSH and SFTP client for Windows. It is developed and supported professionally by Bitvise. The SSH Client is robust, easy to install, easy to use. Bitvise SSH Client is a feature-rich graphical SSH/SFTP client for windows and allow you dynamic port forwarding through an integrated proxy with auto-reconnecting capability.
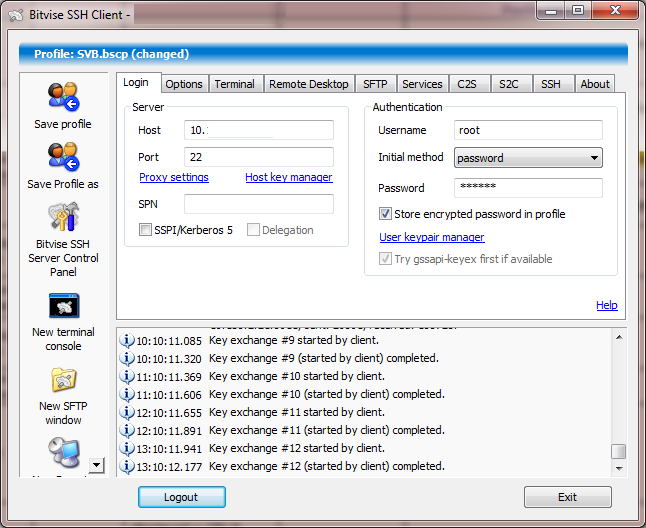
Bitvise SSH Client is free for personal use, as well as for individual commercial use inside organizations. You can download Bitvise SSH Client here.
MobaXterm is your ultimate toolbox for remote computing. In a single Windows application, it provides loads of functions that are tailored for programmers, webmasters, IT administrators and pretty much all users who need to handle their remote jobs in a more simple fashion.
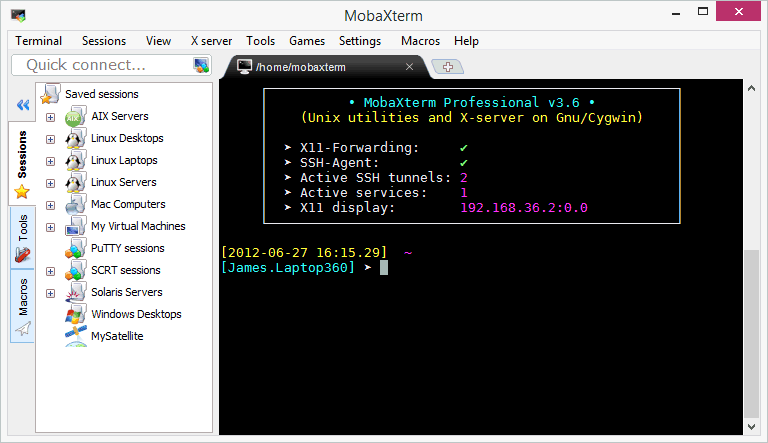
MobaXterm provides all the important remote network tools (SSH, X11, RDP, VNC, FTP, MOSH, …) and Unix commands (bash, ls, cat, sed, grep, awk, rsync, …) to Windows desktop, in a single portable exe file which works out of the box. MobaXterm is free for personal use. You can download MobaXterm from here.
I think that DameWare SSH is the best free ssh client.
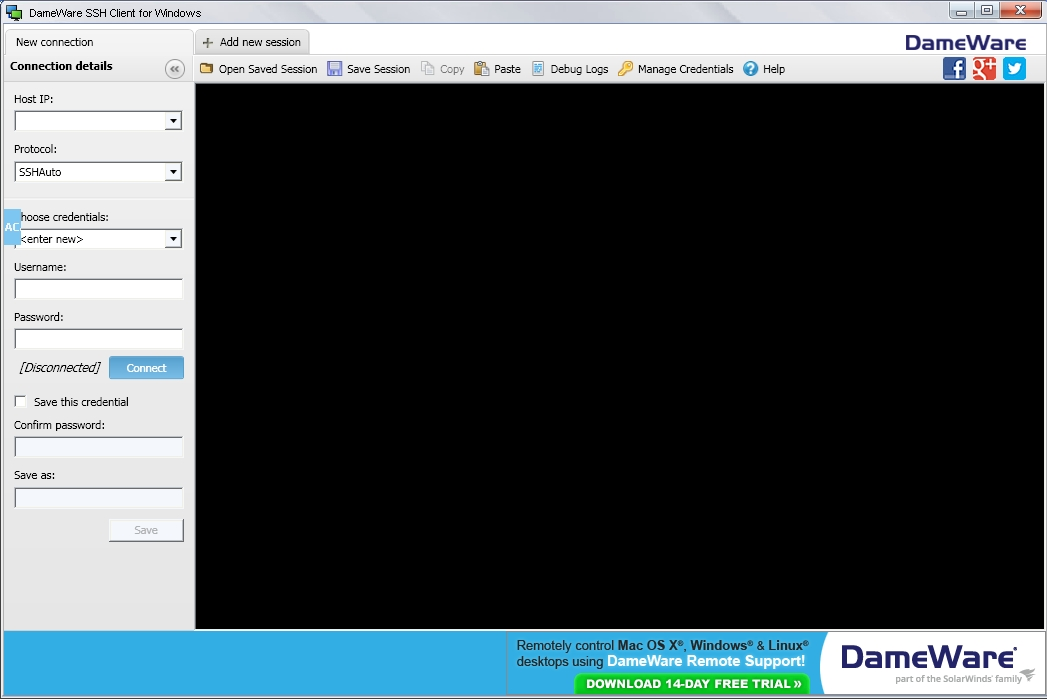
This free tool is a terminal emulator that lets you make multiple telnet and SSH connections from one easy-to-use console.
You can download DameWare SSH from this link.
SmarTTY is a free multi-tabbed SSH client that supports copying files and directories with SCP on-the-fly.

Most SSH servers support up to 10 sub-sessions per connection. SmarTTY makes the best of it: no annoying multiple windows, no need to relogin, just open a new tab and go!
Cygwin is a large collection of GNU and Open Source tools which provide functionality similar to a Linux distribution on Windows.

Cygwin consists of a Unix system call emulation library, cygwin1.dll, together with a vast set of GNU and other free software applications organized into a large number of optional packages. Among these packages are high-quality compilers and other software development tools, an X11 server, a complete X11 development toolkit, GNU emacs, TeX and LaTeX, OpenSSH (client and server), and much more, including everything needed to compile and use PhysioToolkit software under MS-Windows.
After reading our article, which is your favorite SSH client? You can leave a comment describing your favorite system and the reasons of your choice. And of course if there is another SSH client doesn’t appear in this article, you can help us to add it.
---------------------------------------------------------------------
List Of Free Windows SSH Client Tools To Connect To Your Linux Server
Apache is the world’s most widely used web server software. It was developed and maintained by an open community of developers. Furthermore, it is available for various operating systems such as: Unix, FreeBSD, Linux, Solaris, Novell NetWare, Windows, OS/2, TPF and OpenVMS. It is released under the Apache license and it is a free and open source system. It enables users to run websites with less configuration and administration. This helps to be more productive since it has various pre-installed modules. So if you want to maximize your performance, you need to know some important points that will be outlined in this article.
While using Ubuntu or Debian based systems you will remark the existence of various modules which can’t be useful. But you need to be careful, since the needed modules aren’t clear and you need know the dependencies between them. So as a suggestion, it will more beneficial if you list the current modules and try to disable them one-by-one with restarting of Apache and discovering what will be the cause of each error.
To disable a module on Ubuntu and Debian you just need to use the command autoindex. You can disable the following modules if you don’t need them:
PHP, Perl, Python, Rewrite, Rack/Ruby/Passenger and SSL
Mostly, those modules aren’t used but if you need them you just have to re-enable them and restart your Apache. So, after you finish this, it is time for checking errors after reload you Apache configuration. In Ubuntu and Debian, to check the error messages you have to use: /var/log/apache2/error.log.
My first error is:
Syntax error on line 6 of /etc/apache2/sites-enabled/site1:
Invalid command 'DAVLockDB', perhaps misspelled or defined by a module not included in the server
configuratin
Action 'configtest' failed.
So I can understand that what I have disabled is needed. Indeed, I re-enable it using:
sudo a2enmod dav_fs
Then, I restart Apache and check which next error is. It may take several tries before you get the minimum list. But don’t worry you just need to be patient.
With PHP site, you are using mod-php and with a ruby site Passenger Phusion, aka mod-rails and mod-rack may be used. But the problem here that there is some losses. For example, if you have a page which will cause 40 HTTP requests, just one will be for the dynamic page and 39 are for images, javascript and css. So why this loss of using more than 30 requests and no dynamic content is responded. This problem is happen because the C language for the interpreter is embedded into Apache that is why an overflow memory for every page view.
Enabling the mod-php may lead to use over 100MB of RAM of consumption per Apache child process. Could you imagine the important losses because you will not have just one running process.
To solve this problem, it is recommended to do as follow:
So after using those advices, a new server process for PHP or Python or Rails will be launched. Then Apache, instead of dealing with the concerned requests through embedded code, merely forwards the call for dynamic content onto this backend process.
You will remark the difference. After removing mod-php from your server, to size of your Apache process will move from 100-120MB to under 10MB. It is a magic.
The default Apache configurations aren’t suited with many operations systems while using small servers (30 child processes or more). Since, if each one of them uses 125MB of your RAM, so your VPS will need at least 3GB which is. If around ten peoples will load a page, your cloud server at this time will become overloaded.
If your VPS gets overloaded, and reaches the maximum number of clients, some will be served and others will get a failure. They can then reload the page and maybe have greater success on the second try. Which is not always guarantee, so it will be better to have fewer children processes to respond rapidly than to have a huge number of child processes and unable to operate.
As an example, a WordPress is hosted on a 1GB droplet using 4 php-fpm processes and is able to operate with over 900 simultaneous users at once. Which is equivalent to have 40 million viewers of your page per day, can you imagine!!
Previously, the most use of Apache configuration were with prefork MPM, the suitable one to be used with PHP and other embedded languages. But if you can use the worker MPM which is faster than perfork with PHP and Rails.
So to enable this module you just need to install it using:
sudo apt-get install apache2-mpm-worker
On Ubuntu if you enable it so the prefork module will be automatically disabled and also mod-php and others will be uninstalled.
I strongly encourage you to try this with a simple test and to make your own comparison. Don’t forget to leave your comment after your test.
---------------------------------------------------------------------
Apache Performance Tuning
Sbackup, Simple Backup, is an Open Source, easy to use backup solution intended for desktop use. It can backup any subset of files and folders. All configuration is accessible via Gnome interface. File and paths can be included and excluded directly or by regex, It supports local and as well as remote backups. Though it looks simple in use and configuration, it has many features like an advanced backup utility.
The notable features of Sbackup are listed below.
Sbackup is available in the default repositories of Ubuntu, Debian and Linux Mint.
So, we can install it using command:
sudo apt-get install sbackup
Done!
Open up SBackup either from Dash or Menu.
At first launch, Sbackup will notify you to create a new backup profile.

The main interface of SBackup will look like as shown below.

Please not that SBackup comes with two modes:
As the name implies, In normal mode you can’t do some tasks like scheduling backups. In Administrator mode you can have all your options enabled.
As I mentioned before, SBackup won’t have any user profiles at first launch. Only “default profile” will be available. Be mindful that you can’t delete the default profile.
Now, let us create a new profile.
To create a new profile, go to Tools -> Profile Manager. The Profile Manager will look like below.

You can create any number of configuration profiles of your choice. Each profile has its own set of settings including backup destination, backup format etc.
Click ‘Add’ to create a new profile, for example “sk”.

The new profile has been created now.
Now, select the new profile and click Edit to switch from default profile to the new profile.

Now, you should see the new profile is selected in the bottom.

However you can use default profile and edit it as per your requirements if you wish.
Important Note: As I mentioned before, to schedule your backup you must run SBackup as root user.
In this how-to tutorial, I will be using default profile in Administrator mode.
Open up your Terminal and run the following command to open SBackup with root user privileges.
sudo sbackup-config-gtk
Or, you can open “Simple Backup – Configuration for Admins” from the Menu or Dash.
The above command will open SBackup with default profile with administrative mode.
Now, let us discuss about each sections in SBackup.
In General section you can define how often do you want to do a full backup. The default option is 7 days. By default SBackup will do full backup every 7 days. Then you can define the compression format for your backup file.

This tab is pretty self-explanatory. You can include the files/folders that you want to backup using SBackup. Here you can either select individual files or entire folder to backup.
For example, I deleted all directories in the include section and added single directory called “My backup”.

Just like Include tab, we can define the files/folders path to exclude from being backed-up by SBackup. Just select the path of the files/folders that needs to be excluded from backup. By default SBackup will exclude the the following:

Further more, you can add the file types that you want to exclude from backup such mp3 or avi etc. Also if you want to add some other file types in the exclude list, just add them by clicking on the add button.
By default SBackup won’t backup the folders .gvfs, .thumbnails, .Trash and .cache etc.

Also you can omit the files/folders of certain size from backup. Here i excluded the files/folders which are bigger than 100MB in size.

This is the path where you want to store your backup file. As i mentioned above, you can backup files/folders either in your local hard drive or to an external destination such as FTP, NAS etc.

Note: Make sure that destination has enough free space to store the backup.
In this section you can schedule the backups at a particular time. Click on the Simple radio button and select your schedule type such as hourly, daily, weekly and monthly.

You can configure scheduled backups either simply by choosing an interval or by a custom cron definition.
If you’re good at command line crontab, select custom and define the cron job. If you select the daily schedule type, a cron job will be created in the /etc/cron.daily/ location.
sudo ls -l /etc/cron.daily/sbackup
Sample output:
lrwxrwxrwx 1 root root 33 Jul 8 17:46 /etc/cron.daily/sbackup -> /usr/share/sbackup/sbackup-launch
This section gives you the option to delete the backup files after a particular period of time. By default, your backup files which are older than 30 days will be automatically deleted. Of course, you can define the period of your choice.

‘Report’ is the final section. From here, you can define to receive the mail notification directly in your inbox after the backups completed.
Enter your mail id, smtp server address, email ID and password and click Test settings. Be mindful that, before test the mail settings save the configuration by clicking on the Save Configuration button on the Tool bar.

You’ll see a message “Test Successful” after testing your mail settings.
Now, it’s time to make sample backup.
If you want to start backup immediately, click Make Backup now button on the SBackup tool bar. or Go to Tools -> Make Backup now from the Menu bar.

A new window will open. Click Yes to create backup.

Now you can see that a backup process will be started in the background. You can monitor the progress of the backup by means of the status indicator displayed in the notification area.

After completing the backup, close SBackup and check for your backup in the destination directory. In my case my destination directory is /var/backup.
sudo ls /var/backup
Sample output:
2015-07-08_18.30.07.054463.sk.ful 2015-07-08_18.30.08.037350.sk.inc
Open “System Backup – Restoration for admins” from the Menu or run the following command to open SBackup in Administrator mode.
From your Terminal run command:
sudo sbackup-restore-gtk
In the SBackup restoration window, select the date to get the list of the available backups and select the any one of the available snapshots.
Then, Click on the any one of the files to restore on the Restoration management pane. Once you done, click restore to save them in the default location or click restore as to save the files in a custom location.

Now, the data will be restored from the selected backup. After successful restoration, you will see the following message.

Go to the backup location and see whether your files/folders are successfully restored or not.
As the name implies, SBackup is very very simple in-terms of installation, configuration and usage. I am really satisfied about SBackup and it perfectly does the job as it advertised. Give it a try you won’t be disappointed.
That’s all for now. Cheers!
Reference links:
The post Sbackup: A Simple Backup Solution For Linux Desktop appeared first on Unixmen.
Virtual Hosts are used to setup more than one domain or websites using a single IP address. This is very useful if anybody wants to run multiple websites using a single IP address on single VPS.
In this tutorial, let me show how to setup virtual hosts in Apache web server on Ubuntu 15.04 server. Also, this method should work on previous Ubuntu distributions such as Ubuntu 14.10, 14.04 etc.
For the purpose of this tutorial, I will be using Ubuntu 15.04 64bit server version, and I am going to host two testing websites namely “unixmen1.local” and “unixmen2.local”.
My test box IP address and hostname are 192.168.1.102/24 and server.unixmen.local respectively. Be sure to modify the virtual domain names as per your requirement.
Prior to install apache server, let us update our Ubuntu server:
To do that, run:
sudo apt-get update
Now, install apache web server using the following command:
sudo apt-get install apache2
After installing apache server, let us test whether the webserver is working properly or not by navigating to the URL http://ip-address/.
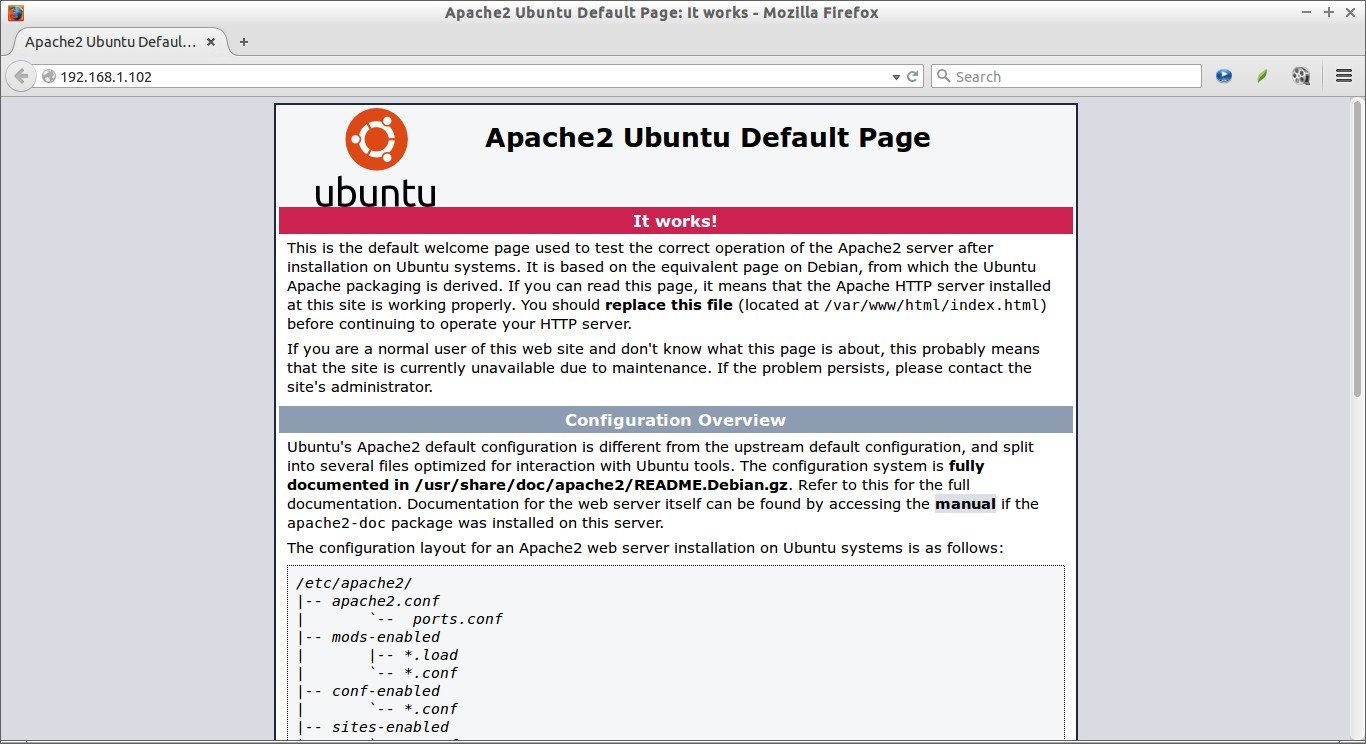
As you see in the above picture, apache webserver is working.
Now, let us proceed to setup virtual hosts in Apache web server.
Now, let us proceed to setup virtual hosts. As I mentioned earlier, I am going to host two virtual hosts called “unixmen1.local”, and “unixmen2.local”.
Create a public directory to place the two virtual hosts data.
First, let us create a directory for unixmen1.local site:
sudo mkdir -p /var/www/html/unixmen1.local/public_html
Then, create the directory for unixmen2.local site:
sudo mkdir -p /var/www/html/unixmen2.local/public_html
The above directories are owned by root user now. We should change the ownership of these two directories to the regular user.
sudo chown -R $USER:$USER /var/www/html/unixmen1.local/public_html/
sudo chown -R $USER:$USER /var/www/html/unixmen2.local/public_html/
The “$USER” variable indicates the currently logged in user.
Set the read permissions to the Apache web root (/var/www/html/) directory, so that everyone can read files from that directory.
sudo chmod -R 755 /var/www/html/
We have created the directories for holding the websites data and assigned the necessary permissions and ownership to them.
Now, we have to create the sample pages to be served through the websites.
First, let us create a sample page to the unixmen1.local virtual host.
Create a ‘index.html’ for unixmen1.local virtual host,
sudo vi /var/www/html/unixmen1.local/public_html/index.html
Add the following contents:
<html>
 <head>
 <title>www.unixmen1.local</title>
 </head>
 <body>
 <h1>Welcome To Unixmen1.local website</h1>
 </body>
</html>
Save and close the file.
Similarly, add the sample page to the second virtual host.
sudo vi /var/www/html/unixmen2.local/public_html/index.html
Add the following contents:
<html>
 <head>
 <title>www.unixmen2.local</title>
 </head>
 <body>
 <h1>Welcome To Unixmen2.local website</h1>
 </body>
</html>
Save and close the file.
By default, Apache comes with a default virtual host file called 000-default.conf. We will copy the 000-default.conf file contents to our new virtual host files.
sudo cp /etc/apache2/sites-available/000-default.conf /etc/apache2/sites-available/unixmen1.local.conf
sudo cp /etc/apache2/sites-available/000-default.conf /etc/apache2/sites-available/unixmen2.local.conf
Make sure the virtual host files contains .conf extension at the end.
Now, modify the unximen1.local.conf file to reflect with our new own values.
sudo vi /etc/apache2/sites-available/unixmen1.local.conf
Make the relevant changes that reflect to the unixmen1 site.
<VirtualHost *:80>
        # The ServerName directive sets the request scheme, hostname and port that
        # the server uses to identify itself. This is used when creating
        # redirection URLs. In the context of virtual hosts, the ServerName
        # specifies what hostname must appear in the request's Host: header to
        # match this virtual host. For the default virtual host (this file) this
        # value is not decisive as it is used as a last resort host regardless.
        # However, you must set it for any further virtual host explicitly.
        #ServerName www.example.com

        ServerAdmin webmaster@unixmen1.local
        ServerName unixmen1.local
        ServerAlias www.unixmen1.local
        DocumentRoot /var/www/html/unixmen1.local/public_html

        # Available loglevels: trace8, ..., trace1, debug, info, notice, warn,
        # error, crit, alert, emerg.
        # It is also possible to configure the loglevel for particular
        # modules, e.g.
        #LogLevel info ssl:warn

        ErrorLog ${APACHE_LOG_DIR}/error.log
        CustomLog ${APACHE_LOG_DIR}/access.log combined

        # For most configuration files from conf-available/, which are
        # enabled or disabled at a global level, it is possible to
        # include a line for only one particular virtual host. For example the
        # following line enables the CGI configuration for this host only
        # after it has been globally disabled with "a2disconf".
        #Include conf-available/serve-cgi-bin.conf
</VirtualHost>
Like wise, modify the second virtual host file.
sudo vi /etc/apache2/sites-available/unixmen2.local.conf
Make the relevant changes that reflect to the unixmen2 site.
<VirtualHost *:80>
        # The ServerName directive sets the request scheme, hostname and port that
        # the server uses to identify itself. This is used when creating
        # redirection URLs. In the context of virtual hosts, the ServerName
        # specifies what hostname must appear in the request's Host: header to
        # match this virtual host. For the default virtual host (this file) this
        # value is not decisive as it is used as a last resort host regardless.
        # However, you must set it for any further virtual host explicitly.
        #ServerName www.example.com

        ServerAdmin webmaster@unixmen2.local
        ServerName unixmen2.local
        ServerAlias www.unixmen2.local
        DocumentRoot /var/www/html/unixmen2.local/public_html

        # Available loglevels: trace8, ..., trace1, debug, info, notice, warn,
        # error, crit, alert, emerg.
        # It is also possible to configure the loglevel for particular
        # modules, e.g.
        #LogLevel info ssl:warn

        ErrorLog ${APACHE_LOG_DIR}/error.log
        CustomLog ${APACHE_LOG_DIR}/access.log combined

        # For most configuration files from conf-available/, which are
        # enabled or disabled at a global level, it is possible to
        # include a line for only one particular virtual host. For example the
        # following line enables the CGI configuration for this host only
        # after it has been globally disabled with "a2disconf".
        #Include conf-available/serve-cgi-bin.conf
</VirtualHost>
After modifying the virtual hosts files, disable the default virtual host (000.default.conf), and enable new virtual hosts as shown below.
sudo a2dissite 000-default.conf
sudo a2ensite unixmen1.local.conf
sudo a2ensite unixmen2.local.conf
Finally, restart the apache service.
In Ubuntu 15.04:
sudo systemctl restart apache2
In Ubuntu 14.10 and previous versions:
sudo service apache2 restart
That’s it. Now, we successfully configured the apache virtual hosts on our Ubuntu server.
Edit file /etc/hosts,
sudo vi /etc/hosts
Add the virtual domain names one by one as shown below.
[...]
192.168.1.102   unixmen1.local
192.168.1.102   unixmen2.local
Save and close the file.
Open up your browser and point to the URL http://unixmen1.local or http://unixmen2.local. You should see the sample pages which we created earlier.
Unixmen1.local Test page:
Unixmen2.local Test page:

If you want to access these sites from your remote systems, you should add the actual domain name records in your DNS server. Hence, I don’t have any actual domain names and DNS server, I tested this only on my local system, and It’s worked perfectly as I expected.
Likewise, you can create and host as many as sites you wanted. Setting up Virtual Hosts in Ubuntu is not that difficult. Hope this tutorial will help you.
Cheers!
The post Setup Apache Virtual Hosts On Ubuntu 15.04 appeared first on Unixmen.
We, all, know the popular saying: “Prevention is better than cure”. If you are a Linux System administrator, you might know how the ‘brute force attack applications’ causes the problem in your local or remote servers. Imagine if your server is compromised by an unknown attacker and the data from the servers are in the wrong hand. It could definitely lead you and your organization into a biggest trouble you ever imagined. Brute force attacks are trial and error methods used by applications to decode your encrypted data. The encrypted can be any passwords or Keys. In simple, a brute force attack application will try all possible combination of passwords or keys repeatedly until find out the correct one. Depending upon the complexity of password, It will take time. If it takes too much time to find the password, your password, probably, safe and strong.
There are some intelligent tools available to block or prevent Brute force attacks. Today, we are going to discuss about the following tools.
A word of caution: Do not install both tools on the same systems. You might not be able to get the correct results.
First, let us see what is SSHGuard, and how to install and configure it to prevent brute force attacks.
SSHGuard is a fast and lightweight monitoring tool written in C language. It monitors and protects servers from brute force attacks using their logging activity. If someone continuously trying to access your server via SSH with many(may be four) unsuccessful attempts, the SSHGuard will block him/her for a bit by putting their IP address in iptables. Then, it will release the lock automatically after sometime. Not only SSH, it protects almost all services such as sendmail, exim, dovecot, vsftpd, proftpd and many.
On Ubuntu/Debian, SSHGuard is available in the default repositories.
So, we can easily install it with command:
sudo apt-get install sshguard
On CentOS/RHEL 6.x:
First download and add FlexBox repository as shown below.
wget http://sourceforge.net/projects/flexbox/files/flexbox-release-1-1.noarch.rpm
Update repositories list using command:
yum repolist
Finally, install sshguard using command:
yum install sshguard
For other disros, download the respective binary file from the official site and install yourself.
Or, you can download it from here.
The SSHGuard doesn’t have a configuration file. All you have to do is to create a new chain for SSHGuard in iptables to insert blocking rules.
For IPv4 support, run the following command with root privileges:
iptables -N sshguard
For IPv6:
ip6tables -N sshguard
Now update the INPUT chain to pass the traffic to the sshguard. Specify --dport option to protect all the ports of services using sshguard. If you want to prevent attackers from doing any traffic to the host, remove the option completely
For IPv4 support:
iptables -A INPUT -j sshguard
For IPv6 support:
iptables -A INPUT -j sshguard
For IPv4 support:
iptables -A INPUT -m multiport -p tcp --destination-ports 21,22,110,143 -j sshguard
For IPv6 support:
ip6tables -A INPUT -m multiport -p tcp --destination-ports 21,22,110,143-j sshguard
Finally, save the iptables rule.
service iptables save
Verify that you have NOT a default allow rule passing all ssh traffic higher in the chain. Verify that you have NOT a default deny rule blocking all ssh traffic in your firewall. In either case, you already have the skill to adjust your firewall setup.
Here is a sample ruleset that makes sense:
iptables -N sshguard
Block whatever sshguard says is bad:
iptables -A INPUT -j sshguard
Enable ssh, dns, http, https:
iptables -A INPUT -p tcp --dport 22 -j ACCEPT
iptables -A INPUT -p udp --dport 53 -j ACCEPT
iptables -A INPUT -p tcp --dport 80 -j ACCEPT
iptables -A INPUT -p tcp --dport 443 -j ACCEPT
Block everything else:
iptables -P INPUT DROP
If you do not use iptables, the following commands will create and save an iptables configuration that does absolutely nothing except allowing sshguard to work:
iptables -F
iptables -X
iptables -P INPUT ACCEPT
iptables -P FORWARD ACCEPT
iptables -P OUTPUT ACCEPT
iptables -N sshguard
iptables -A INPUT -j sshguard
Finally save the iptables configuration:
service iptables save
That’s it. Now you have installed and configured SSHGuard to protect your ssh, ftp and other services from brute force attackers.
Fail2ban is an open-source intrusion prevention system that can be used to prevent brute force attacks and other suspicious malicious attacks. It scans log files (e.g. /var/log/apache/error_log) and bans IP’s that show the malicious signs such as too many password failures, seeking for exploits etc.
Generally, Fail2Ban then used to update firewall rules to reject the IP addresses for a specified amount of time, although any arbitrary other action (e.g. sending an email, or ejecting CD-ROM tray) could also be configured. Out of the box Fail2Ban comes with pre-configured filters for various services (Apache, curier, SSH etc.).
Login as root user and enter the following command to install Fail2Ban:
On Ubuntu/Debian:
apt-get install fail2ban
On CentOS/RHEL:
Add EPEL repository first.
yum install epel-release
yum repolist
Then, install fail2ban with command:
yum install fail2ban
Enable and start fail2ban service.
service fail2ban start
chkconfig fail2ban on
Or,
systemctl enable fail2ban
systemctl start fail2ban
Done.
All configuration files will be found under /etc/fail2ban directory. The main configuration file is /etc/fail2ban/jail.conf. It’s a good idea to take backup of main config file to avoid merges during upgrades. Take local copy of /etc/fail2ban/jail.conf file as shown below:
cp /etc/fail2ban/jail.conf /etc/fail2ban/jail.local
Open up /etc/fasil2ban/jail.local file using any editor:
vi /etc/fail2ban/jail.local
Find a section called [Default]. This section contains the basic set of rules that Fail2Ban will follow. Set the values as per your requirement.
Here is my settings:
[DEFAULT]

# "ignoreip" can be an IP address, a CIDR mask or a DNS host
ignoreip = 127.0.0.1/8 192.168.1.200/24
[...]
bantime  = 600
[...]
maxretry = 3

# "backend" specifies the backend used to get files modification. Available
# options are "gamin", "polling" and "auto".
# yoh: For some reason Debian shipped python-gamin didn't work as expected
#      This issue left ToDo, so polling is default backend for now

[...]
backend = auto
#
# Destination email address used solely for the interpolations in
# jail.{conf,local} configuration files.
destemail = root@localhost
[...]
#
Here,
By default, Fail2Ban contains set of pre-defined filters for various services. So you don’t need to enter any manual entries in the configuration files. All you need to do is just change the values of enabled to true or false, the respective services are automatically watched by Fail2Ban.
Here is sample output of SSH section in jail.local file.
[ssh]

enabled  = true
port     = ssh
filter   = sshd
logpath  = /var/log/auth.log
maxretry = 6
Here, let us see brief details of each entry.
Once you have changed the configuration, restart Fail2Ban service to save the changes:
systemctl restart fail2ban
Or,
service fail2ban restart
You can verify the rules that added by Fail2Ban in iptables using the following command:
iptables -L
Sample output:
Chain INPUT (policy ACCEPT)
target     prot opt source               destination
f2b-sshd   tcp  --  anywhere             anywhere             multiport dports ssh
ACCEPT     all  --  anywhere             anywhere             ctstate RELATED,ESTABLISHED
ACCEPT     all  --  anywhere             anywhere
INPUT_direct  all  --  anywhere             anywhere
INPUT_ZONES_SOURCE  all  --  anywhere             anywhere
INPUT_ZONES  all  --  anywhere             anywhere
ACCEPT     icmp --  anywhere             anywhere
REJECT     all  --  anywhere             anywhere             reject-with icmp-host-prohibited
[...]
I am going to try some random failed attempts from my local client to my Fail2Ban server.
Then, I verified the failed login attempts in the /var/log/fail2ban.log file:
cat /var/log/fail2ban.log
Sample output:
2015-07-13 15:38:15,480 fail2ban.filter         [11792]: INFO    [sshd] Found 192.168.1.100
2015-07-13 15:38:15,482 fail2ban.filter         [11792]: INFO    [sshd] Found 192.168.1.100
2015-07-13 15:38:15,483 fail2ban.filter         [11792]: INFO    [sshd] Found 192.168.1.100
2015-07-13 15:38:15,485 fail2ban.filter         [11792]: INFO    [sshd] Found 192.168.1.100
2015-07-13 15:38:15,485 fail2ban.filter         [11792]: INFO    [sshd] Found 192.168.1.100
2015-07-13 15:38:15,487 fail2ban.filter         [11792]: INFO    [sshd] Found 192.168.1.100
2015-07-13 15:38:15,488 fail2ban.filter         [11792]: INFO    [sshd] Found 192.168.1.100
2015-07-13 15:38:15,490 fail2ban.filter         [11792]: INFO    [sshd] Found 192.168.1.100
2015-07-13 15:38:15,491 fail2ban.filter         [11792]: INFO    [sshd] Found 192.168.1.100
2015-07-13 15:38:15,492 fail2ban.filter         [11792]: INFO    [sshd] Found 192.168.1.100
2015-07-13 15:38:15,493 fail2ban.filter         [11792]: INFO    [sshd] Found 192.168.1.100
2015-07-13 15:38:15,495 fail2ban.filter         [11792]: INFO    [sshd] Found 192.168.1.100
2015-07-13 15:38:15,496 fail2ban.filter         [11792]: INFO    [sshd] Found 192.168.1.100
2015-07-13 15:38:16,234 fail2ban.actions        [11792]: NOTICE  [sshd] Ban 192.168.1.100
Or
iptables -L
![Debian 7, 1 nic, internet, bridge, local repo [Running] - Oracle VM VirtualBox_004](http://1102047360.rsc.cdn77.org/wp-content/uploads/2013/07/Debian-7-1-nic-internet-bridge-local-repo-Running-Oracle-VM-VirtualBox_004.png)
As you seen in the above two outputs, my local IP 192.168.1.100 is banned by Fail2Ban.
Note: The banned IP address will removed after 600 seconds by default.
That’s it. Hope these tools will be useful to you somewhere.
Good luck!
The post Prevent Brute Force Attacks Using These Tools appeared first on Unixmen.